Import PST to Office 365 – Learn the Quick Way to Upload PST Files


Learn how to import PST to Office 365 through this complicated guide. This is the guide which is especially crafted by the technology enthusiast. Learn the easy and quickest steps to import PST files. Just follow the guide till the end to ensure a smooth migration of PST files.
Table of Contents
When it comes to cloud-based platforms, numerous organisations use Office 365. Microsoft Office 365 is a Software-as-a-service solution that includes Microsoft Office and other services – email and collaboration.
Due to its feature-rich nature and performance, Office 365 has become the first choice of users and organisations. However, the user must import PST file to Office 365 mailbox in some situations.
Now, the question crops up, is it possible to import PST file to Office 365 mailbox Online Archive folder? Yes, users can easily import with the help of PowerShell commands. In this blog, we will discuss the step-by-step process of uploading PST to Office 365 using PowerShell commands.
Some Prerequisites for Manual Method to Import PST Files to Office 365:
- An admin account on Office 365 tenant is required
- Have Import Export Mailbox admin role
- Having high upload bandwidth is an advantage
Method #1 – Import PST to Office 365 Outlook via PowerShell Commands
To upload PST to Office 365 without Outlook, Microsoft provides an Import Service feature built on Azure storage. Let’s discuss it in detail.
Phase 1. Storage Provisioning
Step 1. In Office 365, click on Import Service > Data Migration.
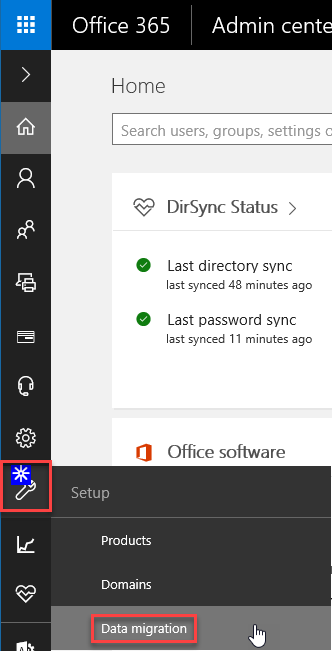
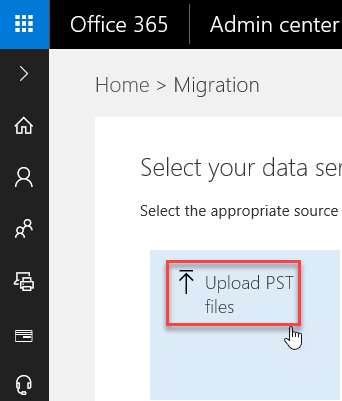
Step 2. Now, you need to click on the Upload PST option.
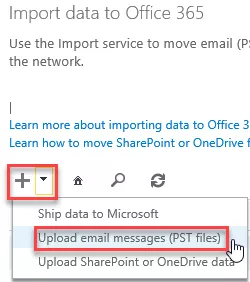
Step 3. After that, click on the + sign and select the Upload email messages (PST files) option.
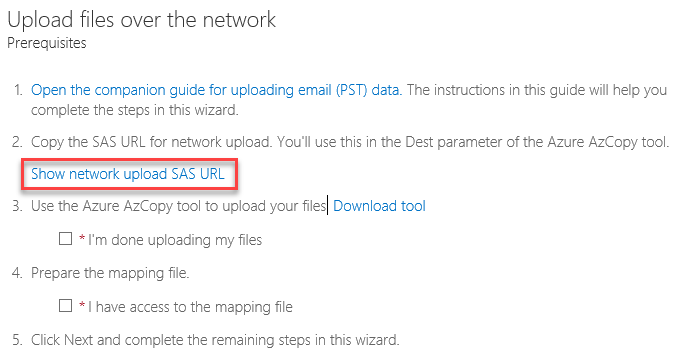
Step 4. For the first import, the Storage account will be created. You need to click on ‘Show network upload SAS URL’ for that. This URL will contain:
- Storage Account Name
- Container Name
Shared Access Signature: It contains the sv – storage service version, se – expiration date, sr – storage type, si – storage identifier, and sig – signature. Azure AzCopy Tool uses this URL to upload PST.
Phase 2. Upload PST to Office 365 Account
After the completion of the storage provisioning process, the user can begin the PST upload procedure. To upload PST, the user has two options either they can use the AzCopy tool (Command Line Tool) or Azure Storage Explorer (Graphical tool).
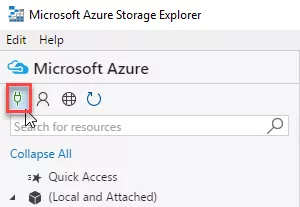
Step 1. First, you need to connect to the Azure Storage Explorer
Step 2. Now, enter the Shared Access Signature (SAS) URL or an account key.

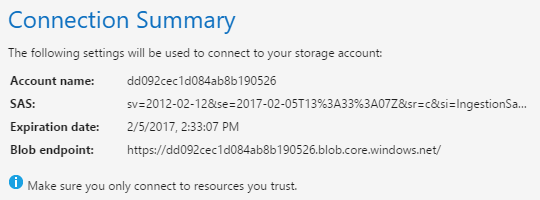
Step 3. You can see the Connection Summary after entering the required SAS URL.
Step 4. Next, you can import PST using Azure Storage Explorer Tool.
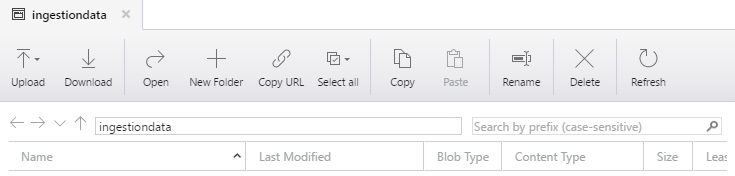
Step 5. After that, you can check the list of files present on Azure by using.
Phase 3. Mapping the File
Once you have uploaded the PST file to Azure Storage, you must build a CSV file. This CSV file will map the PST files to mailboxes and destination folders.
Phase 4. Import PST to Outlook Online
Finally, you need to import the PST mapping file. Click on the Finish button, and your PST file will be imported to Online Archive in Office 365.
Method #2 – How to Import PST to Office 365 Using Outlook
- Step 1. In the very first step, you have to configure your Office 365 account in Outlook.
- Step 2. Now, launch Outlook, navigate to File, and click on it.
- Step 3. Click on the Open & Export option from the menu.
- Step 4. Then, hit the Import/Export option. Now choose Import from another program of the file (default selected).
- Step 5. Click on Outlook Data File (.pst) from the given options. Choose the PST file you want to import to Office 365.
- Step 6. Set the location where you want to import. Lastly, click on the Finish button.
Limitations of Using PowerShell Commands to Upload PST to Office 365 Mailbox
This method has certain limitations, including:
- Large Data Volume – The network upload method might not be suitable for a large volume of data, as the upload process would become quite time-consuming and resource-intensive.
- Internet Bandwidth- The manual method requires a sufficient and reliable internet connection with high upload speeds to import PST to Office 365. If the internet connection gets slow or becomes unstable, then the upload process may fail several times.
- PST File Size Limit- You can only import PST files to Office 365 with sizes smaller than 2 GB. If the recommended size exceeds, the eDiscovery might not work. Hence, to upload more than 2GB in size, you can split it into smaller files before uploading it to Office 365 mailbox.
- Data Security- Another reason PST files are not encrypted, hence, that they are vulnerable to data breaches. If PST files are not handled with care, then they can be lost or stolen, and the data they contain might be compromised.
- PST File Corruption- It is quite obvious, that the PST files are fragile and can easily get corrupted. Furthermore, if the PST files are corrupted in between the process, then they can not be uploaded or imported, which results in data loss.
- Not Suitable for Multiple Users – Last, but not least, the manual approach is not suitable for importing multiple user mailbox data at once. It can create confusion, which will eventually result in accidental data deletion.
Also Read: How to save Office 365 Mailbox emails to desktop hard drive?
Method #3 – Use Drive Shipping to Upload PST to Office 365 Mailbox
Step 1. In the drive shipping method, first, you have to prepare your PST files. Ensure all PST files are healthy and already named for easy identification and management.
Step 2. Now, get a virus-free hard drive and make sure it fulfills all the requirements of drive shipping. Then copy or transfer all the required PST files to the hard drive that needs to be uploaded to Office 365.
Step 3. As these PST files must have organizational crucial data, for the security of PST data files, Microsoft recommends users encrypt the hard drive using BitLocker or any similar encryption software.
Step 4. Now, to import PST to Office 365 account, you need to create a drive shipping request. To do this, you can log in to the Microsoft 365 admin center, go to Import Services >> Data Migration, and create a drive shipping request.
Step 5. Once all the above steps are completed, you can prepare the hard drive for shipping. To do so, you can safely pack the encrypted hard drive with other shipping documents. Then use any of the reputed shipping services to send the hard drive to the designated Microsoft data center.
Step 6. Now you can track the shipping progress using the details provided by the shipping company. Once, the files reach the Microsoft data center, you can check the status in the Microsoft admin center. You will also receive a notification when the upload process is completed by Microsft.
Step 7. In this last step, you should verify the PST data uploaded to Office 365. Remember, this process can take time, hence, you must have some additional time to use this process over others.
Sometimes, it becomes difficult for the user to understand and implement the steps of the above manual method correctly. Additionally, if the user tries to perform the steps without any technical knowledge, then it can also lead to data loss issues.
Thus, it is recommended to opt for an automated and reliable solution to import PST files to Office 365 account.
Limitations of Using Drive Shipping Method for Importing PST Files to Office 365 Account
There could be several limitations in using drive shipping for this operation. Below are some of the noteworthy shortcomings.
- It could be a Time-Consuming Task
As, above discussed, this process involves physically shipping the PST containing hard drives to Microsoft Data Centers. It takes a significant amount of time to prepare, collect, and send PST files, especially for large amounts of data.
- It has a Potential Risk for Data Loss or Damage
Drive shipping has always had a risk of data loss or damage during transit. Moreover, there are various factors for the same, such as mishandling, accidents, or other unforeseen circumstances.
- It could be Significantly Costly
Drive shipping comes with a respective charge; Microsoft charges $2 per GB to import PST to Office 365 account. It also incurs additional costs for shipping, insurance, and handling of hard drive storage devices.
- It can not be used for Multiple Imports
This method might not be appropriate for organizations with frequent or large-scale PST imports, because of the time-consuming and costly process. The Drive Shipping method to upload PST to Office 365, is more commonly used for one-time or infrequent migrations.
- It Lacks Real-time Data Synchronization
In drive shipping, we have to physically ship the hard drive to the Microsoft data center. This means that there would not be any real-time synchronization between the on-premises data and the Office 365 environment during this shipment.
Method #4 – Network Upload Method
This approach lets you upload PST files directly to Microsoft 365 through a secure Azure storage location using tools like AzCopy and the Import service:
- Open compliance.microsoft.com.
- Navigate to Data Lifecycle Management > Microsoft 365 > Import.
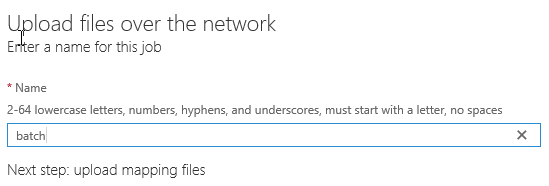
- Go to the Import tab and click (+) New import job.
- In the wizard, select Upload your data.
- Copy the SAS URL and install the Azure AzCopy utility on your computer.
- Launch Command Prompt on your local machine to start the PST import process.
- Run the following command to upload PST files:
azcopy.exe copy “<PST source location>” “<SAS URL>”azcopy.exe copy “\\FILESERVER1\PSTs” “https://3c3e5952a2764023ad14984.blob.core.windows.net/ingestiondata?sv=2012-02-12&se=9999-12-31T23%3A59%3A59Z&sr=c&si=IngestionSasForAzCopy201601121920498117&sig=Vt5S4hVzlzMcBkuH8bH711atBffdrOS72TlV1mNdORg%3D” - Use Azure Storage Explorer to confirm all PST files were uploaded successfully.
- Create a CSV file to define the destination mailboxes.
- In the Import Data wizard, choose “I’m done uploading my files” and “I have access to the mapping file.”
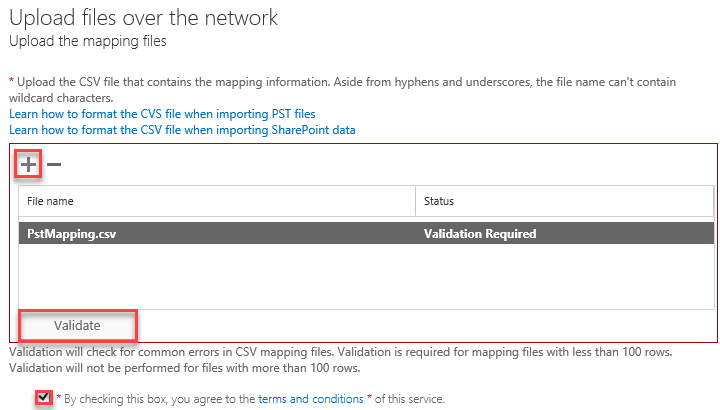
- Upload your CSV mapping file by clicking (+), selecting it, and validating it.
- Click Save and Close.
- Microsoft will analyse the uploaded data and display its age for filtering purposes.
- Finally, click Import Data to bring the PST files into Outlook 365.
Import PST Files into Office 365 Mailbox – Standout Tip
The user can easily import PST to Office 365 account with the help of a reliable application such as EmailDoctor Outlook to Office 365 Migration Tool. With this utility, one can easily import PST files, including emails, contacts, calendars, and tasks, to Office 365 in a hassle-free way.
Moreover, the software also provides the option to include specific folders during the PST migration process. One can also import the PST files to Office 365 account selectively with the help of the Date Filter option offered by the tool. Additionally, all the attributes associated with the emails, such as attachments and metadata, are maintained even after the migration process. The software is compatible with all versions of Microsoft Outlook.
Final Words
Users import PST to Office 365 for numerous purposes, as discussed in the above post. However, they were not able to find a reliable and instant way to implement this task. Therefore, in this blog, we have introduced manual and automated solutions to upload PST to Office 365.
The user can opt for any method of their choice. However, to avoid data loss issues, it is recommended to opt for the above-mentioned tool.
Frequently Asked Questions and Answers
A: There are three ways to import PST files to Office 365 account. The first is by using the PowerShell command. The second is through Outlook, and another is by using the above-mentioned tool. Both manual ways are time-consuming and complex. Hence, the last option, i.e. using the software, seems to be the best way.
Here is the working of the tool to import PST file to Office 365:
- Step 1. Download and run the tool on a PC.
- Step 2. Choose Outlook & Office 365 as platforms.
- Step 3. Select the Workload & Apply Date Filter.
- Step 4. Authenticate Source & Destination Platforms.
- Step 5. Choose Required Users & Click on the Start Button.
A – Yes, using the above-mentioned tool, you can import multiple Outlook PST file data to O365 Online mailboxes in a few steps. Moreover, you can also import PST files to Office 365 webmail.
A – Yes, you can use the PowerShell method as well as an automated approach to migrate Orphan Outlook PST to the O365 account.
Must Read: How to Forward Multiple Emails from One Office 365 Account to Another
