How to Move SharePoint Site to Another Site – Best 3 Methods Explained


Synopsis: Oftentimes, users are required to move SharePoint site to another site in a seamless manner. However, the only problem for users is that this task is not that easy at all. There are multiple complexities involved here for which users need to be aware of the technicalities. Therefore, this article consists of all three solutions along with their pros & cons respectively.
To migrate SharePoint Online site to another site, there are several tips mentioned below that users need to focus on. Let’s look at a real user query before we proceed to the solution.
“Hi everyone, I’m George from Oklahoma, United States. It’s been quite a while that I & my team are finding a solution to move our SharePoint Sites consisting of data to another one. The problem we are facing is that everybody is giving different solutions. Therefore, we are confused. Please suggest a future-proof solution so that in the future we can even perform the cross-tenant migration as well if needed.”
Table of Content
Move SharePoint Site to Another Site Collection Through Content Structure
Well, not all users want to perform the cross-tenant SharePoint migration. Therefore, we have a total of three solutions here. The first manual one is for users with an OnPremise environment. The second is for Online & the last one is an automated solution.
Sharepoint offers users a feature of the site collection that can help them move their sites or their sole parts to anywhere else in the site collection. However, users must ensure that their site has its publishing features enabled. This is one of the many prerequisites for this task to move SharePoint site to another site with ease.
Also Read: Best SharePoint Migration Checklist for All Users
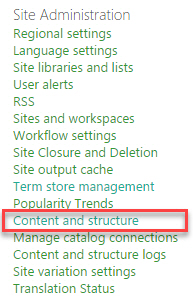
Step 1. Navigate to your Site Collection’s Root
Step 2. Select the Content and Structure option.
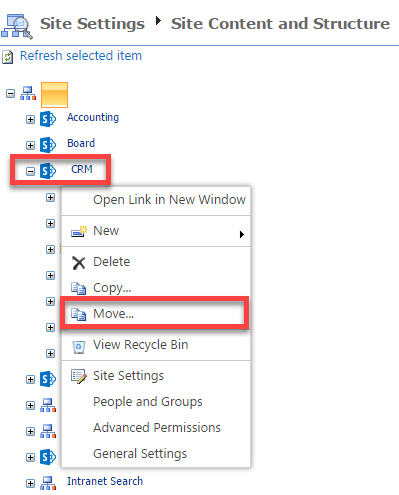
Step 3. In the prompt screen, Right Click on Site.
Step 4. Select the Move or Copy command here.
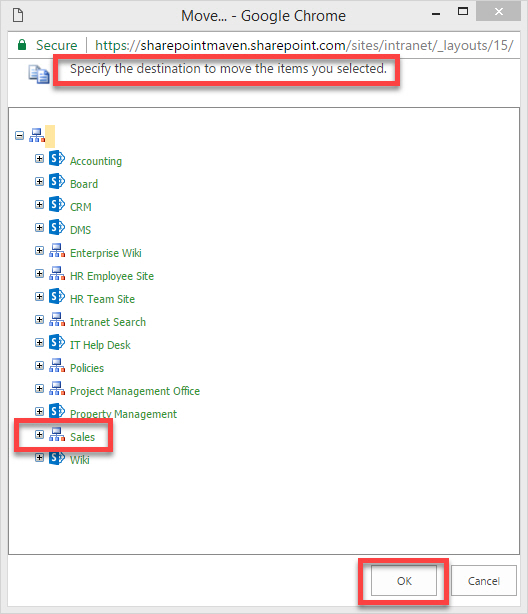
Step 5. Choose the Destination & Click Ok button.
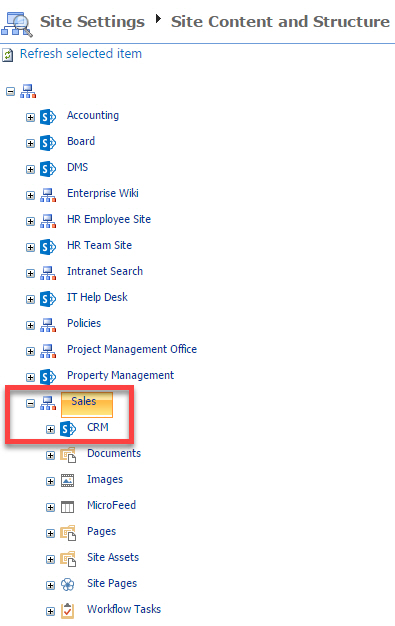
Step 6. After buffering, the migration is Completed.
How to Migrate SharePoint Site to Another Site by Template Method?
For this method, all that users need to do is just perform 5 steps each in two phases. Users can rely on this method as well without any doubt. So let’s begin without any delay.
Phase – 1: Create & Save the Site Template
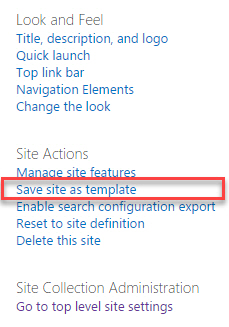
Step 1. Navigate to active sites, select the site, and click on the Site Settings option.
Step 2. Now, in the Site Actions, Select the Save Site option and proceed.
Step 3. Enter the Template Name and Description to save these data files.
Step 4. Check the Include Content checkbox to include all the site data.
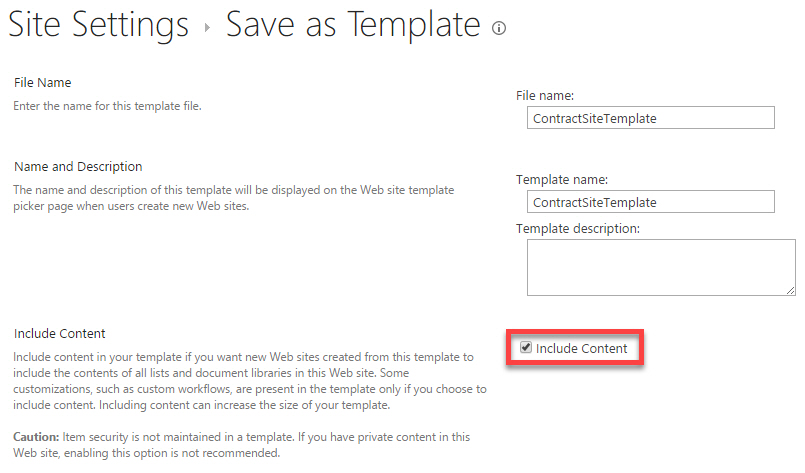
Step 5. Hit the OK button to save your template & proceed to phase two.
Phase – 2: Upload Site Template to move SharePoint site to another site
- Step 1. Now, simply click on the Site Settings option.
- Step 2. In Web Designer Galleries, Click Solutions.
- Step 3. Hit the Upload button in the commands group.
- Step 4. Click on the Browse in the add comments box.
- Step 5. Select the Template, and Click Activate in the commands.
Pros Manual Methods to Get A Deep Insight
There are pros & cons to both manual as well as automated solutions to move SharePoint site to another site. Let’s start with the manual solution first followed by the automated one.
Advantages of the Manual Method -:
- Using the template method, users don’t need to enable the publishing feature.
- Moving templates to different site collections is possible & quite easy.
Limitations of Manual Methods in Migrating SharePoint Online Site to Another Site
- The template can only be 50MB maximum. Users can’t create a template with a size of more than 50MB.
- Only small sites should use this as the bigger ones will have to perform the task in batches leading to inefficiency.
- No modern-day features are available in these methods as these are not meant for this migration task in the first place.
- Quite risky as without appropriate knowledge, it can spoil the overall experience of users.
- Templates are limited to 50MB, which restricts larger site migrations without breaking them into smaller ones. It makes this method less efficient in batches.
- Users must enable publishing features for the content structure method, limiting its applicability in non-publishing environments.
- Manual methods lack automation and modern capabilities and advanced features, leading to a less efficient and feature-rich migration process.
- Since, the manual method poses a higher risk of errors, hence, without adequate knowledge or expertise it can lead to potentially data loss or corruption.
- Using the manual method you can not migrate a few types of content or configurations which limit their scope.
- The manual method lacks the various filter that limits selective migration and priority-wise migration.
Learn How to Migrate SharePoint Online Site to Another Site Automatically
Now, that we covered both the manual solutions, it’s time to simply focus on the most advanced as well as safest solution. As per experts, this process is already complicated. Furthermore, opting for the manual solution makes it riskier for our data files to get lost or catch corruption.
For the automated solution, all that users need to do is simply download the advanced SharePoint Online Migration Tool first. This expert-recommended software is full of modern-day features & capabilities for migrating sites.
Follow the Steps to Move SharePoint Site to Another Site Collection
Step 1. Launch Tool and select Source & Destination as Office 365.

Step 2. Select the Document Library & Lists in workload selection.

Step 3. Enter Source and Destination credentials. Now Validate them.

Step 4. Map Source Sites to Destination Sites using mapping feature.

Step 5. Click on the Start Migration button to complete this process.

Automated Solution All Advantages
- There is no need for users to go through the complex process as the automated solution offers an easy gateway to get desired results.
- The automated solution offers several features like date filter, batch migration, etc that help users speed up the process with utmost accuracy.
- The automated utility is capable of executing the SharePoint Online tenant to tenant migration also in simple ways & no hassles.
- Users do not need to get tense about their data’s integrity at all. This is because the automated method takes complete care of that.
- The modern method is quick & works with both small as well as large sites of SharePoint Online.
- The Batch migration & status report options are available here at the end of the migration.
Automated Solution Drawbacks
- There’s no drawback but a prerequisite that users must create a project in Azure first to implement the required actions.
Best Tips to Acknowledge to Migrate SharePoint Online Site
After covering all the methods, it’s now time that we learn some tips for getting the best results in our migration task. Following the below-mentioned tips can be fruitful for users. Also, it can help users if they want to merge two SharePoint Sites together as well.
- Prepare Source & Destination Platforms -: Users must prepare their source & destination sites. Make sure that all the necessary permissions are given to the required persons. Apart from that, make sure that your source & destination sites are ready for the big change about to happen.
- Communicate with Staff -: Informing the higher authorities & employees that are going to experience the change is important as well. With the staff being prepared for the data migration among SharePoint Online sites, the post-migration management of data can be easy.
- Track Your Sites Migration -: Learning how to migrate SharePoint site to another site is not a task that users just put on auto mode. Even if a tool is capable of this, users must track the process, and understand the data transferred & remaining. Moreover, evaluating the status report is equally important.
- Focus on Data Integrity -: It’s crucial to select a method & tool that considers data integrity a lot. Keeping a strict eye on all the events can help users minimize data loss or data corruption.
Conclusion
If users want, they can move SharePoint site to another site using any of the above methods but only after accessing their requirements. As per Microsoft’s MVPs, the automated solution is the hassle-free way & offers the maximum accuracy out of all. Rest, as per the preferences users can select any method that fits best to them after taking care of all factors.
