Microsoft Office 365 Tenant to Tenant Migration Step By Step Guide


Office 365 tenant-to-tenant migration is the process of moving data, services, and users from one Office 365 tenant to another. It provides a solution to consolidate, optimize, and streamline the digital workspace for enhanced productivity and collaboration. An Office 365 tenant represents an organization’s dedicated space within Microsoft’s cloud environment, where its users and resources reside.
Email data or mailbox migration is the primary concern of organizations in merge & acquisition scenarios. But users also want manual methods to do this task. Although it is a complex solution, we will still include it in this article along with the most recommended professional software available online.
So, let’s get started.
Why do Organizations Move from One Office 365 Tenant to Another?
There are several major reasons why organizations opt for this type of migration:
- When companies merge or undergo acquisitions, they may end up with multiple Office 365 tenants. Consolidating these tenants into a single one enhances management, reduces costs, and promotes collaboration between the newly unified workforces.
- Some organizations may want to move from a hybrid Office 365 environment to a fully cloud-based setup for better control, security, and customization.
- When a company expands into new regions or countries, it might be more efficient to have all users in a single Office 365 tenant rather than maintaining separate tenants for each location.
- Over time, businesses might create multiple tenants for various purposes. Tenant consolidation helps reduce complexity, simplifies management, and optimizes licensing costs.
- A tenant-to-tenant migration can be initiated to enhance security measures, ensure data compliance, and meet regulatory requirements.
- In some cases, organizations may need to change their tenant name due to rebranding or other business reasons, requiring a migration to a new tenant.
Best Practices for a Successful Office 365 Tenant to Tenant Migration
- A well-defined migration plan with clear goals, timelines, and potential risks should be established before commencing the migration process.
- Conduct a comprehensive audit of existing data and resources to determine the scope of the migration and identify any potential challenges.
- Prior to migration, perform full data backups and conduct test migrations in a controlled environment to mitigate any unforeseen issues.
- Keep all stakeholders informed about the migration process and provide training to end-users to ensure a smooth transition.
- Consider using specialized migration tools and services designed for tenant-to-tenant migrations to simplify and automate the process.
Is There Any Manual Method to Perform This Migration?
There is a manual method available to perform Office 365 tenant-to-tenant migration, although it can be complex and time-consuming. Manual migration involves exporting data from the source tenant and importing it into the destination tenant using various built-in Office 365 tools. Here’s an overview of the manual migration process:
- Preparation of Office 365 Mailbox: Understand the scope of the migration, identify the data to be migrated, and create a migration plan with clear timelines and steps.
- Backup Critical Data Beforehand: Inform users about the migration, provide necessary training, and ensure they back up critical data from their mailboxes and OneDrive.
- Export Source Tenant Data: Use PowerShell scripts or the eDiscovery method to export mailbox data to PST files for each user.
- Create user accounts in Destination Tenant: Create new user accounts in the destination tenant, or if using existing accounts, ensure they are properly licensed.
- Import Data into the Destination Tenant: Use PowerShell scripts or Drive Shipping to import PST files into the user’s mailbox in the destination tenant.
- Custom Settings: Reconfigure any custom settings, permissions, and configurations that were present in the source tenant but are not automatically migrated.
- Modify DNS Records: Update DNS records, if necessary, to ensure email and other services point to the new destination tenant.
- Migration is Successfully Completed: Verify that all data has been successfully migrated and that users can access their data in the new tenant.
While manual migration can be done without third-party tools, it can be time-consuming, especially for larger organizations with a significant amount of data. Additionally, manual methods may have limitations in terms of migrating complex settings, and metadata and preserving data fidelity.
As a result, many organizations prefer to use third-party migration tools or services to simplify the process, minimize downtime, and ensure a successful tenant-to-tenant migration.
Best Tool for Office 365 (Microsoft 365) Tenant to Tenant Migration
Office 365 to Office 365 migration tool is one of the best migration tools for various kinds of data transfer operations in O365 with maximum data security and integrity.
This software provides all advanced features that will help you in the migration process. Some highlighted features of this tool are given below:-
- Migrate emails, contacts, calendars, and documents from One Office 365 tenant to another.
- Capable to move Office 365 domain users’ data.
- Date-based filter option to migrate selective data from Office 365 accounts.
- Also supports Office 365 group mailbox migration.
- Delta migration option to migrate newly arrived data.
- Provides users mapping options (import CSV to create mapping).
- Supports Office 365 domain to another tenant migration
- Three options to Re-Run migration.
- Support multiple project migrations.
Step-by-Step Process to Migrate from One O365 Tenant to Another
Before starting the migration by using the tool, you have to do some necessary steps:-
- Prepare Office 365 source and destination tenant.
- Create a project from Microsoft Azure, enable permissions & generate an Application ID.
- Activate software to perform the entire Office 365 tenant data.
Now, we are ready to migrate mailboxes from one Office 365 tenant to another Office 365. Follow the given steps: –
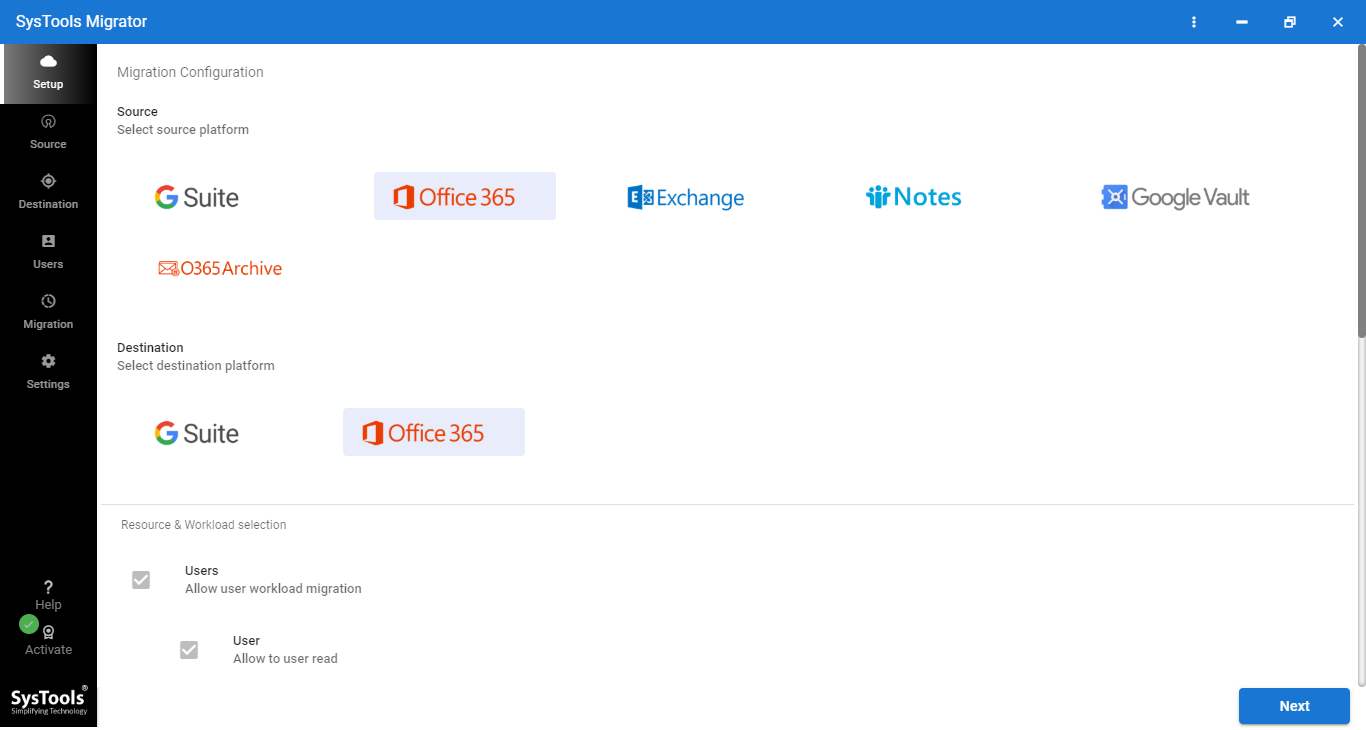
1 – Start the software >> select Office 365 as the source, and destination. Then check email, contact, calendar, and document.
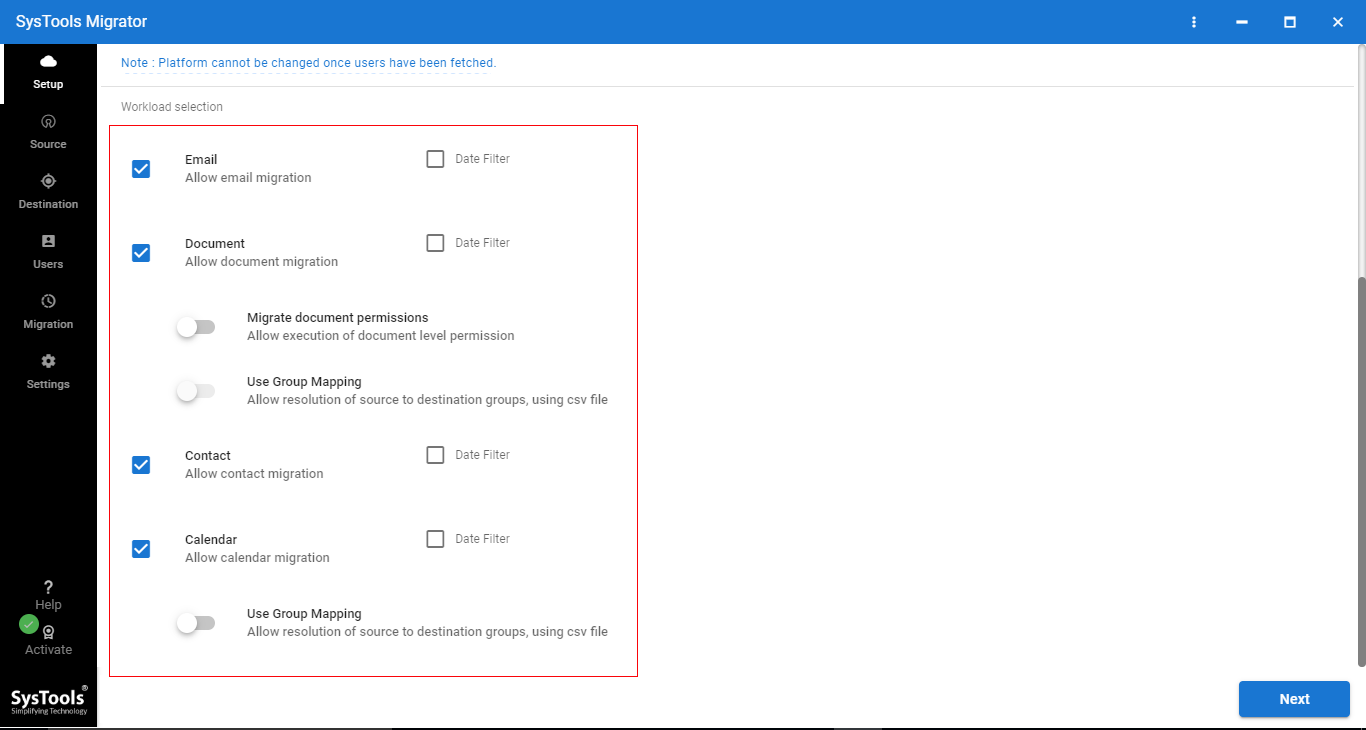
2 – Enable Migrate document permission, Use Group Mapping. It also provides a Date Based filter option. Click on Next to perform Office 365 tenant to tenant migration.
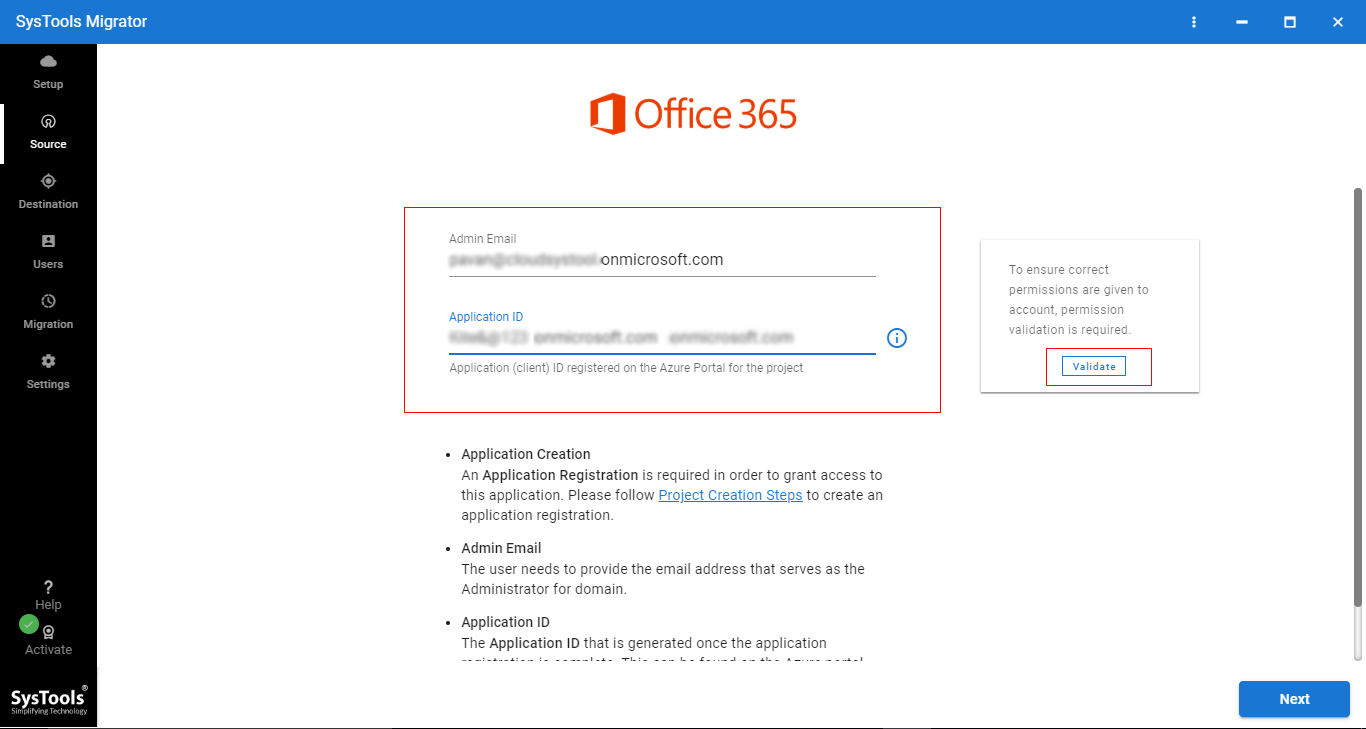
3 – Now, login the Office 365 source tenant with Application ID & Admin ID. Click on Validate then click on Next.
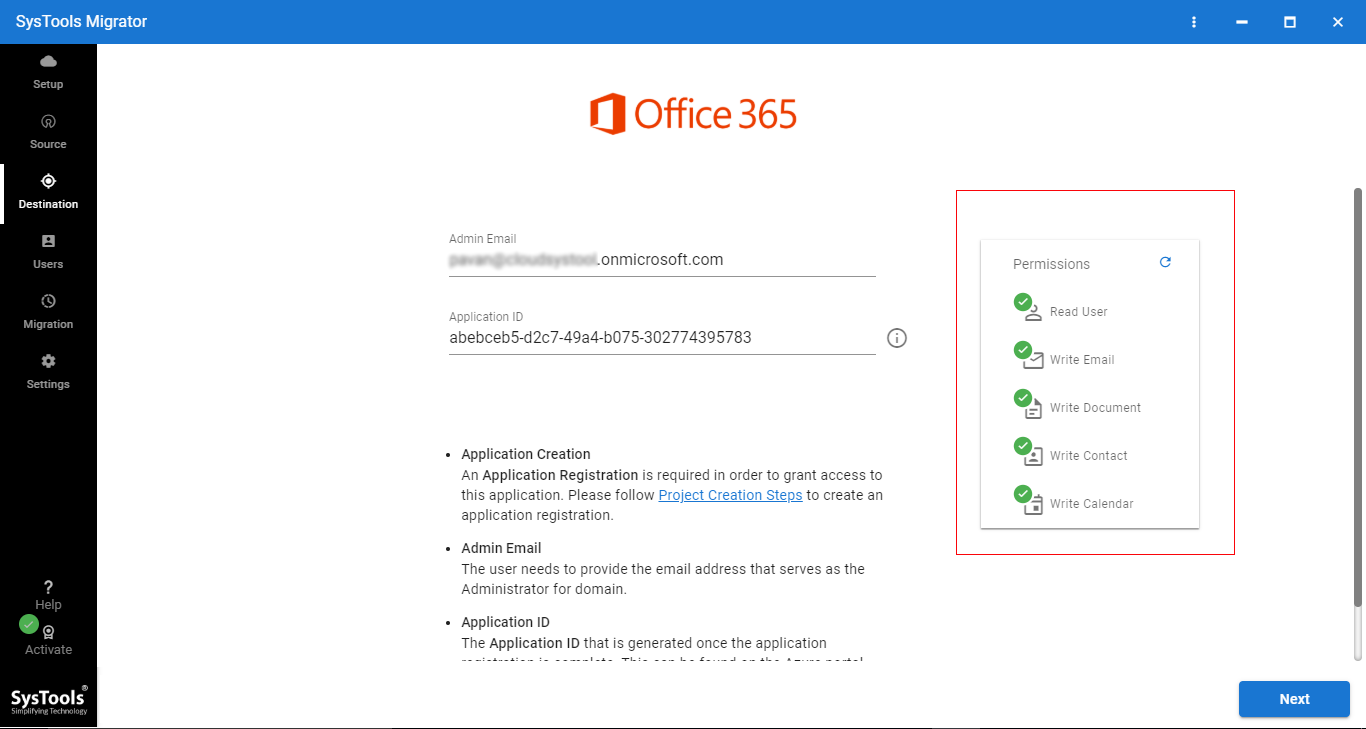
4 – After that, log in to the destination tenant with the Application ID & destination Admin ID and Validate permission. Click on Next to migrate the O365 tenant to another.
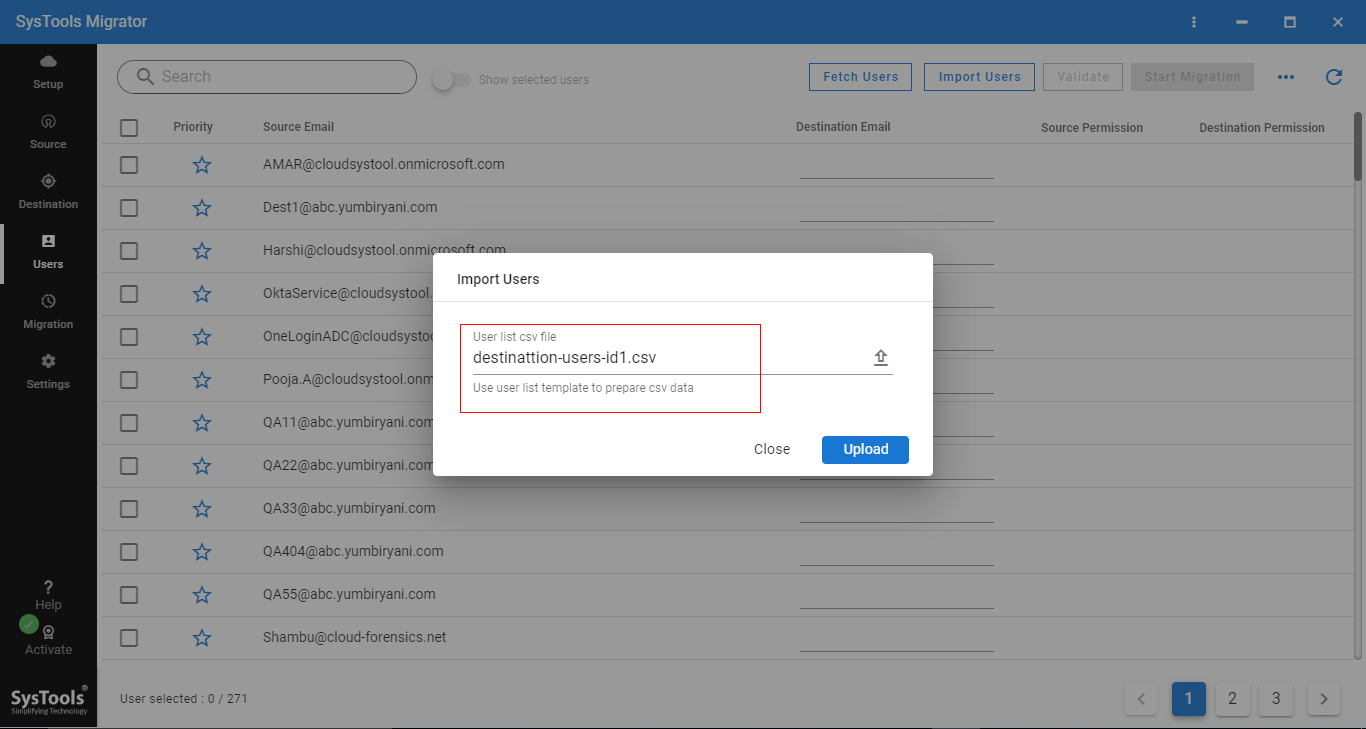
5 – Now, Click on Download Template (CSV file). Enter the Office 365 source & destination users ID (in between you will migrate data) in the CSV file.
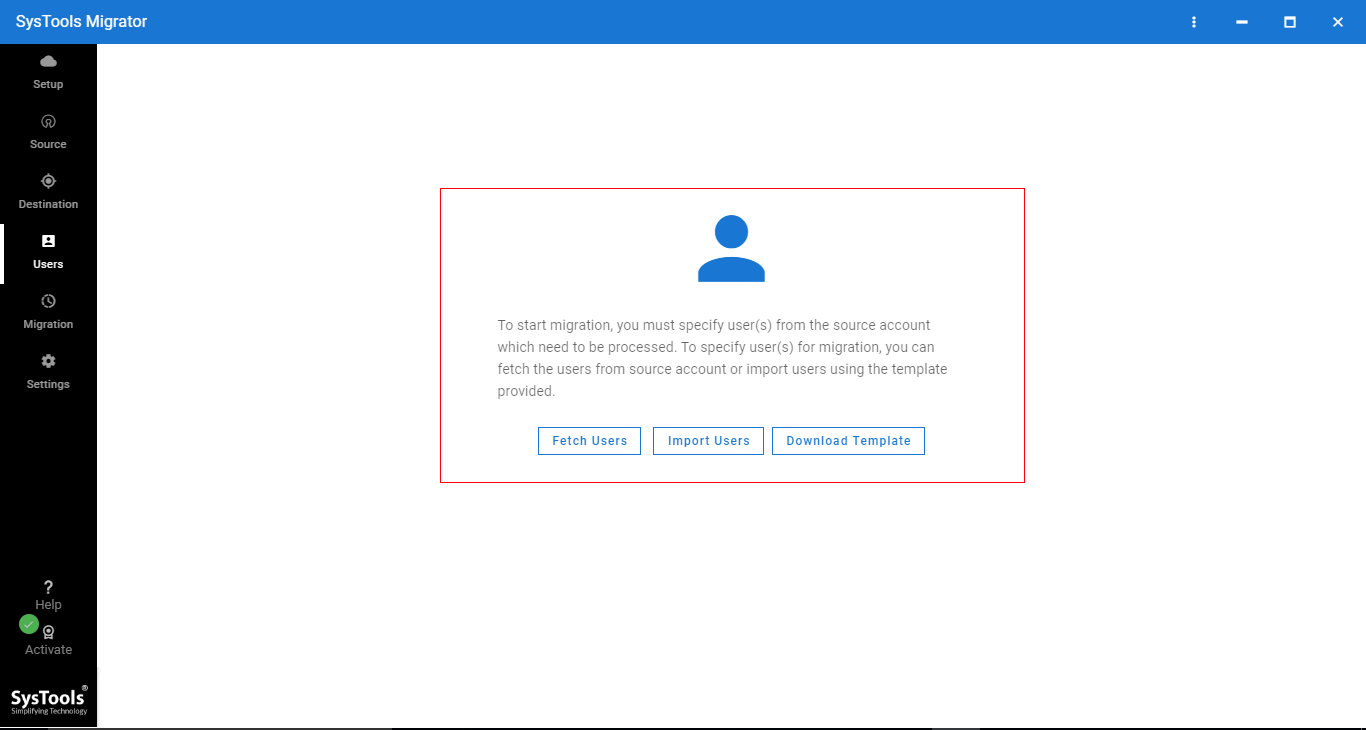
6 – Upload CSV file in the software to fetch data.
7 – Now, you need to validate the permission, click on Validate to transfer Office 365 tenant.
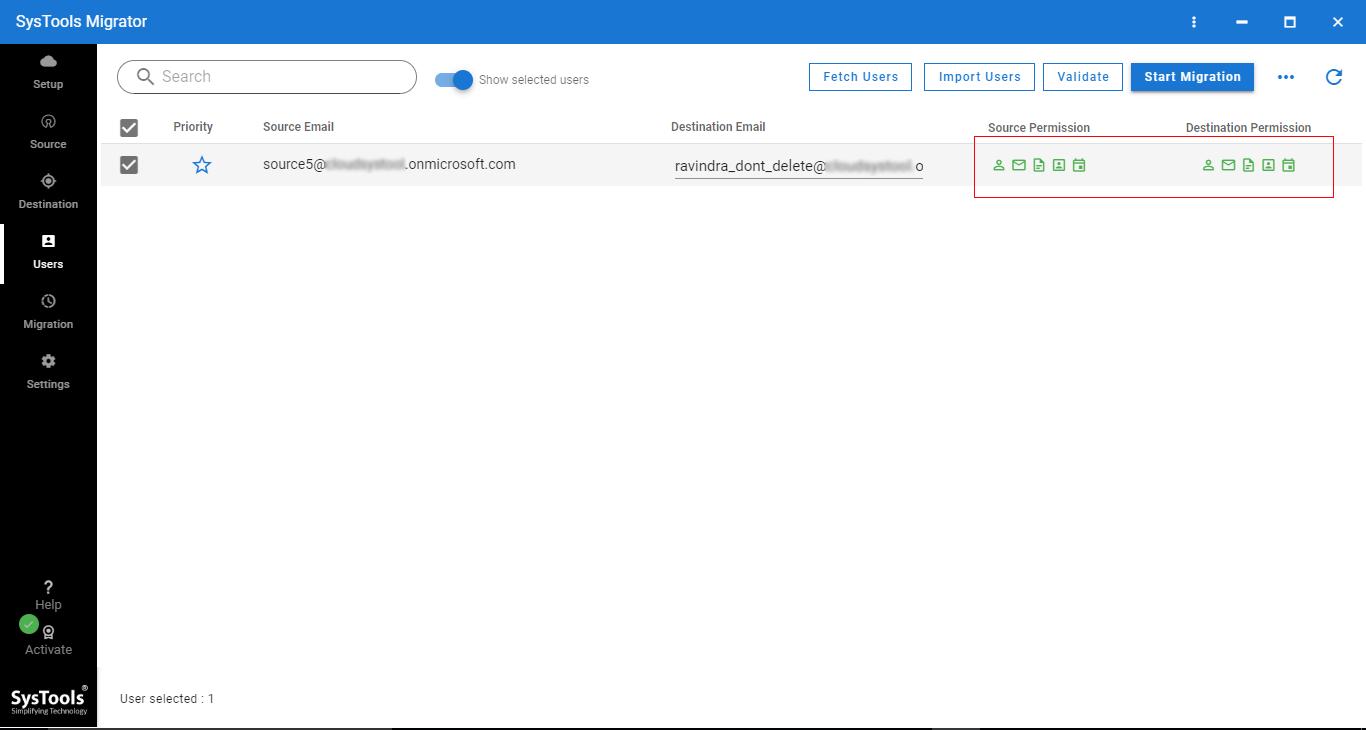
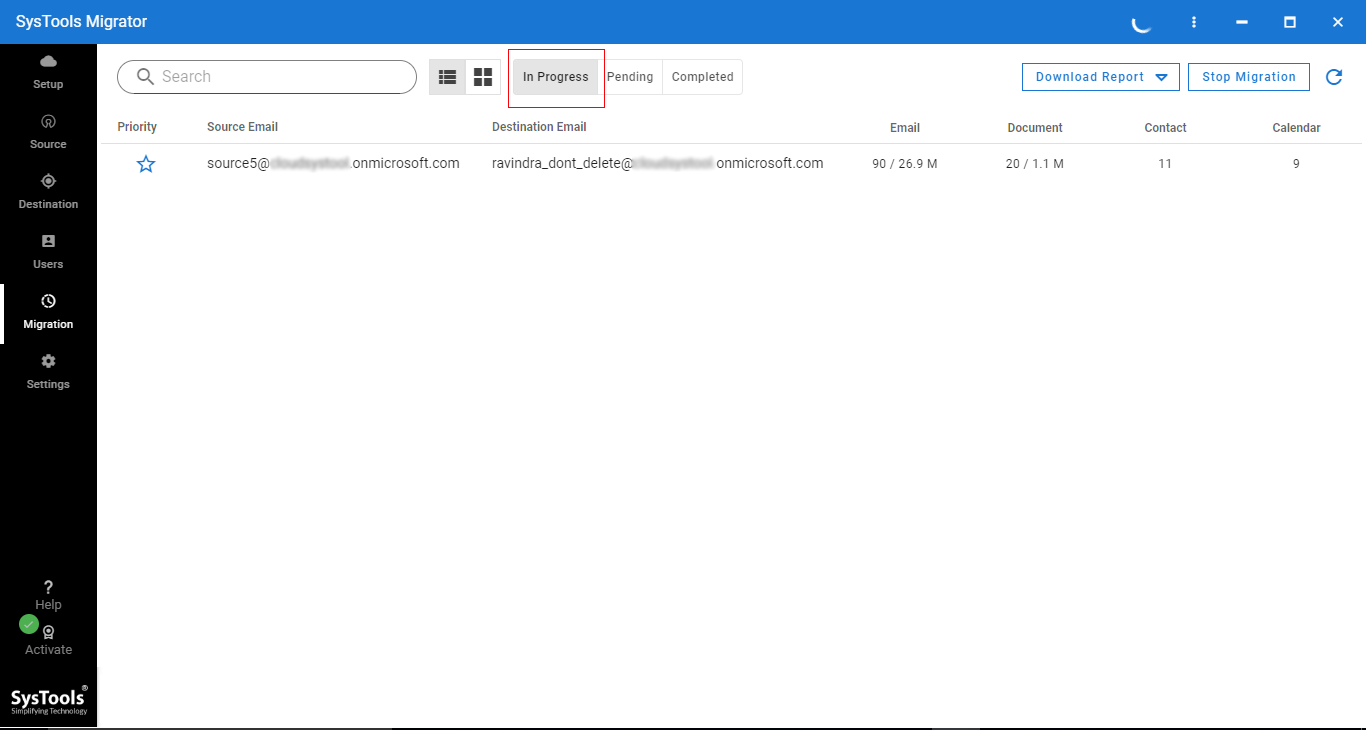
8 – After that, click on Start Migration to perform tenant to tenant migration within Office 365.
Conclusion
Migrating from one O365 tenant to another is not a complicated task, we can easily perform it, but we need reliable software. In the above article, we have explained a step-by-step solution to simplify this technical task. It will help you to perform this task without compromising data security and integrity. By following best practices and utilizing the Office 365 tenant to tenant migration tool, organizations can execute a successful migration without any hassle.
