How to Migrate Office 365 Groups to Another Tenant – Quick Guide


Short Overview: Here we’ll discuss Office 365 group to Office 365 group mailbox migration. Just like other content of Office 365, migrating the relevant content and members of groups is also crucial after a successful merger & acquisition activity. So, keep on reading till the end to know the details about the process.
Before entering into the core discussion, let’s get to know different types of groups in the Microsoft 365 admin center.
- There are six groups named distribution groups, security groups, mail-enabled security groups, shared mailbox, dynamic distribution groups, and Microsoft 365 groups available.
- When there is a need of sending email notifications to a group of people, then you can use a distribution group.
- Security groups are used for giving resources access such as SharePoint sites.
- If multiple people want to access the same mailbox, then they can use a shared mailbox.
- Mail-enabled security groups are used for granting resource access and sending email notifications to those users belonging to that group.
- To facilitate the mass sending of emails and other information within a company, dynamic distribution groups are created.
- Last but not least, Microsoft 365 groups are created for collaboration among users.
Migrate Office 365 Groups to Another Tenant Using 5 Steps
- Step 1. Download, install & Run Software.
- Step 2. Choose Office 365 as Migration Platform.
- Step 3. Enable Groups in Workload & Apply Filter.
- Step 4. Login with Admin Credentials & Validate.
- Step 5. Choose Required Groups & Click on Start.
Now, let’s briefly introduce Microsoft 365 groups.
What is the Purpose of Creating Microsoft 365 Groups?
As per Microsoft, it is a service that works with Office 365 tools that you already use. The main purpose of creating groups is to collaborate with teammates when working on a project plan, scheduling meetings, sending emails, etc.
Office 365 Groups lets you choose a set of users that you wish to collaborate with. Also, easily set up a bundle of resources such as a shared Outlook inbox, calendars, collaborating on files, etc. It automatically gives permission to all members of the group to access those resources.
Creating Office 365 groups is not difficult. It just depends on which tool you are using based on what kind of group you are working with. Further, you need to decide if you want a private group or a public group.
Anyway, let’s move on and understand how you can migrate O365 groups to another tenant.
Reasons Behind Migrating Office 365 Groups to Another Tenant
There can be various reasons for migrating an Office 365 group mailbox, some of the common ones are:
- Merger and Acquisition: In case of a merger or acquisition, the organizations might need to combine their email systems and migrate their mailboxes and groups to a single platform.
- Upgrading to a newer version: Migrating to a newer version of Office 365 can provide new features and improved security.
- Changing the email infrastructure: The organization may change its email infrastructure and move from one email solution to another. For example, from Exchange to Office 365.
- Improving Collaboration: The organization may wish to move from a traditional email system to a more collaboration-focused solution, like Office 365 groups, to improve teamwork and communication.
- Cost savings: Migrating to a cloud-based solution like Office 365 can reduce hardware and maintenance costs, and offer better scalability and accessibility.
Regardless of the reason, it’s important to ensure a smooth and seamless migration to minimize downtime and ensure business continuity.
Ultimate Way to Migrate Office 365 Groups From One Tenant to Another
There is no doubt Microsoft Office 365 is a great teaming tool, but when it comes to migrating group data, it is just as tough as migrating Office 365 mailbox.
However, the good news is that you don’t have to look for different tools for that. Because the All-Rounder Office 365 Migration Tool makes the job simple for you.
This is the best software so far recommended by most IT experts around the world.
Moreover, the user-friendly GUI-based interface lets even a naive user perform the migration smoothly.
In addition to that, you can easily specify the source group(s) through various fetching options provided for groups.
Above all, this trustworthy software ensures a faster and more secure migration by maintaining data integrity throughout the process.
Hence, without any worries, you can rely on the tool for moving your Office 365 group data to another tenant.
Now, let’s have a look at the easy-to-follow steps of Office 365 Groups migration; however, you can also go through the Office 365 migration best practices.
Migrate Office 365 Groups to Another Tenant Step By Step Safely Using Software
You are only a few steps away from transferring your groups and group members to their destination.
Step 1. Download and launch the tool on your system.
Step 2. After that, go to the ‘Set Up’ section. And, choose both the source and destination as ‘Office 365’.
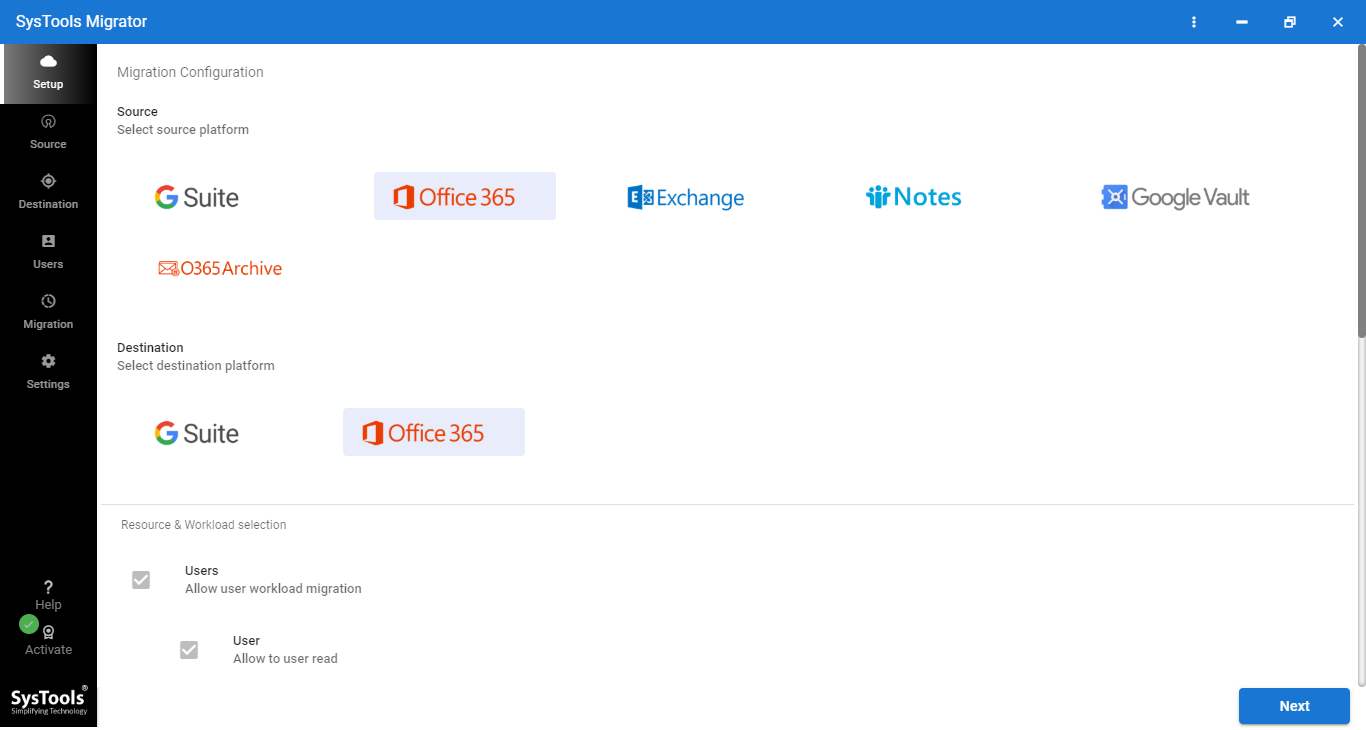
Step 3. Then, scroll down and click on the necessary fields including ‘Groups’.

[Note: Make sure to click on the ‘use group mapping’ sliders ]
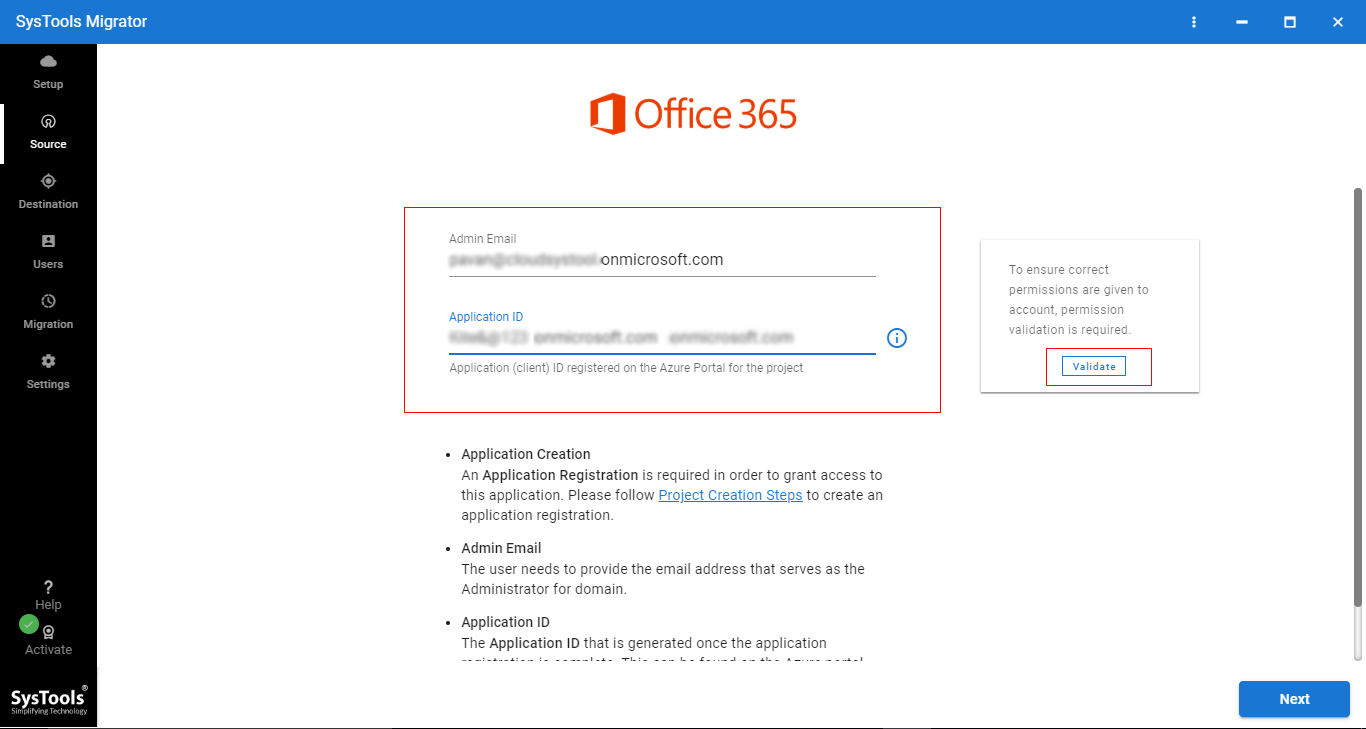
Step 4. Next, navigate to the ‘Source’ tab. Provide the ‘Admin Email’ and ‘Application ID’ for the source. Then, validate the permissions and hit Next to migrate O365 groups to another tenant.
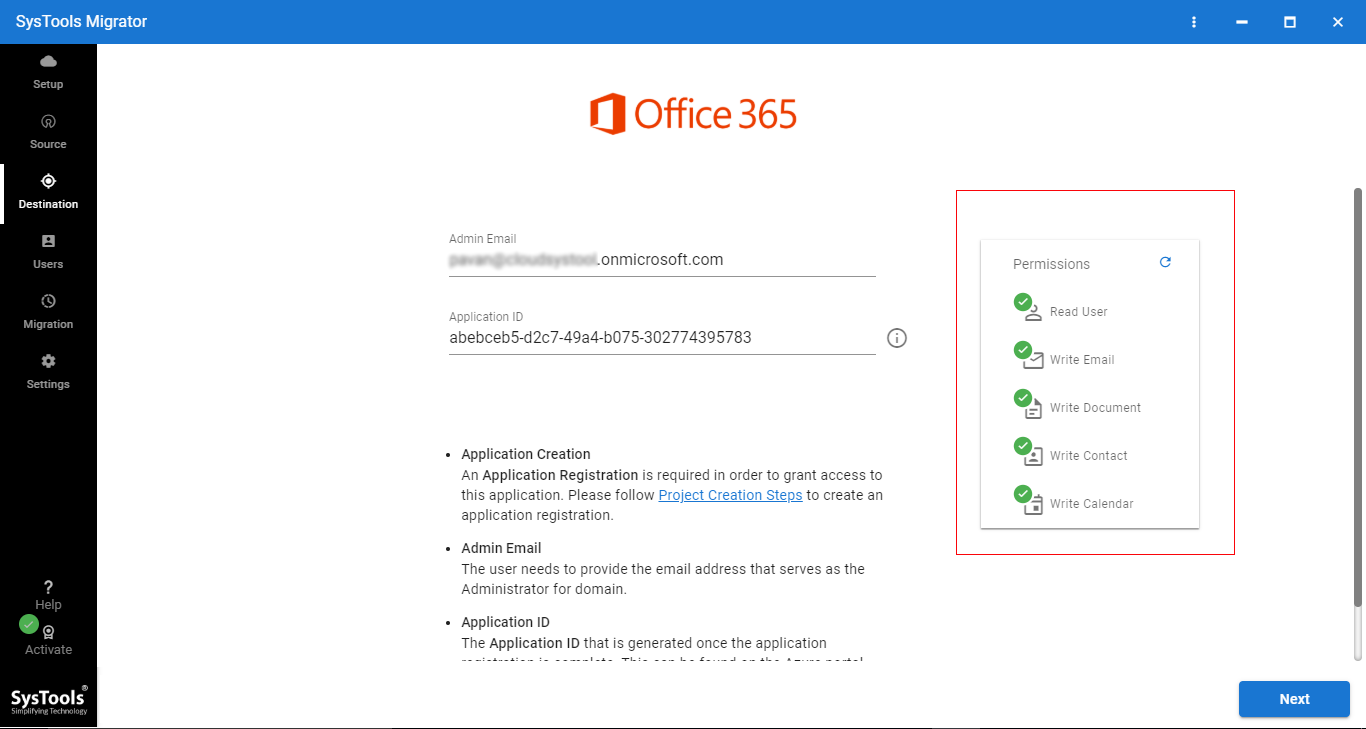
Step 5. Now, navigate to the ‘Destination’ tab. Enter the correct ‘Admin Email’ & ‘Application ID’ for the destination. After that, validate the permissions and click on ‘Next’.
Step 6. Next, go to the ‘Resources’ tab. Here you have three options to specify the group(s) from the source account. Choose any one out of the ‘Fetch Group’, ‘Import Groups’, and ‘Download Template’ options.

Step 7. Then, click on the ‘Validate’ button to verify the source and destination permission. Make sure they are green.

Step 8. Next, click on the blue button named ‘Start Migration’ to migrate Office 365 groups to another tenant.
Step 9. Finally, you can save the report by clicking on the ‘Download Report’.
Wrapping it Together
Nowadays, merger & acquisition activities are becoming common. And the organizations (after joining hands) using Office 365 need to consolidate all the crucial data including group members, to maintain smooth work operations. However, the data migration process is more complicated than you think.
Hence, many IT industry experts follow the above-mentioned tried and tested method to migrate Office 365 groups to another tenant.
