Move OST File of Exchange Outlook.com or IMAP Account Easily


Summary: In this blog, we have discussed the ways to move OST file of Exchange, Outlook.com, or IMAP Account. We have explained the entire process by using the best possible methods.
Though it is very simple to set or change the location of PST files having a place with a POP3 account, changing the location of the OST file for an Exchange, Outlook.com, or IMAP account is significantly more irksome.
This can prompt issues as these files can become very enormous and you have Windows installed and probably won’t be obliged for that. Particularly in the event that you put resources into a quick SSD drive, you as a rule don’t have GBs of room to squander and rather find this data on your bigger data drive.
While you can compel the location of OST files by means of Registry value, you’ll have to evacuate and re-include the file and download all mail once more.
A viable and more straightforward solution is to use Symbolic Links. While the issue around them and how they work is very perplexing, using them is fortunately genuinely simple and they are an extremely compelling solution for this issue.
Note: The user can try OST to PST Extraction tool to Export IMAP, Exchange, Office 365, and Outlook.com OST files to various other file formats. The user can try the demo version of this advanced application from here.
Ways to Move OST File of Exchange Outlook.com or IMAP Account
Here are Strategies to Move OST File
According to Microsoft, you can’t import mail things from a disconnected Outlook data file (.OST). You should trade all your Exchange servers, Outlook.com, or IMAP account email folders and mailbox items to PST files configured through Outlook Import/Export wizard.
At that point, you can import the PST file into your new Live Exchange, Outlook.com, or IMAP account.
Personal Storage Table or PST is an Outlook data file that is used to store backup sends and move Exchange, IMAP, and Outlook.com files to an alternate client file or PC.
On the other hand, you can use automated tools. The tool helps to move OST files legitimately to an alternate IMAP Outlook profile or Live Exchange account with 100% integrity.
Technique 1: Add ForceOSTPath Registry Value
The technique migrates an OST file on a PC. It helps change the default OST location to a client-wanted location with no error.
Follow the strategy when you need to change the default location of the OST file on a similar PC to an alternate drive or folder:
Steps to move OST file to an alternate folder
Press the Windows + R button, type Regedit, and press ‘Enter’
Navigate to
HKEY_CURRENT_USER\Software\Microsoft\Office\16.0\Outlook
Outlook 2013 Users
HKEY_CURRENT_USER\Software\Microsoft\Office\15.0\Outlook
Outlook 2010 Users
HKEY_CURRENT_USER\Software\Microsoft\Office\14.0\Outlook
Outlook 2007 Users
HKEY_CURRENT_USER\Software\Microsoft\Office\12.0\Outlook
Outlook 2003 Users
HKEY_CURRENT_USER\Software\Microsoft\Office\11.0\Outlook
Right-click on the Outlook subkey, pick ‘New’, and afterward click the Expandable String Value option
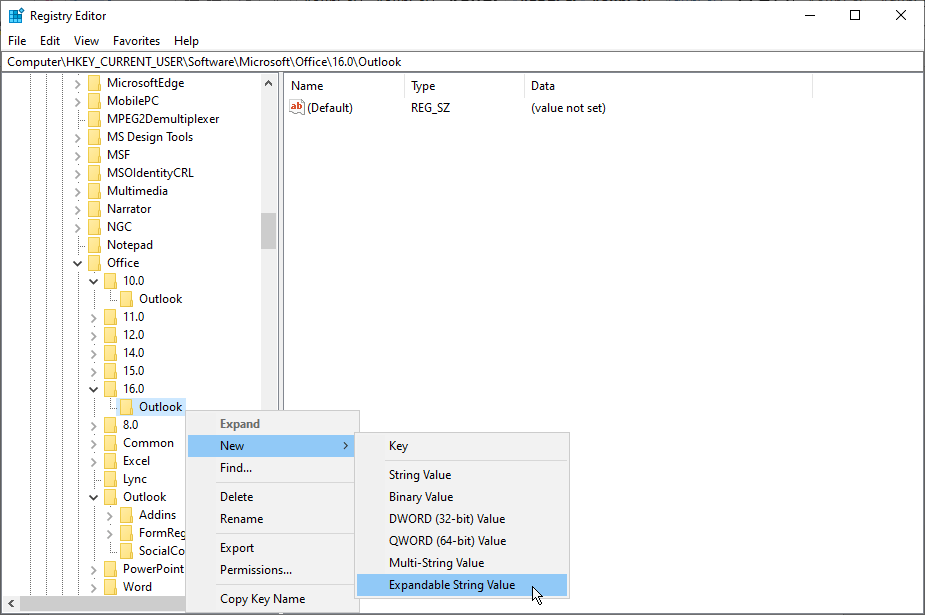
Specify ForceOSTPath and click on the ‘OK’
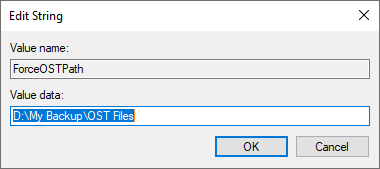
- Right-click the ForceOSTPath and select Modify
- Indicate the OST file path for sparing in the Value box. Click on the OK button
- Close the registry editor window
Technique 2: Via Outlook Import/Export Wizard
Standpoint includes an Import/Export wizard that encourages sending out mailbox things. Follow these means to trade OST mailbox things for Outlook importable PST files.
Follow the technique when you need to change the PC or need to move OST file data to an alternate Live Exchange, Outlook.com, or IMAP account.
This technique works just if your Exchange server, Outlook.com, or IMAP account on Outlook is open.
NOTE: This strategy doesn’t send out meta-data, for example, message rules, blocked files, and folder properties. Likewise, the technique can’t change over an orphaned and corrupted OST file to PST.
Follow These Steps:
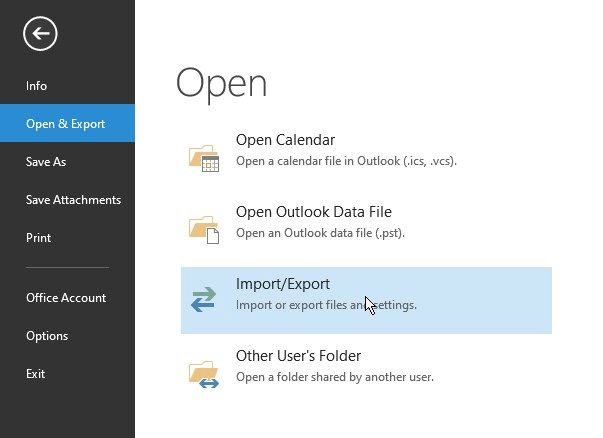
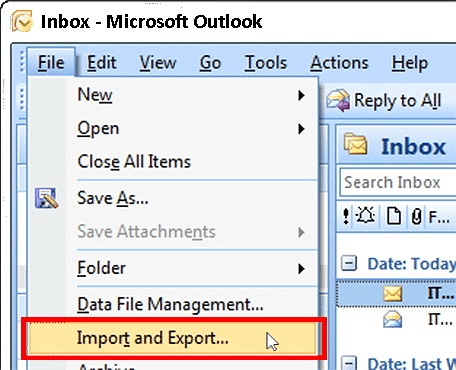
- Dispatch Outlook and go to ‘File>Open and Export>Import/Export
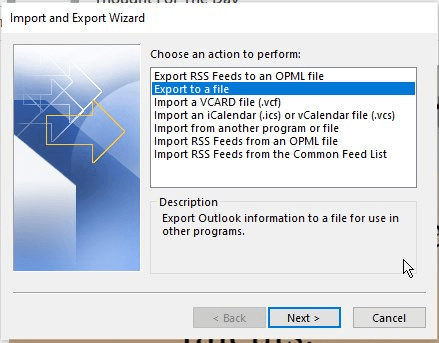
- Pick the ‘Export to a file option.
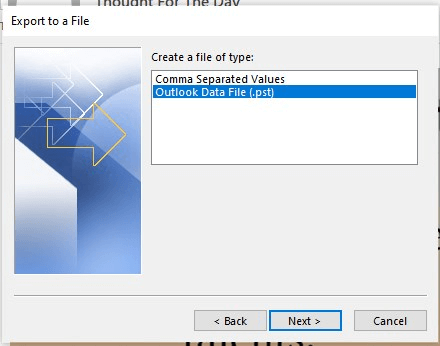
- Select ‘Outlook Data File (PST)‘ and click ‘Next’
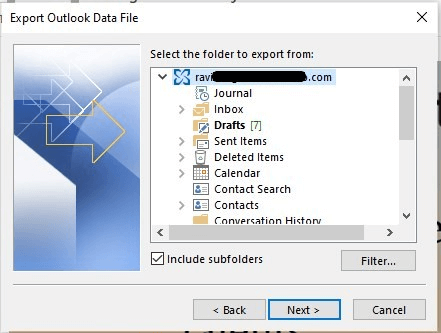
- Select the mail account, click the ‘Include subfolders’ checkbox and afterward click ‘Next’
- Click on the ‘Browse’ to choose a spare location and afterward click ‘Finish’
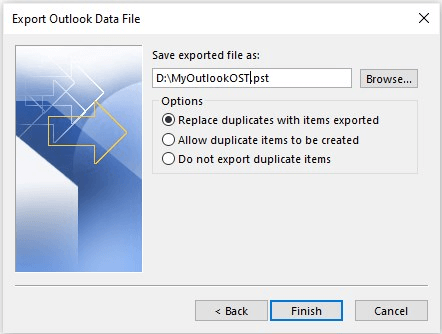
You may enter a secret key to protect the exported PST file from unapproved import. This progression is optional. You may click ‘OK’ without entering the secret key.
Steps to Import PST in Exchange Server, Outlook.com, or IMAP
- Open Outlook and sign in, if not as of now
In Outlook 2007 and 2003
- Click on the ‘File > Import and Export… ‘
- Select ‘Import from another program or file and click on ‘Next’.

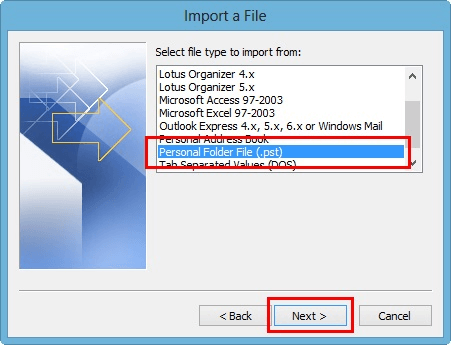
- Select ‘Personal Folder File (PST)’ and click on the ‘Next’
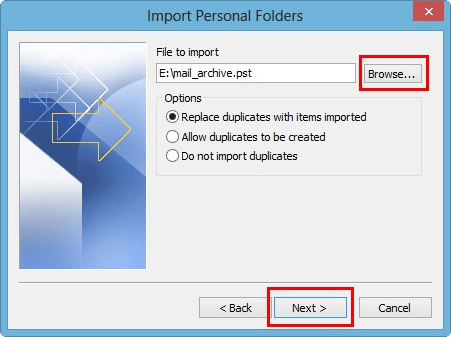
- Click on the ‘Browse’ and select the PST file
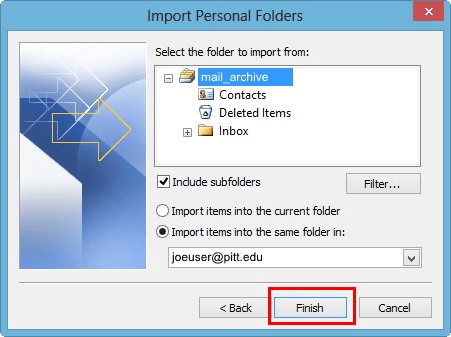
- Pick the ideal Outlook profile where you wish to import PST. Make a point to tap on the ‘Include subfolders’ checkbox and afterward click ‘Finish’
In Outlook 2010
- Go to File>Open>Import
- Select ‘Import from another program or file and click on the ‘Next’
- Select ‘Outlook Data File (.pst)’ and click on the ‘Next’
- Snap ‘Browse’ to pick the PST file
- Select email profile, click the ‘Include subfolders’ checkbox and afterward click ‘Finish’
For Outlook 2013, 2016, and 2019
- Go to ‘File>Open and Export>Import/Export’
- Select ‘Import from another program or file
- Snap ‘Browse’ to pick the PST file and click on the ‘Next’
- Select Outlook profile and click on the ‘Finish’
Strategy 3: Expert Solution to Move OST File of Exchange Outlook.com or IMAP Account
To export an OST file of Exchange,Outlook.com or IMAP account the user can take the help of an OST File conversion software application. By using this the user can easily export the orphaned, corrupted Outlook OST files to Outlook compatible PST format. This software application can easily perform the conversion process. Also, this application supports Outlook application 2019 and all its below versions. The user can download the software from here.
Conclusion
Moving the OST File of Exchange Outlook.com or IMAP Account on Outlook straightforwardly to an alternate client or PC is beyond the realm of imagination without the help of a third-party tool. Move all the mailbox items of the OST file to the new Live Exchange, Outlook.com, or IMAP account.
