How to Transfer Active Directory (AD) to Another Server?


Active Directory (AD) is important in network infrastructure as it handles authentication, authorization, and access to resources in an organization. Additionally, there can be several reasons for migrating the AD to a new server: needing to upgrade hardware, boosting system performance, or introducing security measures. However, to transfer Active Directory to another server is one of the most crucial tasks. A seamless migration of the AD server ensures continuous operations for your network concerning the integrity of your infrastructure.
Two Methods:
In this step-by-step guide, we will provide you with instructions to move Active Directory to another server.
How to Transfer Active Directory to Another Server with Powershell
- Pre-migration Steps
- Step 1: Prepare the New Server
- Step 2: Promote the New Server to Domain Controller
- Step 3: Transfer FSMO Roles
- Step 4: Update DNS Settings
- Step 5: Update DHCP Settings (if applicable)
- Step 6: Validate and Test
- Step 7: Decommission the Old Server
Pre-migration Steps
Before you begin to transfer active directory to another server, it’s essential to prepare for any concerns and issues that may arise afterward.
- Perform a comprehensive inventory of your existing Active Directory environment. Check domain controllers, user accounts, groups, policies, and DNS settings.
- Check the Active Directory version you are moving to. Then, ensure that the source and target servers must meet the necessary hardware and software requirements for that particular version.
- Take backups of your existing Active Directory database, system state, and critical configuration settings.
I. Preparing the New Server
Install the Active Directory Domain Services (AD DS) role on the new server:
Install-WindowsFeature AD-Domain-Services -IncludeManagementTools

II. Promote the New Server to Domain Controller
Once your preparation is complete, you can start setting up the new server. The first step is to promote the new server to a domain controller:
Install-ADDSDomainController `
-NoGlobalCatalog:$false `
-CreateDnsDelegation:$false `
-CriticalReplicationOnly:$false `
-DatabasePath “C:\Windows\NTDS” `
-DomainName “yourdomain.com” `
-InstallDns:$true `
-LogPath “C:\Windows\NTDS” `
-NoRebootOnCompletion:$false `
-SiteName “Default-First-Site-Name” `
-SysvolPath “C:\Windows\SYSVOL” `
-Force:$true
III. Transfer FSMO Roles
Here, we will transfer the FSMO roles to the new domain controller.
- Firstly, verify the current status of the FSMO roles.
Get-ADDomain | Select-Object InfrastructureMaster, RIDMaster, PDCEmulator
Get-ADForest | Select-Object DomainNamingMaster, SchemaMaster
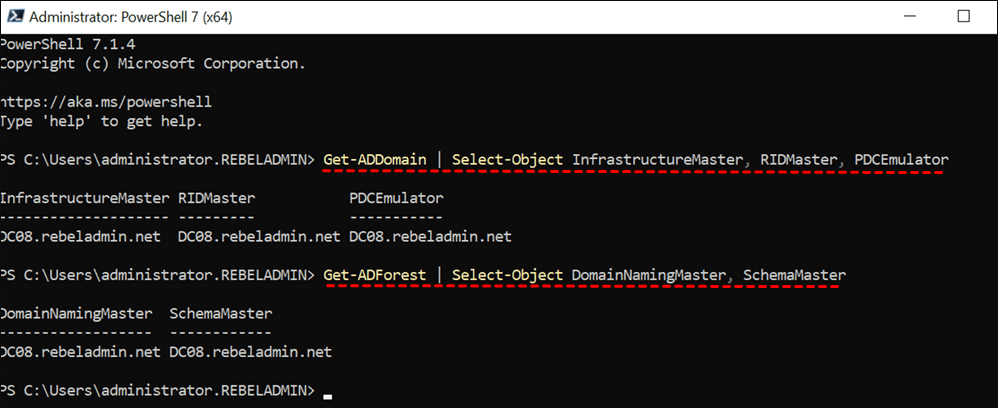
- Now, we will transfer the FSMO roles from the old domain controller to the new one.
Move-ADDirectoryServerOperationMasterRole `
-Identity “NewServer” `
-OperationMasterRole SchemaMaster, DomainNamingMaster, PDCEmulator, RIDMaster, InfrastructureMaster

- You can verify the role transfer by using the following command.
Get-ADDomain | Select-Object InfrastructureMaster, RIDMaster, PDCEmulator
Get-ADForest | Select-Object DomainNamingMaster, SchemaMaster
IV. Update DNS Settings
Now, we will update the DNS settings for the new server and clients:
Set-DnsClientServerAddress `
-InterfaceAlias “Ethernet” `
-ServerAddresses (“NewServerIP”, “OldServerIP”, “AlternateDNS”)
V. Update DHCP Settings (if applicable)
If it is applicable in your case, do not forget to migrate DHCP settings to the new server:
Import-DhcpServer -File “C:\dhcpconfig.xml” -BackupPath “C:\dhcpbackup”
VI. Validate and Test
Test the new domain controller to ensure proper functionality:
Test-ComputerSecureChannel -Repair
Test-ADServiceAccount “ServiceAccountName”
Test-ADDSDomainController -DomainController “NewServer” -Scope Forest
VII. Decommission the Old Server
Once everything is done, demote the old domain controller with the following command:
Uninstall-ADDSDomainController -LocalAdministratorPassword (ConvertTo-SecureString -AsPlainText “Password” -Force) -ForceRemoval -DemoteOperationMasterRole
Do note that you should verify each step before executing them in Powershell. Only if you understand what you are doing will the process to transfer active directory to another server be successful.
You may also be interested in: How to Move Computers from One Domain to Another
Best Practices to Enhance the AD Migration Process
Steps to transfer Active Directory (AD) to a new server are indeed a critical task that requires planning and proper execution. With this much info, let’s go through the points given below:
- Comprehensive Pre-Migration Assessment:
- Active Directory Health Check: Perform exhaustive health checks on your present AD ecosystem prior to initiating the migration action. All replication status, event log errors, and AD database integrity should be monitored. After that, you could have various tools from Microsoft’s dcdiag that will help you with the process.
- Schema Compatibility: You would have to ensure that the AD schema of the new server fits within the existing environment. Otherwise, there could be possible conflicts regarding replication.
- DNS and Global Catalog Considerations:
- DNS configuration: The DNS settings should be good so that AD-dependent functionality works. Configure the DNS server on the new domain controller and then update all client machines to this DNS host. There are basically two choices for achieving this: updating the DHCP scopes or manually configuring on specific systems.
- Global Catalog Server: Find out if you need to set up the new domain controller to function as a Global Catalog server. GC servers allow searching functions across various domains in a forest. Hence, these servers are needed in environments with multiple domains. Configure this role as per your organization’s requirements.
- Group Policy and SYSVOL Replication:
- Group Policy Object (GPOs): Look at current GPOs to judge if they are relying on any old server. GPOs available in the old server should be replicated on the new server, and any hardcoded references in the old server should be updated.
- SYSVOL Replication: Ensure that SYSVOL in which AD public files are kept is being replicated to the new domain controller. This is critical for enforcing policies and scripts consistently across the network.
- Application and Service Dependencies:
- Service accounts: List all applications and services that use AD authentication and update configurations about the new domain controller so that those services do not disrupt.
- LDAP Bindings: Check the applications linked to AD through LDAP if they properly connect with the new server.
- Post-Migration Monitoring and Validation:
- Replication Monitoring: Post-migration, take care to monitor active directory replication to notice and rectify any issues when they arise. Next, you would find the usefulness of tools like repadmin toward achieving this end.
- Client Authentication Testing: Client machines should be checked for error-free log-ins, access to shared resources, and application of group policies while authenticating with the new domain controller.
How to Migrate Active Directory to Another Server using ADM
Active Directory Migrator offers a GUI to transfer AD to new server in a reliable manner. It can move AD users, printers, computers, groups, and contacts. In fact, you can migrate one or more Active Directory domains and forests at one time. Another advantage of ADM is that it offers migration of various objects and properties between servers even if the servers are disconnected or isolated.
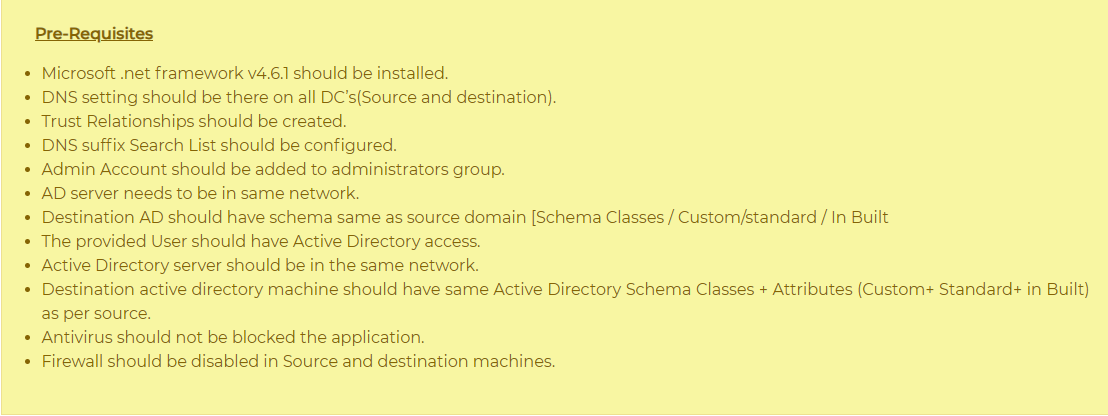
Pre-Migration Checks:
The image below shows the pre-migration checks:
Step-by-Step Process to Transfer Active Directory from One Server to Another
I. Download, install, run, and activate the AD migrator tool on your Windows system.
Download for Windows Purchase Now
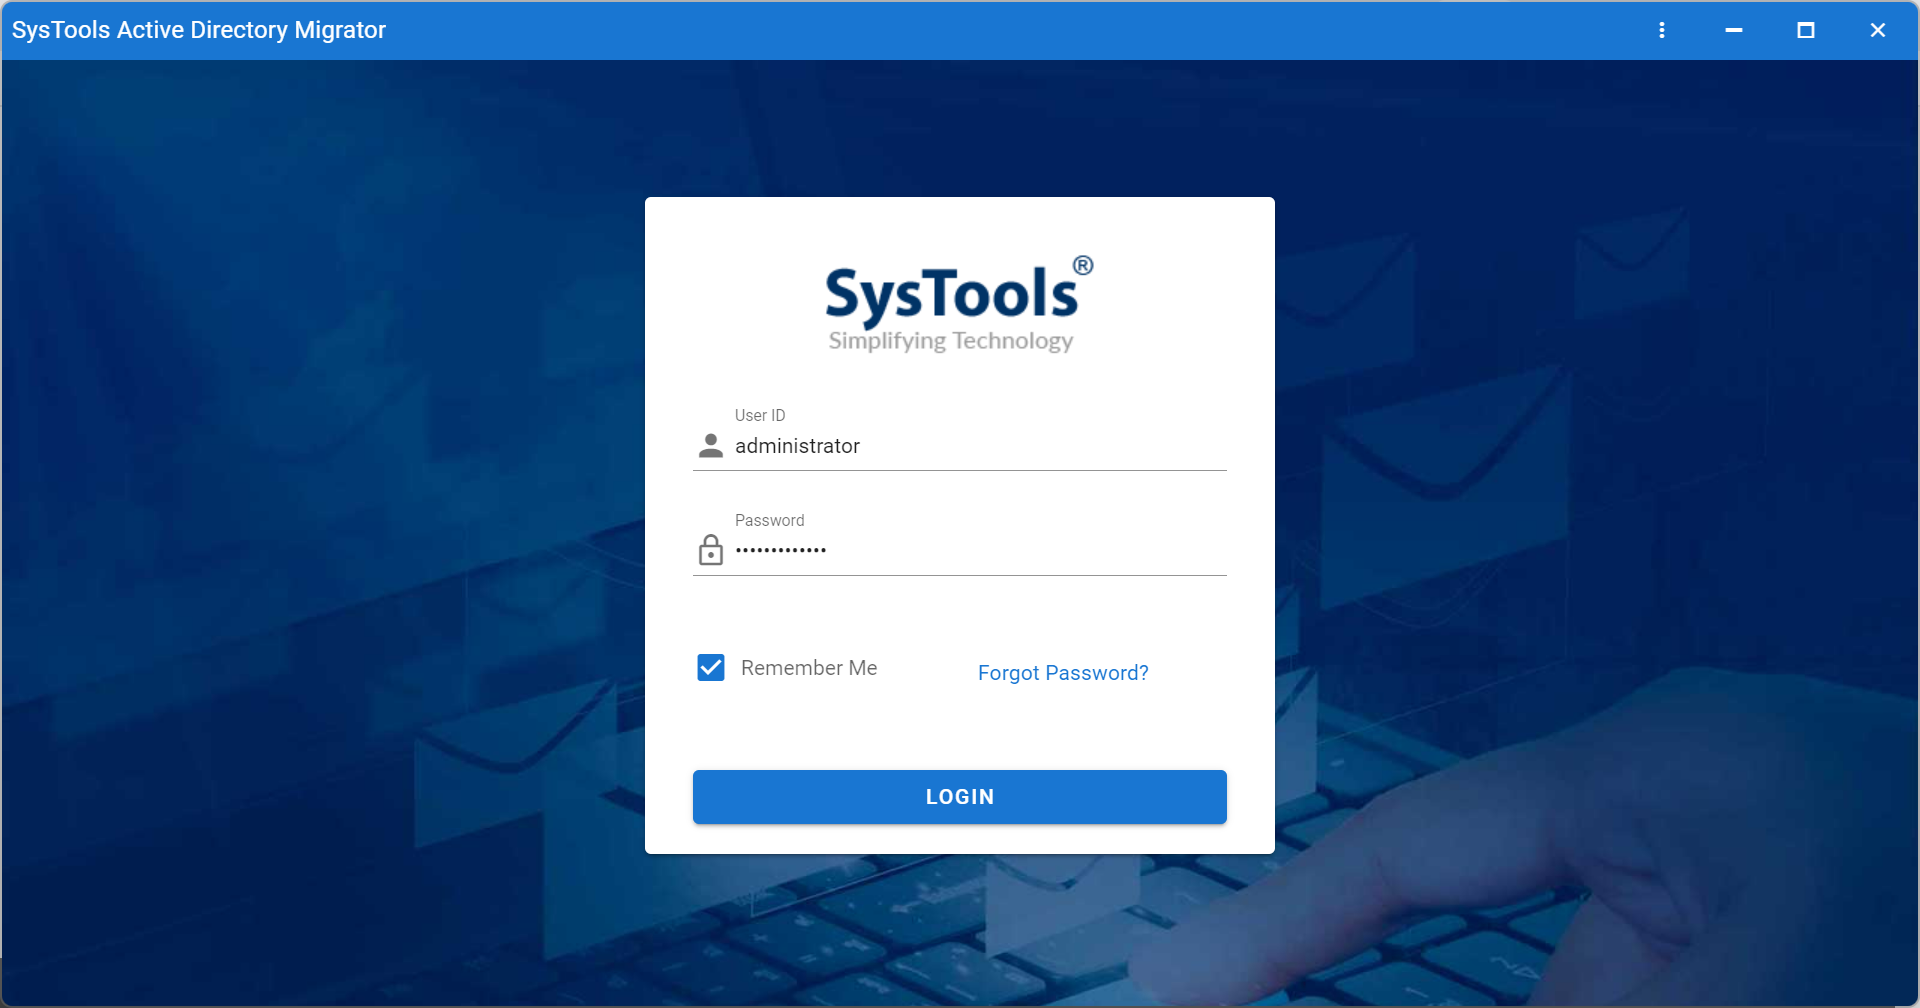
II. Enter administrator in both User ID and Password on the login screen to continue. After login, you can change them for future attempts.
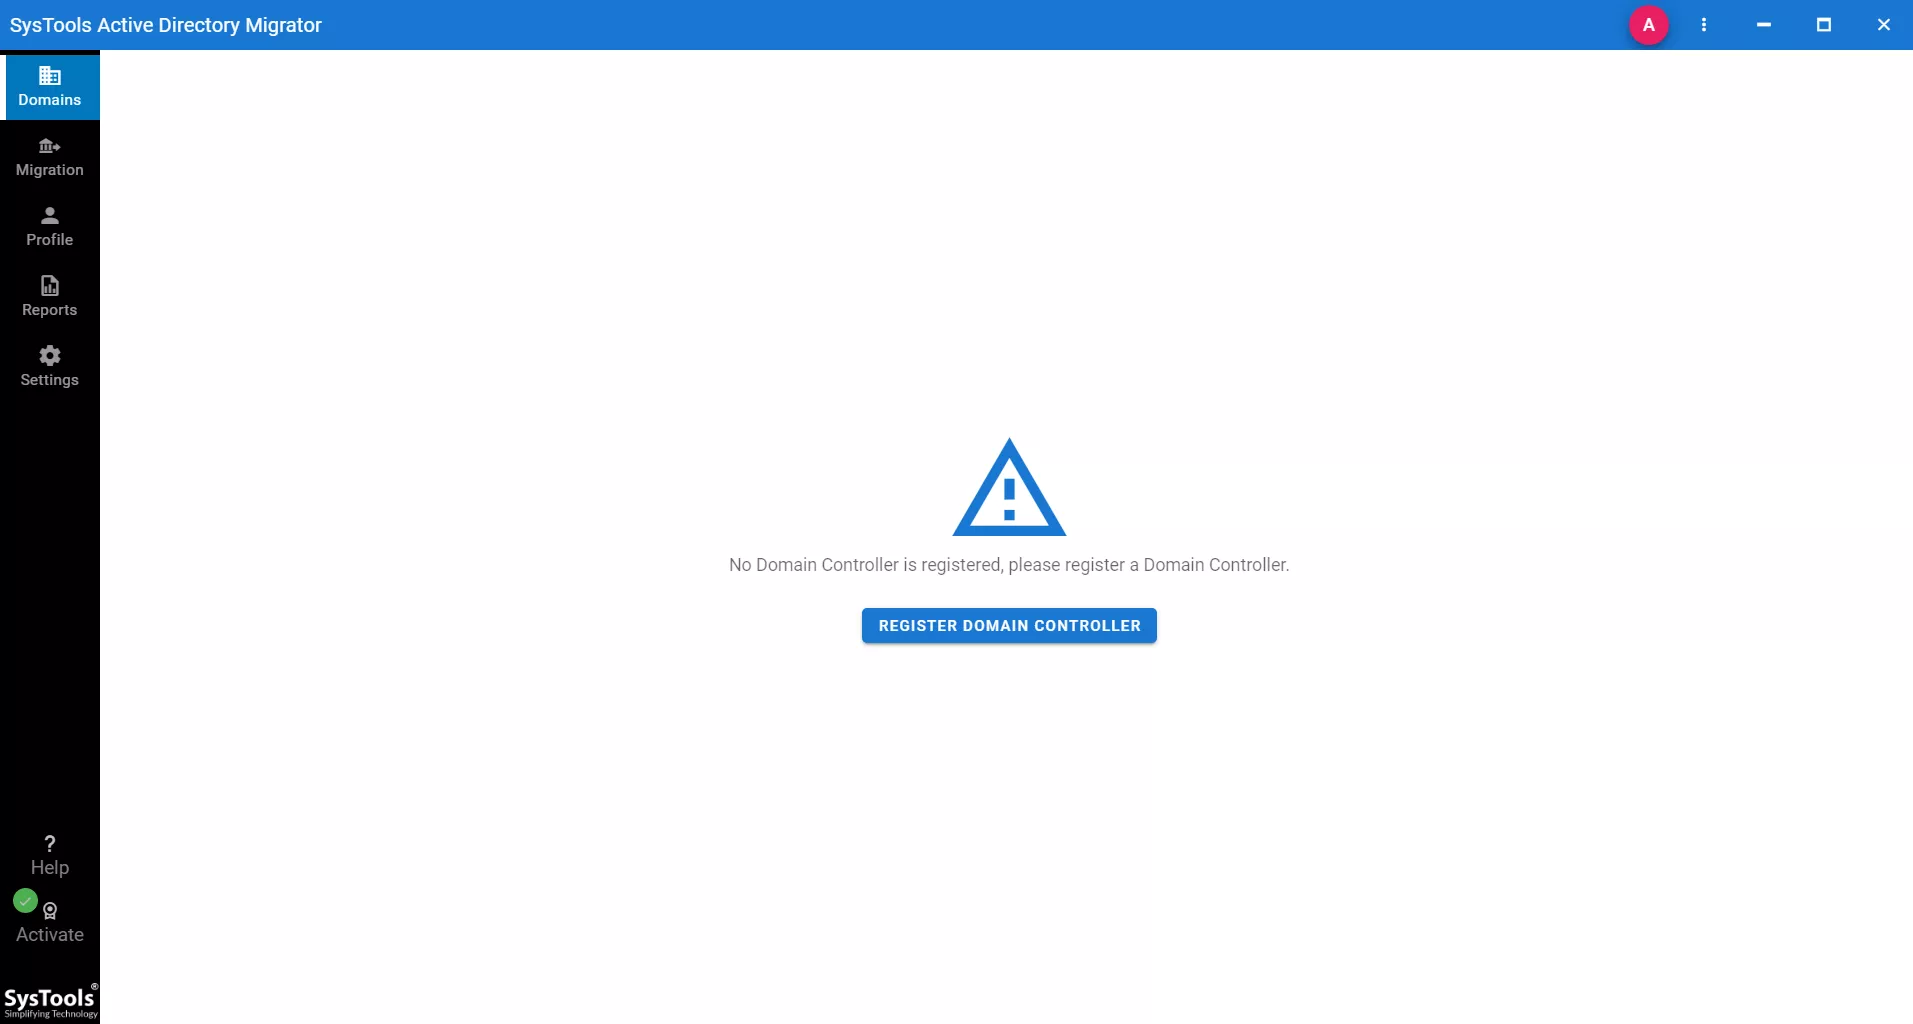
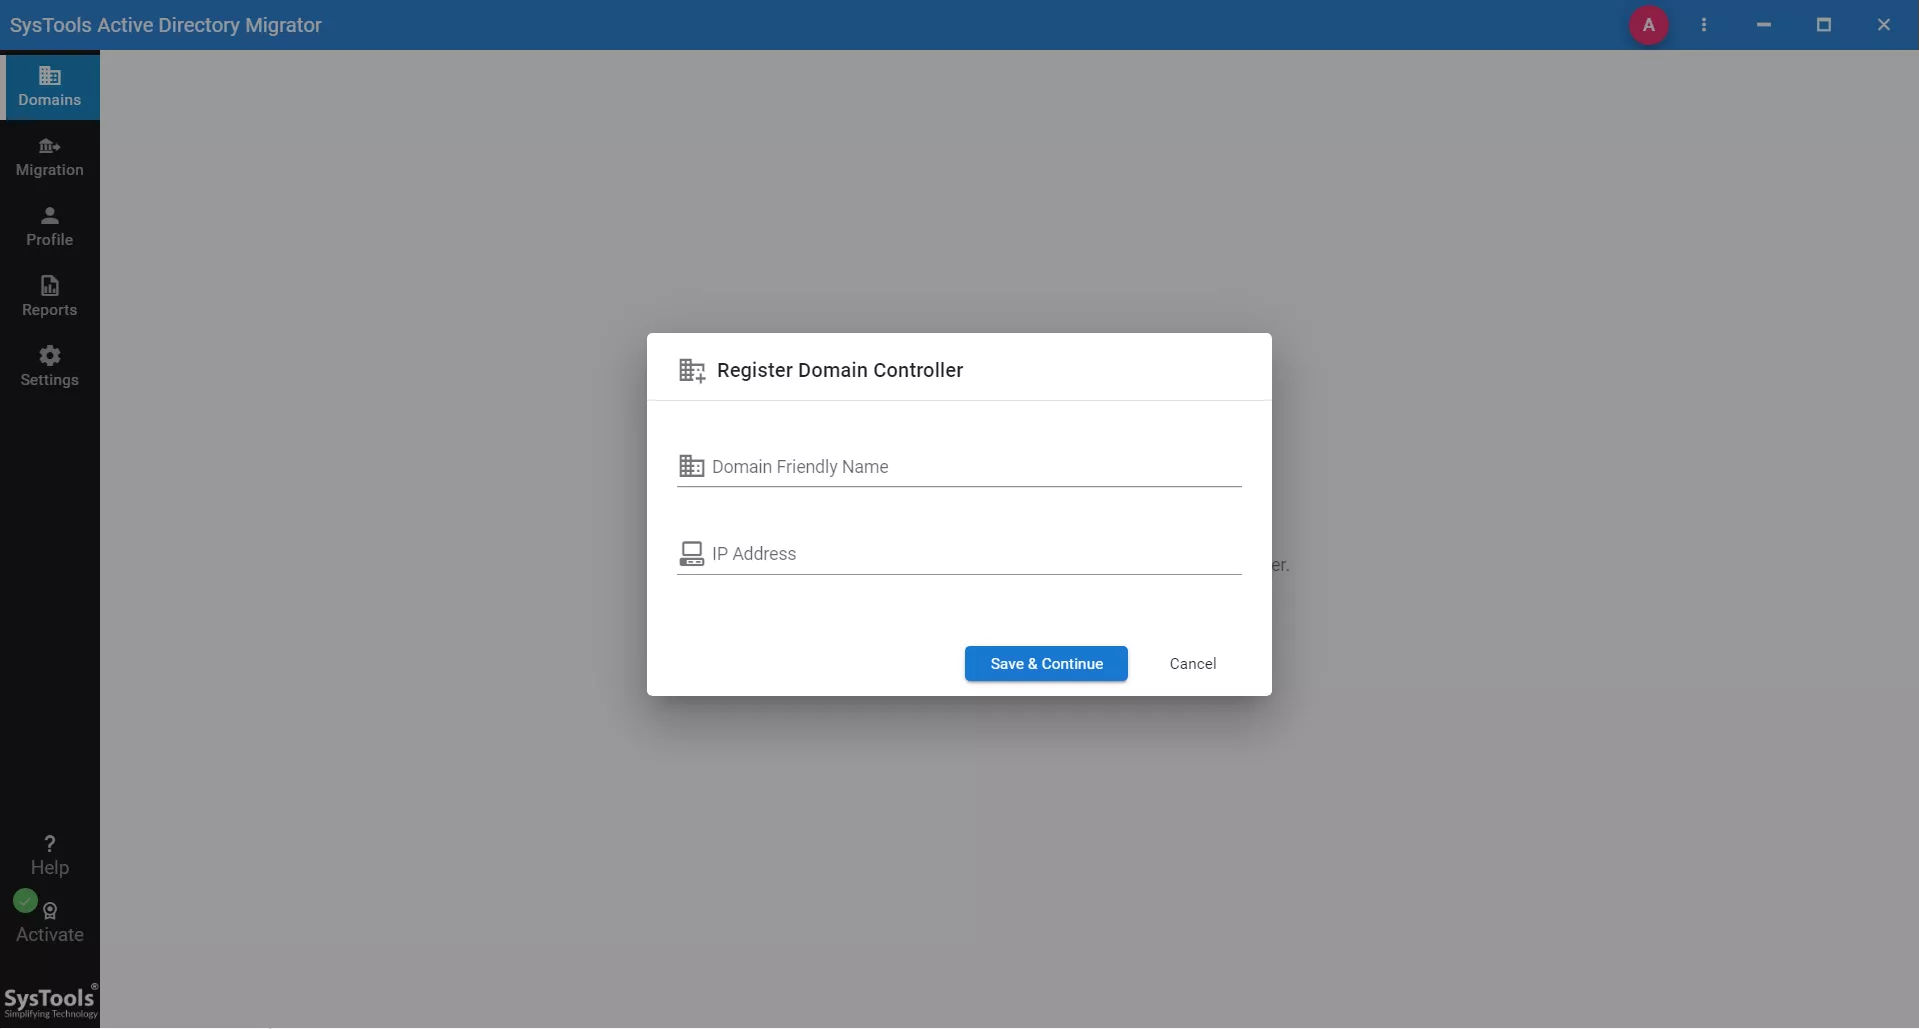
III. After logging in, click on the Register Domain Controller button to register the domains.
IV. Provide the Domain Name and IP Address of the source domain. Then, click on Save & Continue button.
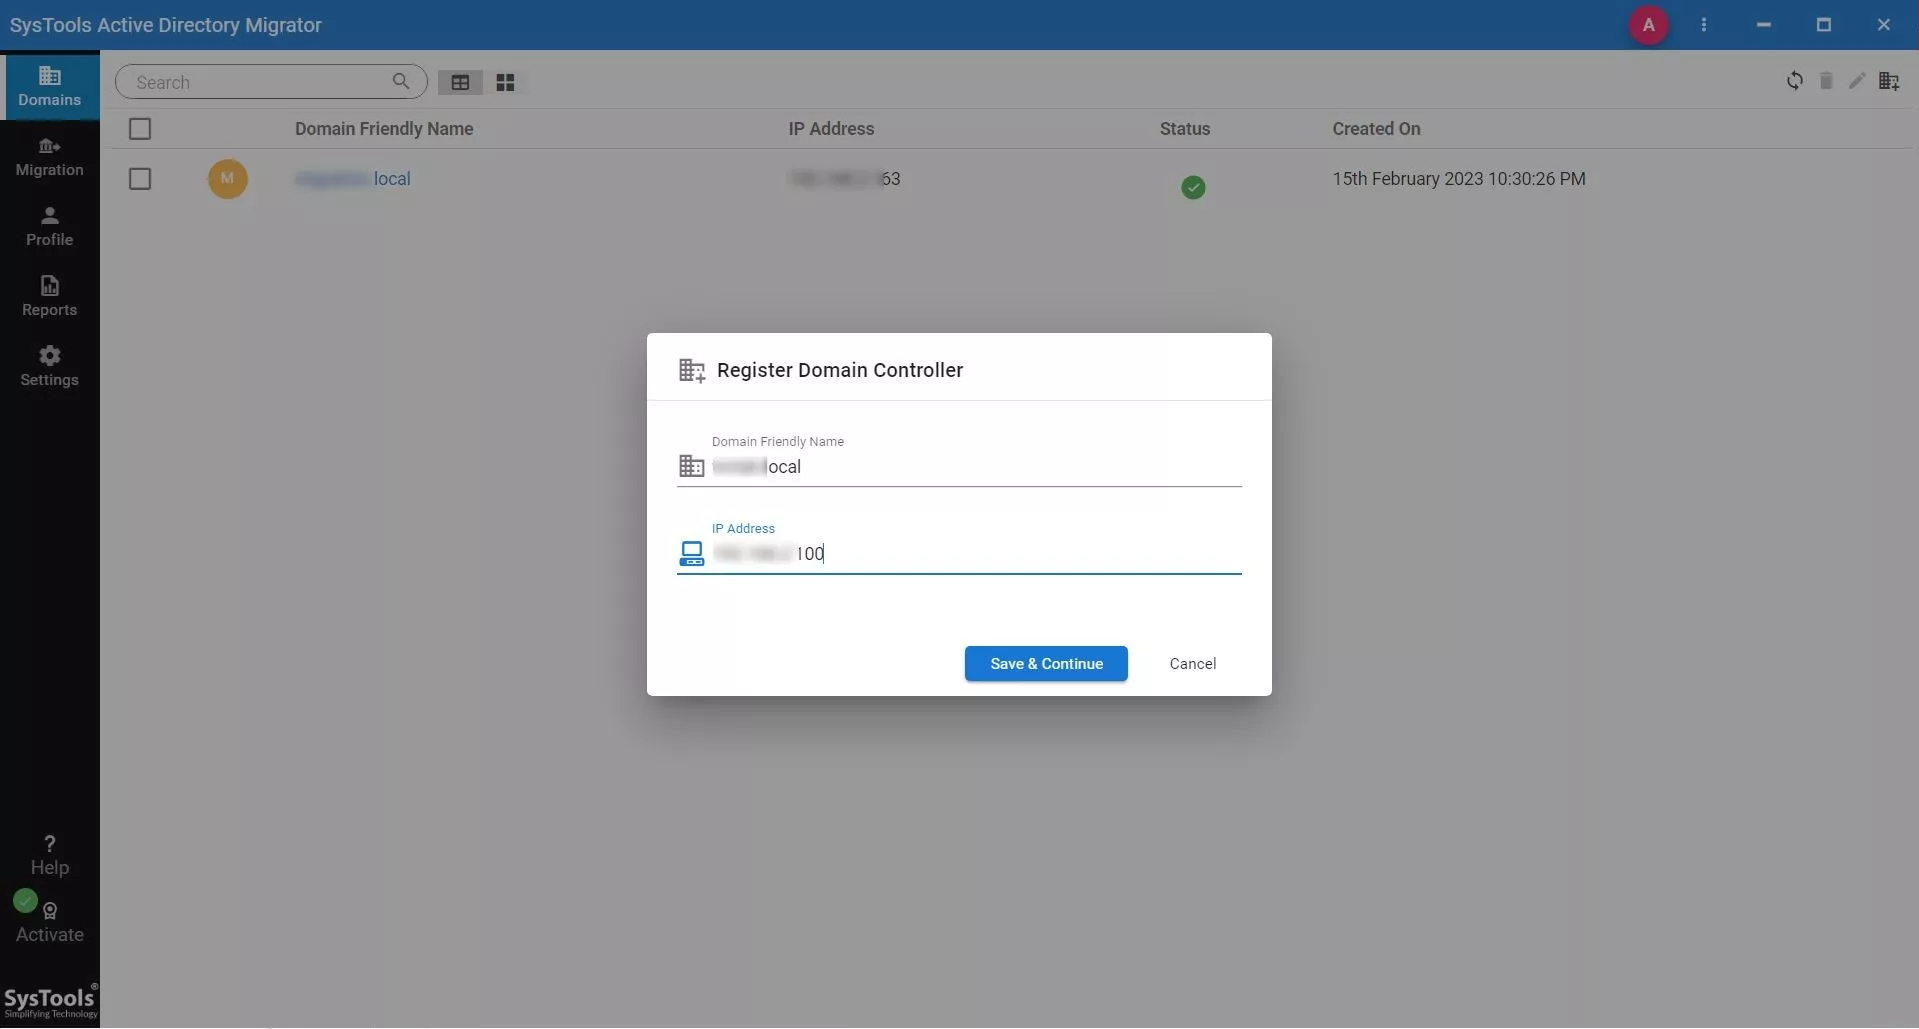
V. In the next window, add another domain name and IP address of the destination domain. Then, click on Save & Continue button.
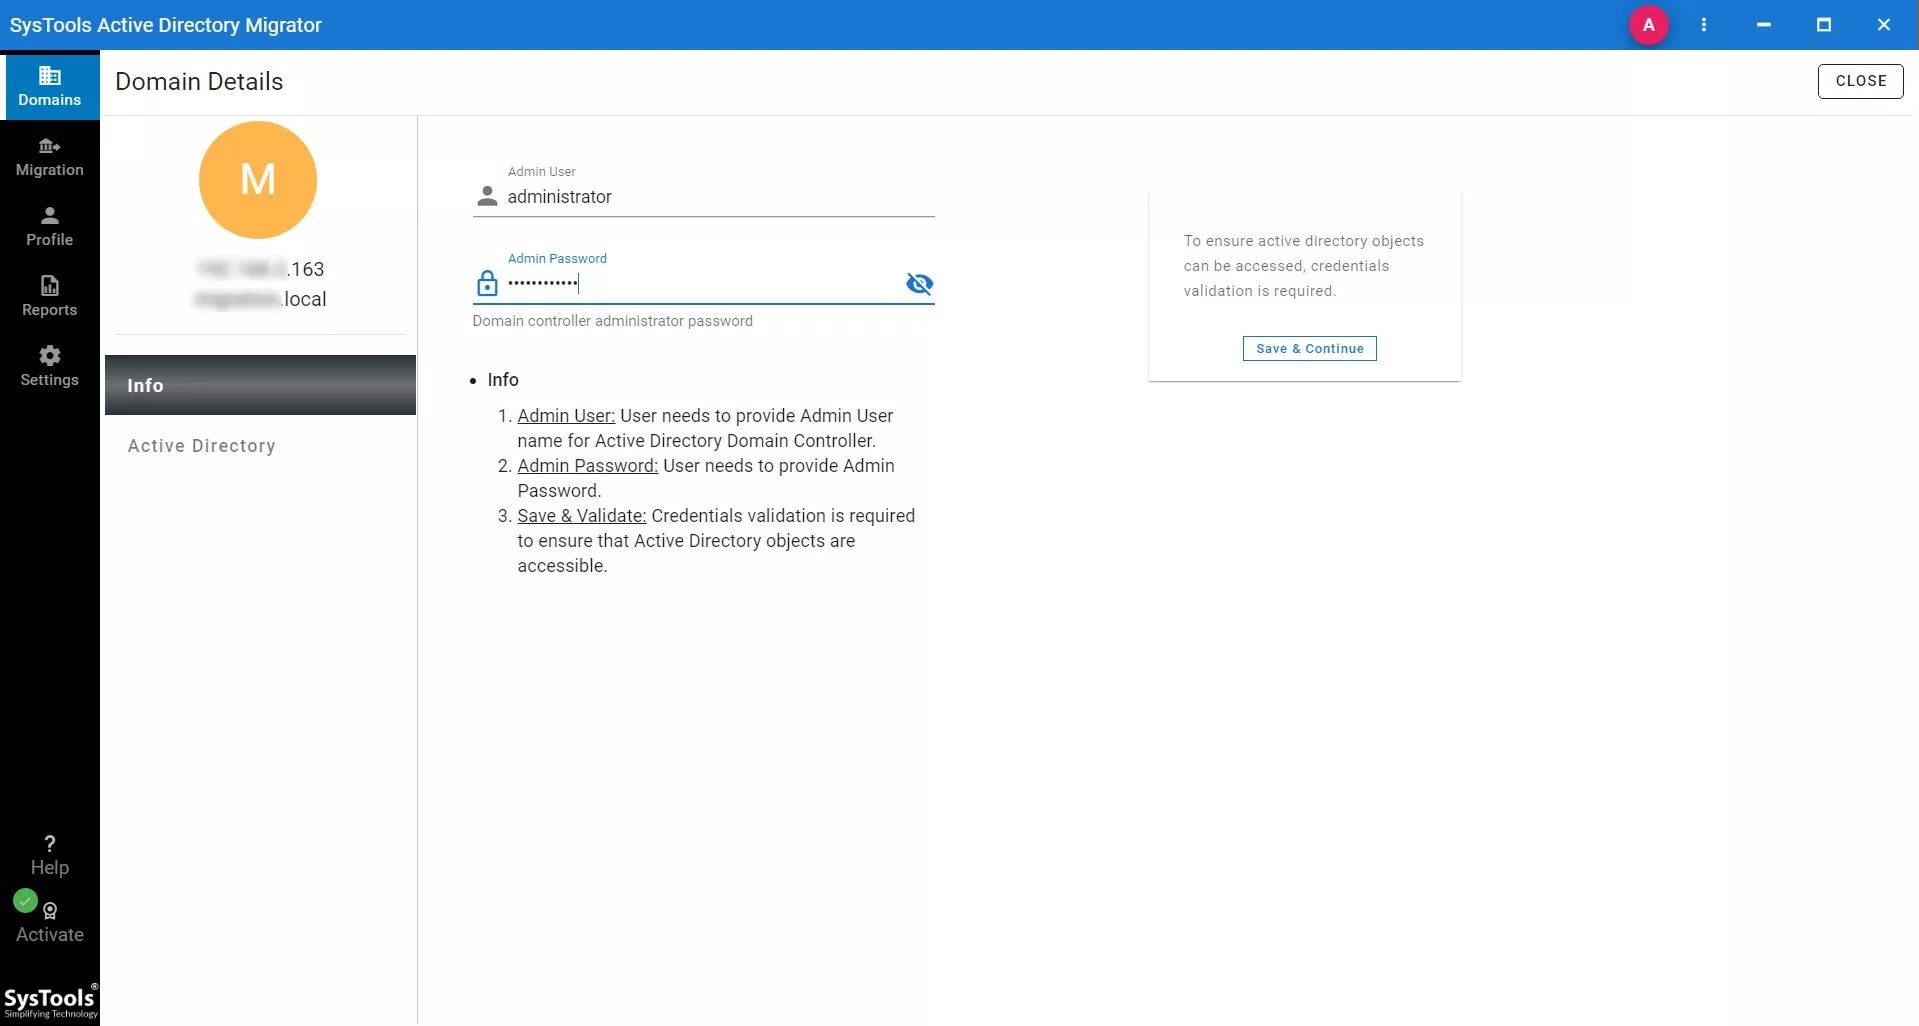
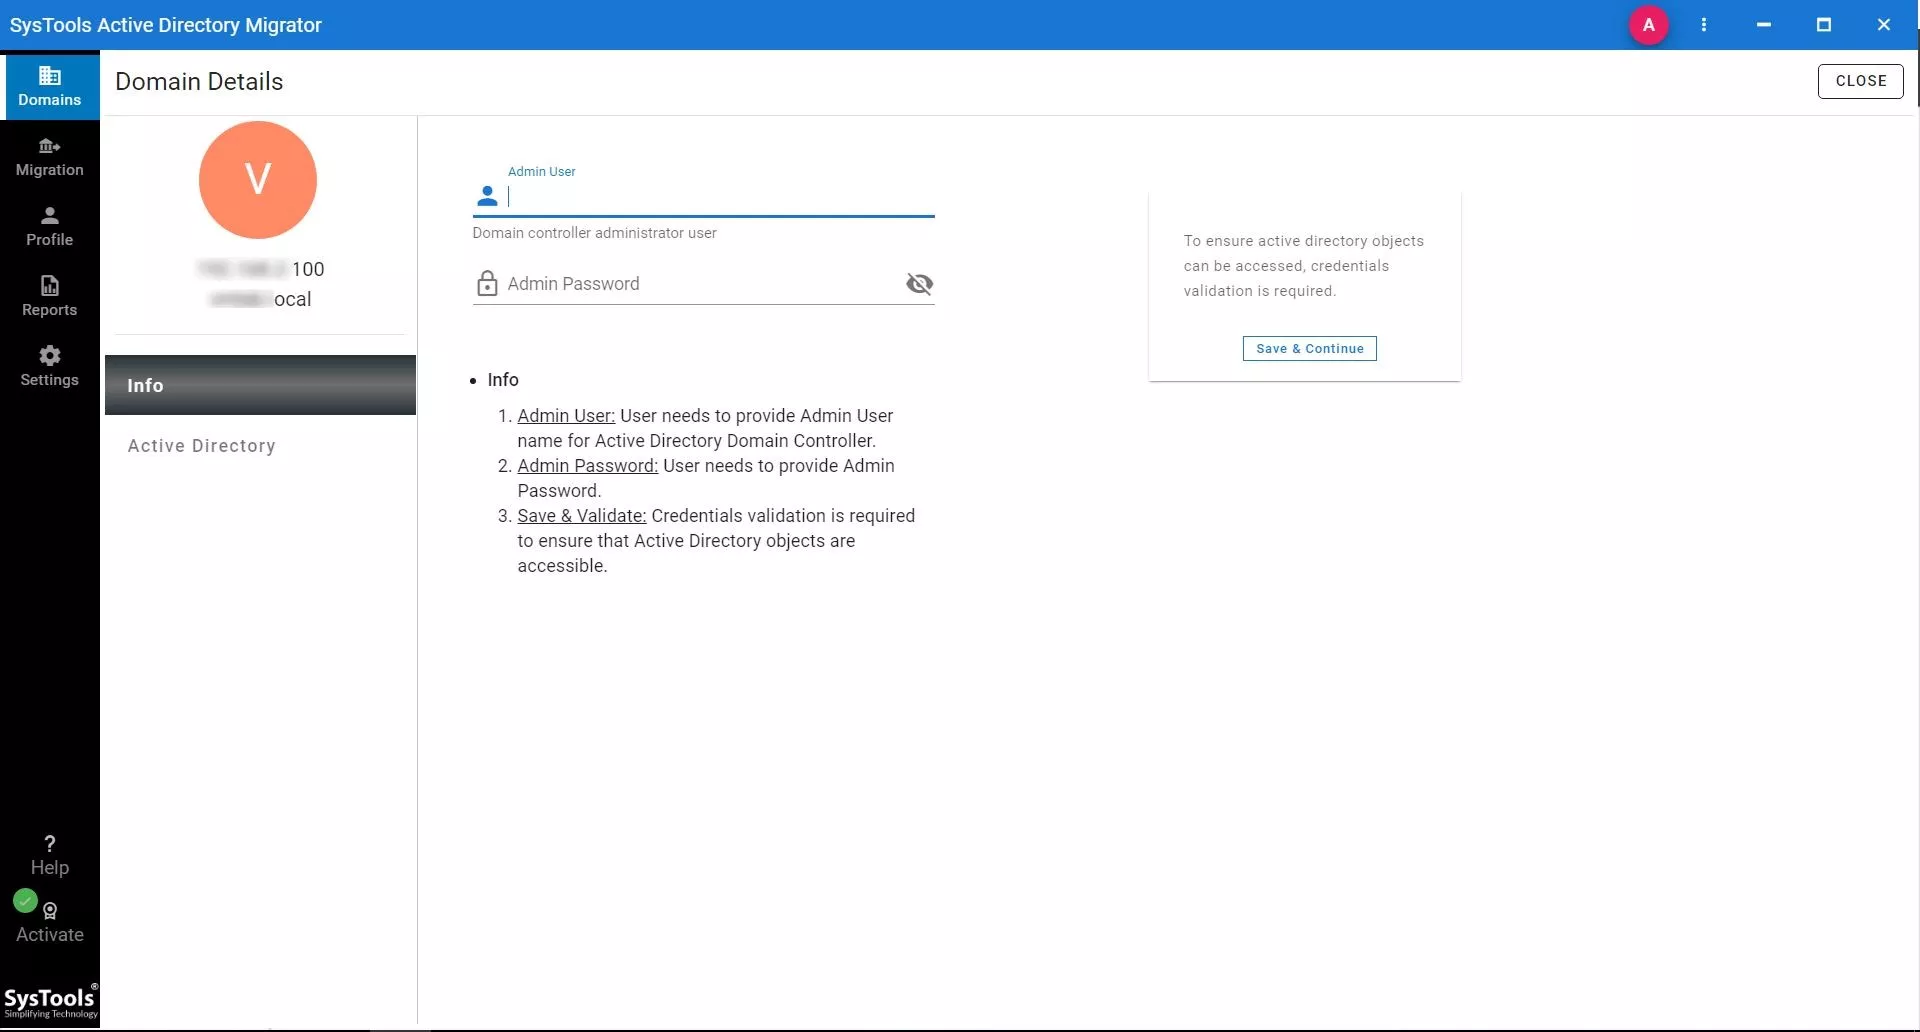
VI. Click on Source Domain and provide credentials for the domain. Click on Save & Validate to validate the credentials and permissions.
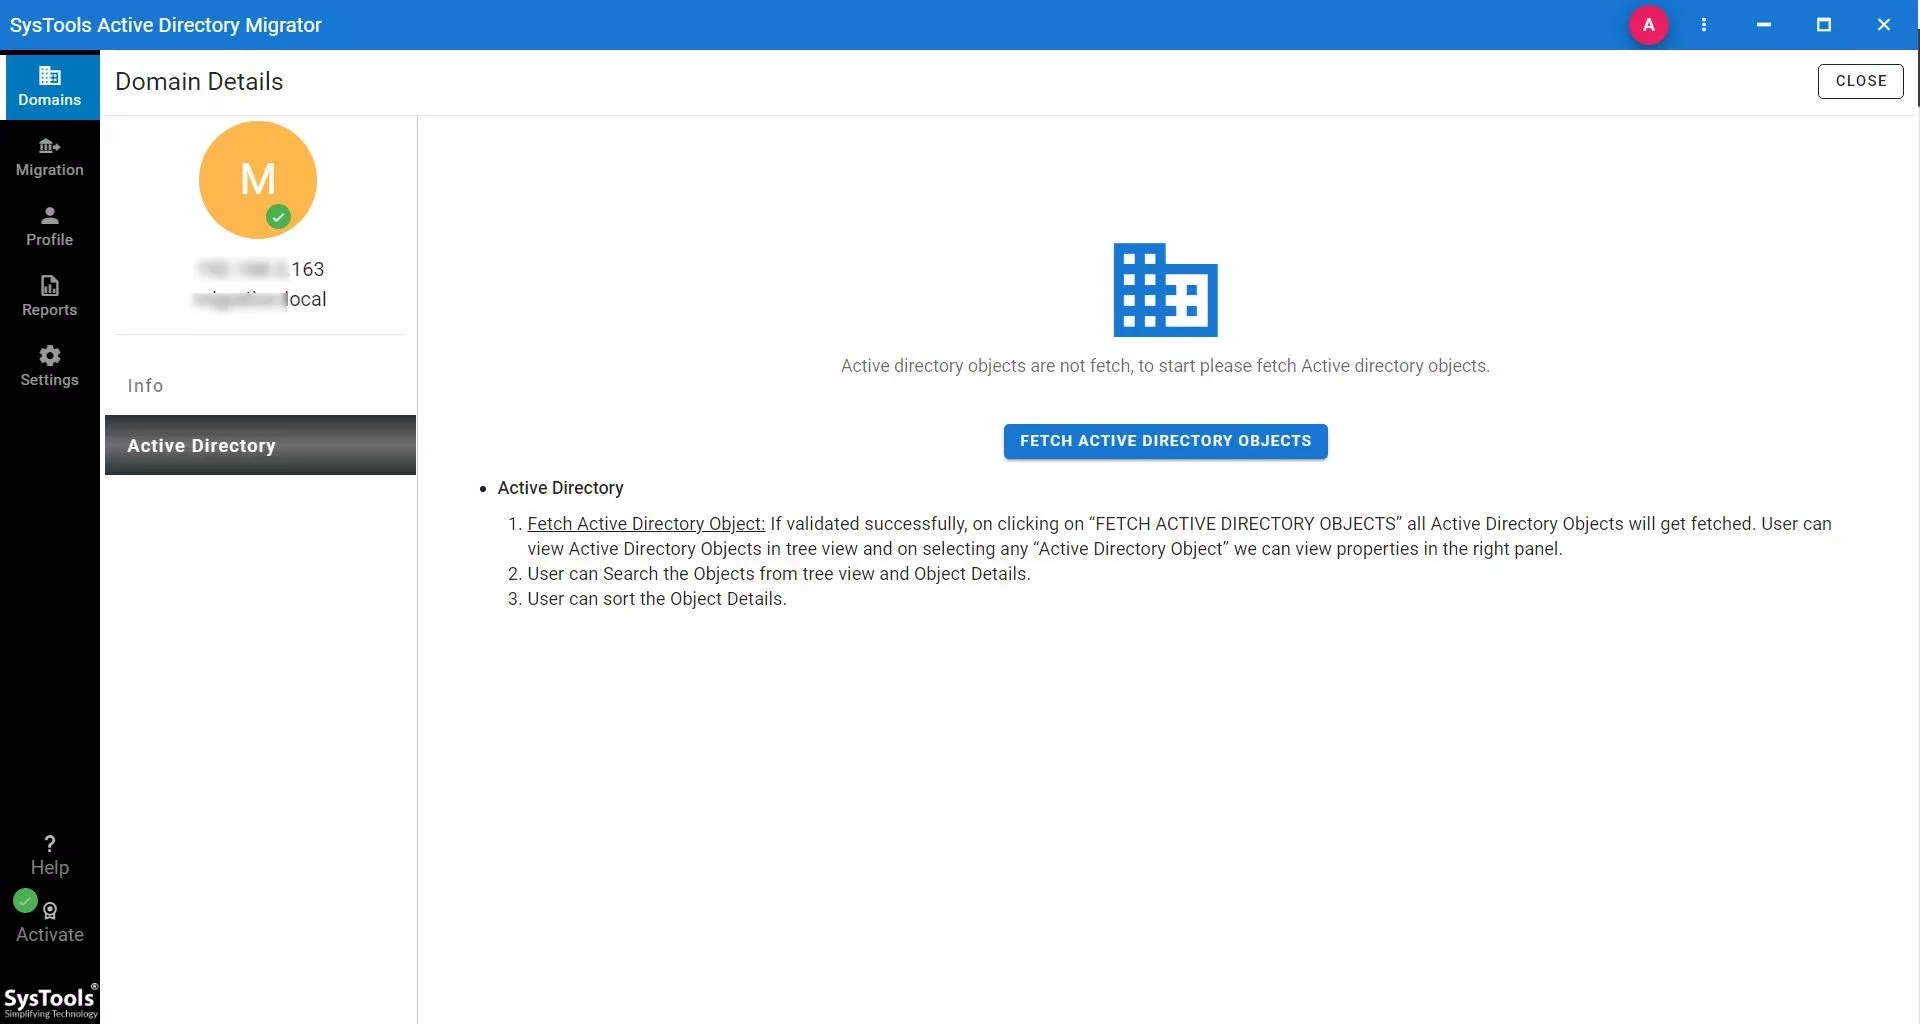
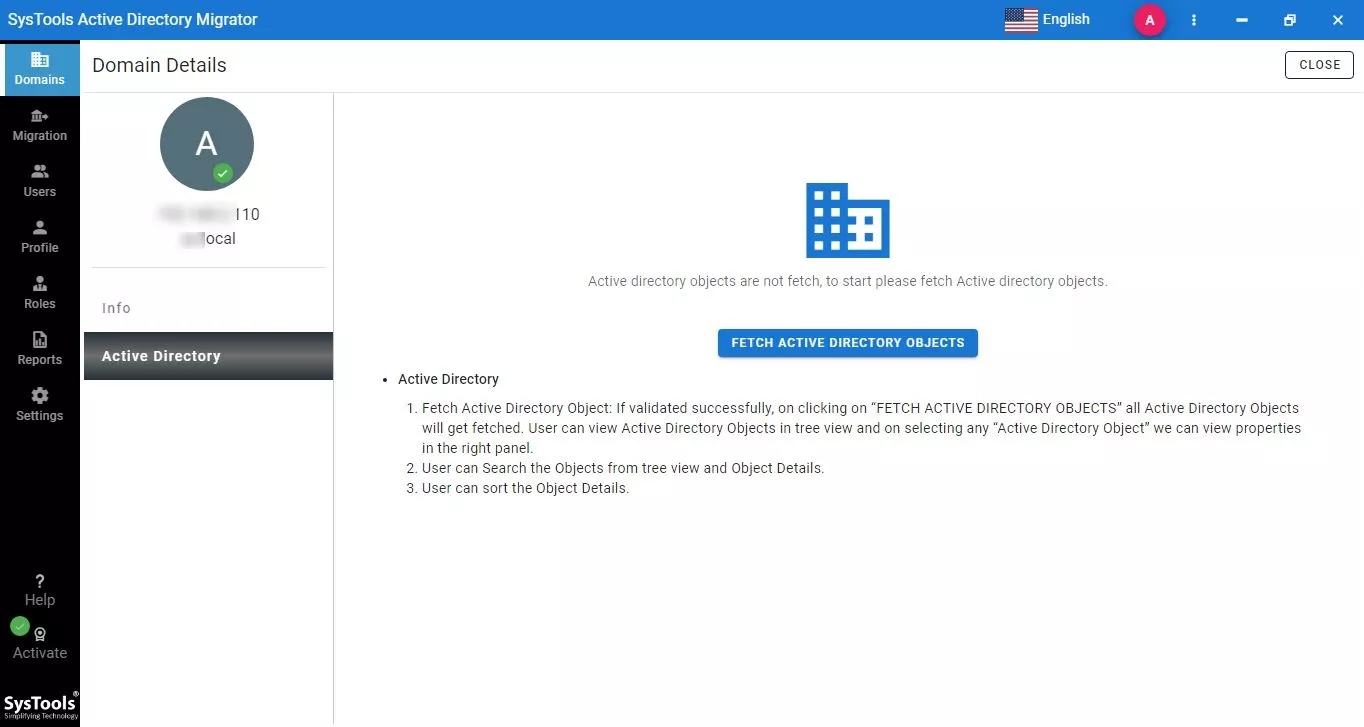
VII. After that, hit the Active Directory tab and click on Fetch Active Directory Objects to fetch the AD objects of the Source domain.
VIII. Now, click on the destination domain and enter the credentials. Click on Save & Continue to validate the credentials and permissions.
IX. Then, go to the Active Directory tab and click on the Fetch Active Directory Objects button to fetch the AD objects of the destination domain.
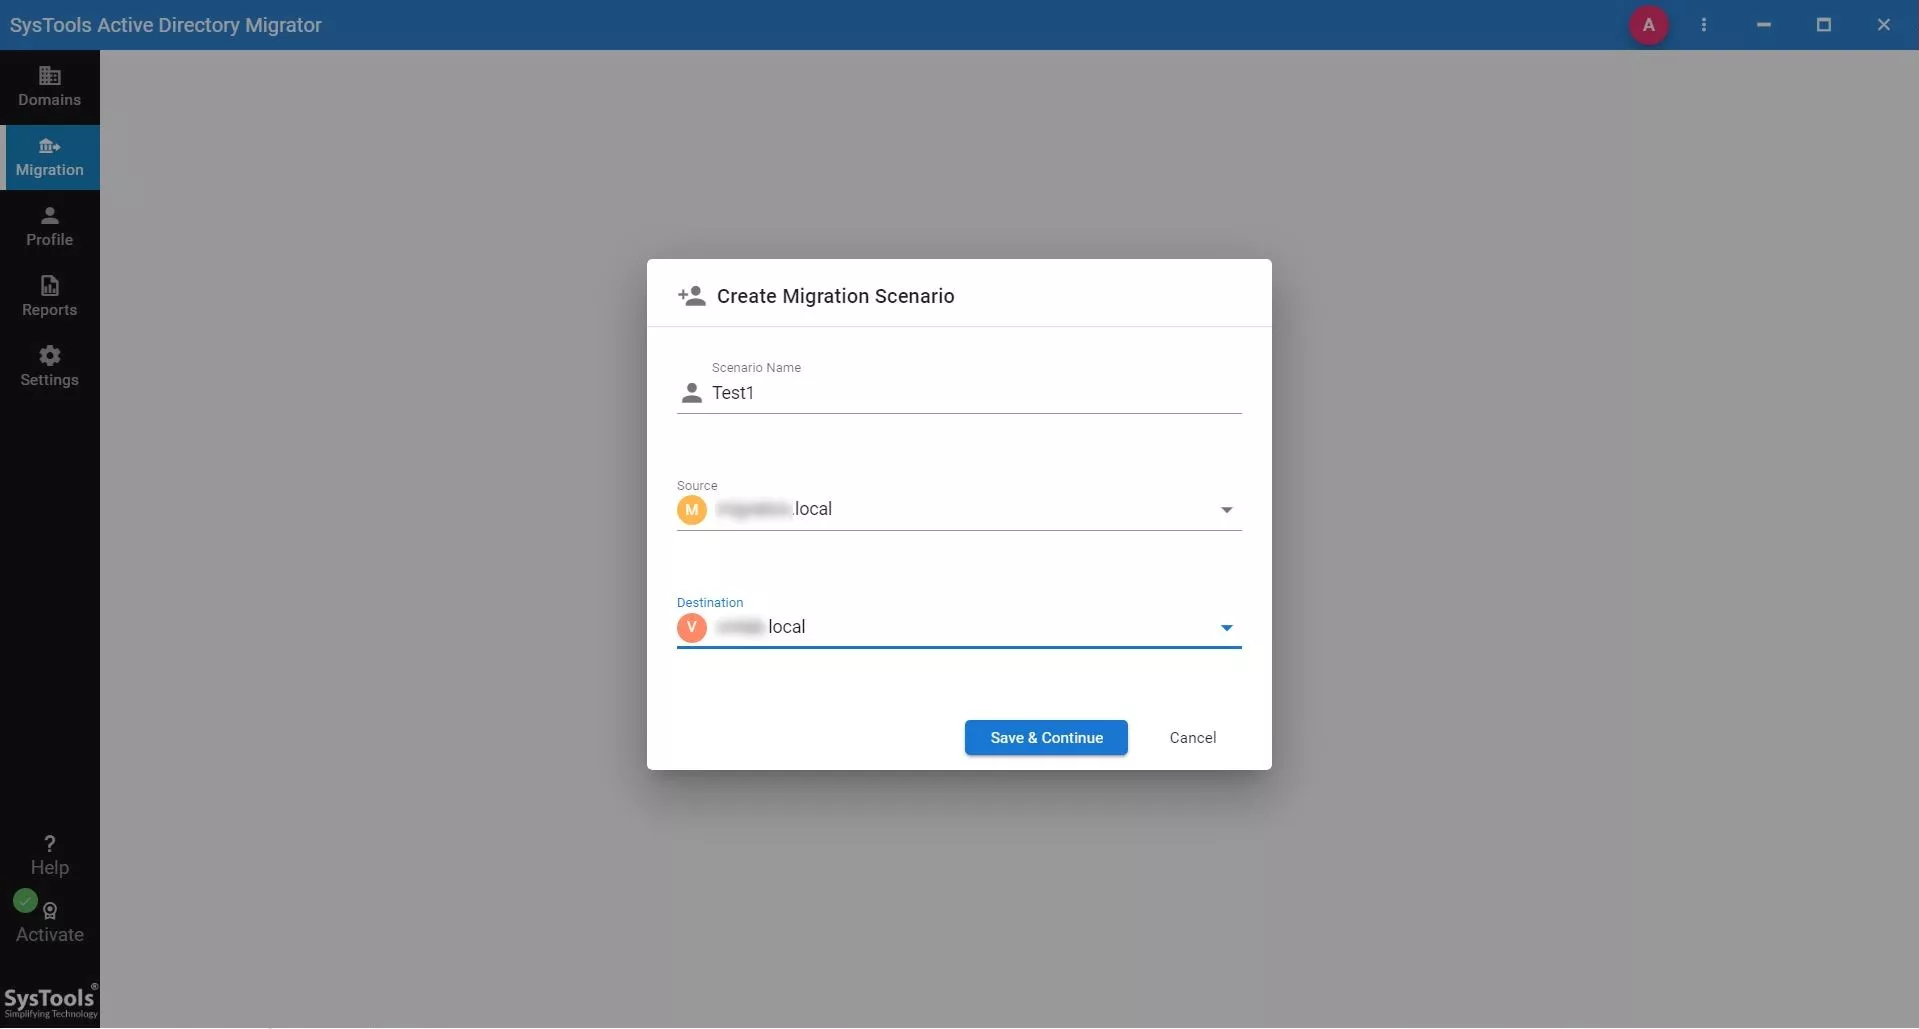
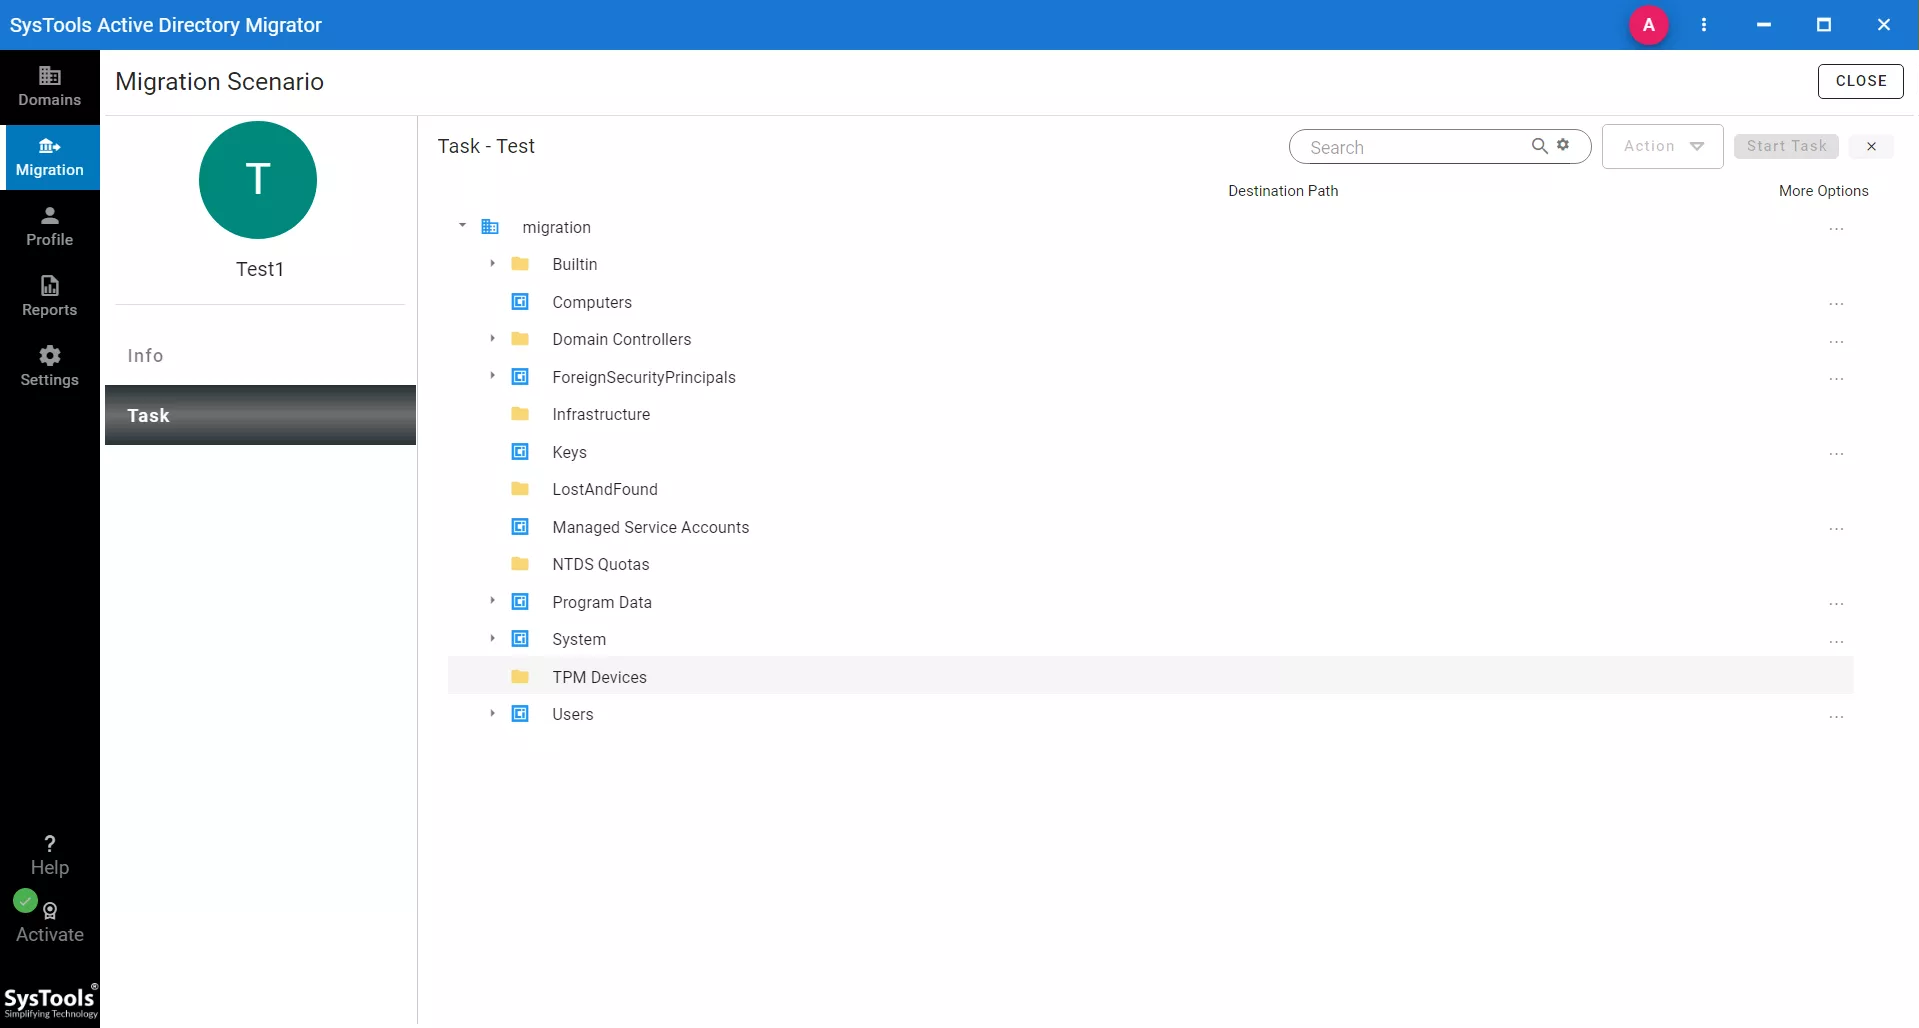
X. Next step is to open the Migration section and click on the Create Migration Scenario.
XI. Here, provide a name and select source and destination domains from the list of all added Active Directory domains.
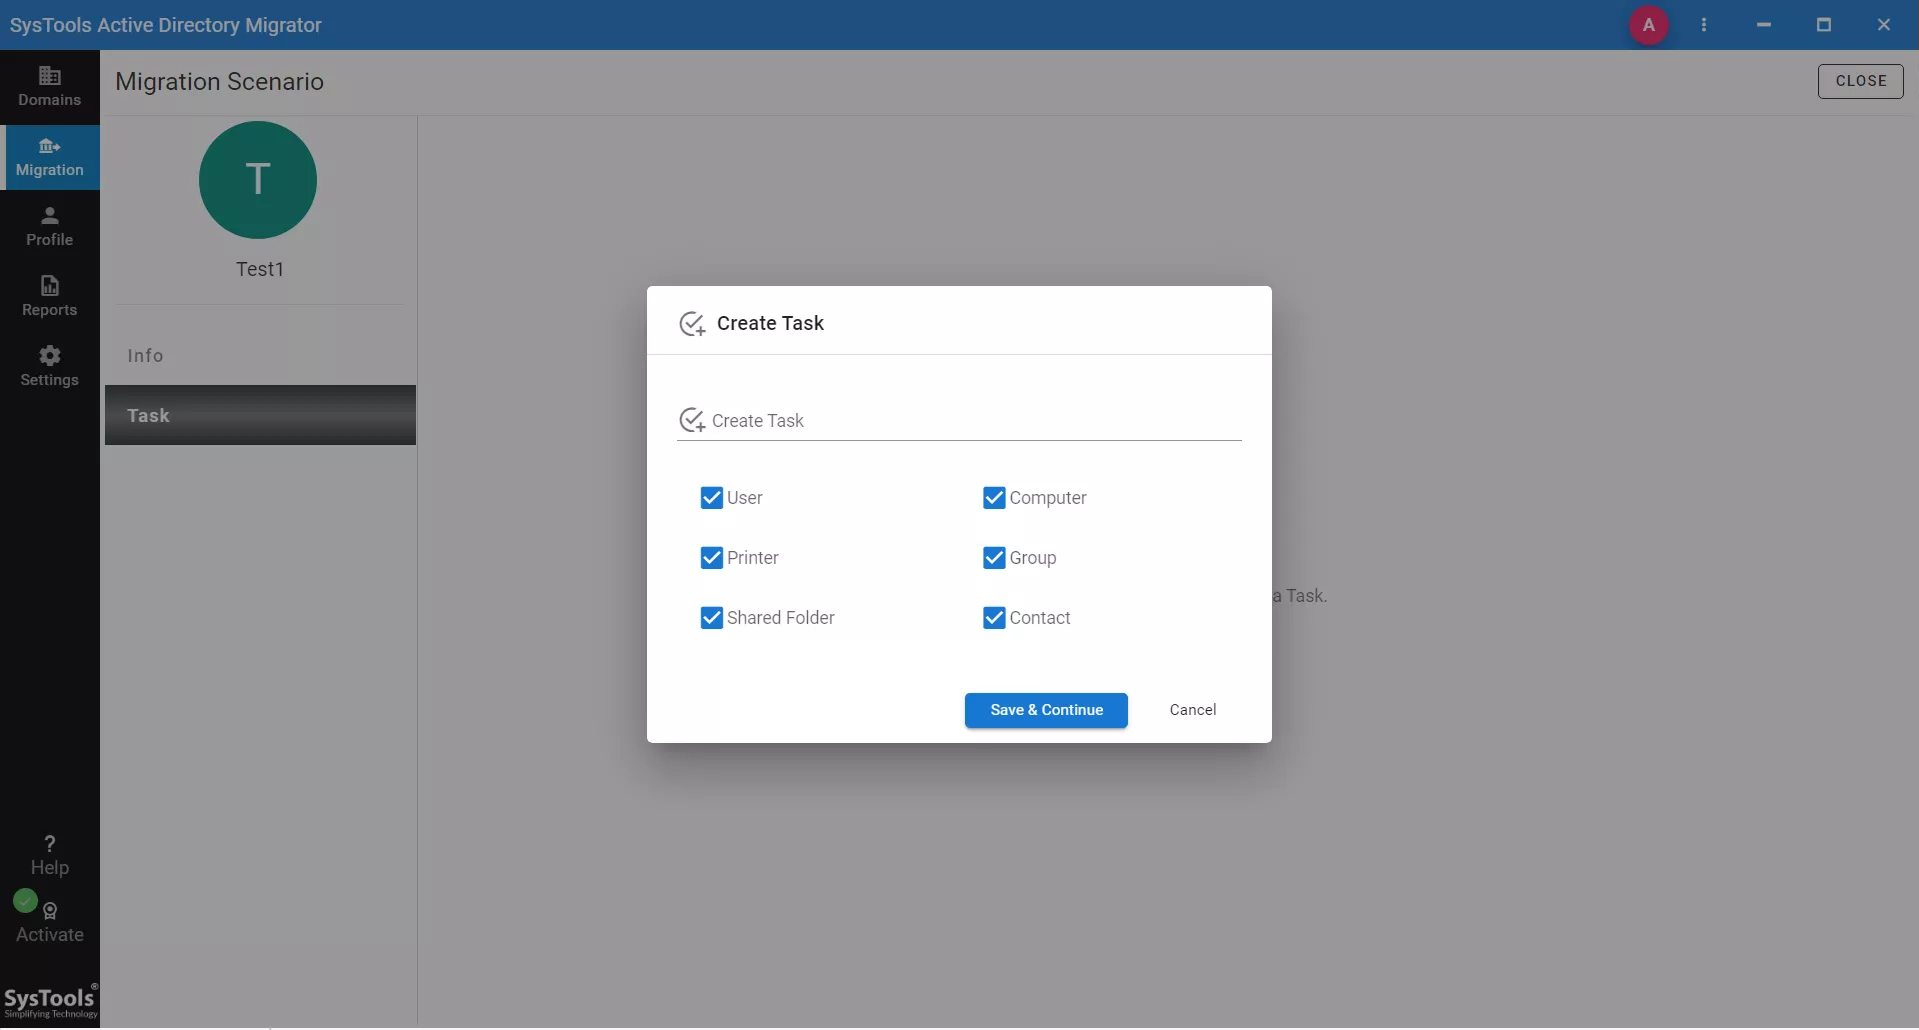
XII. Now, click on Create Task to select the objects you want to migrate from one Active Directory to another.
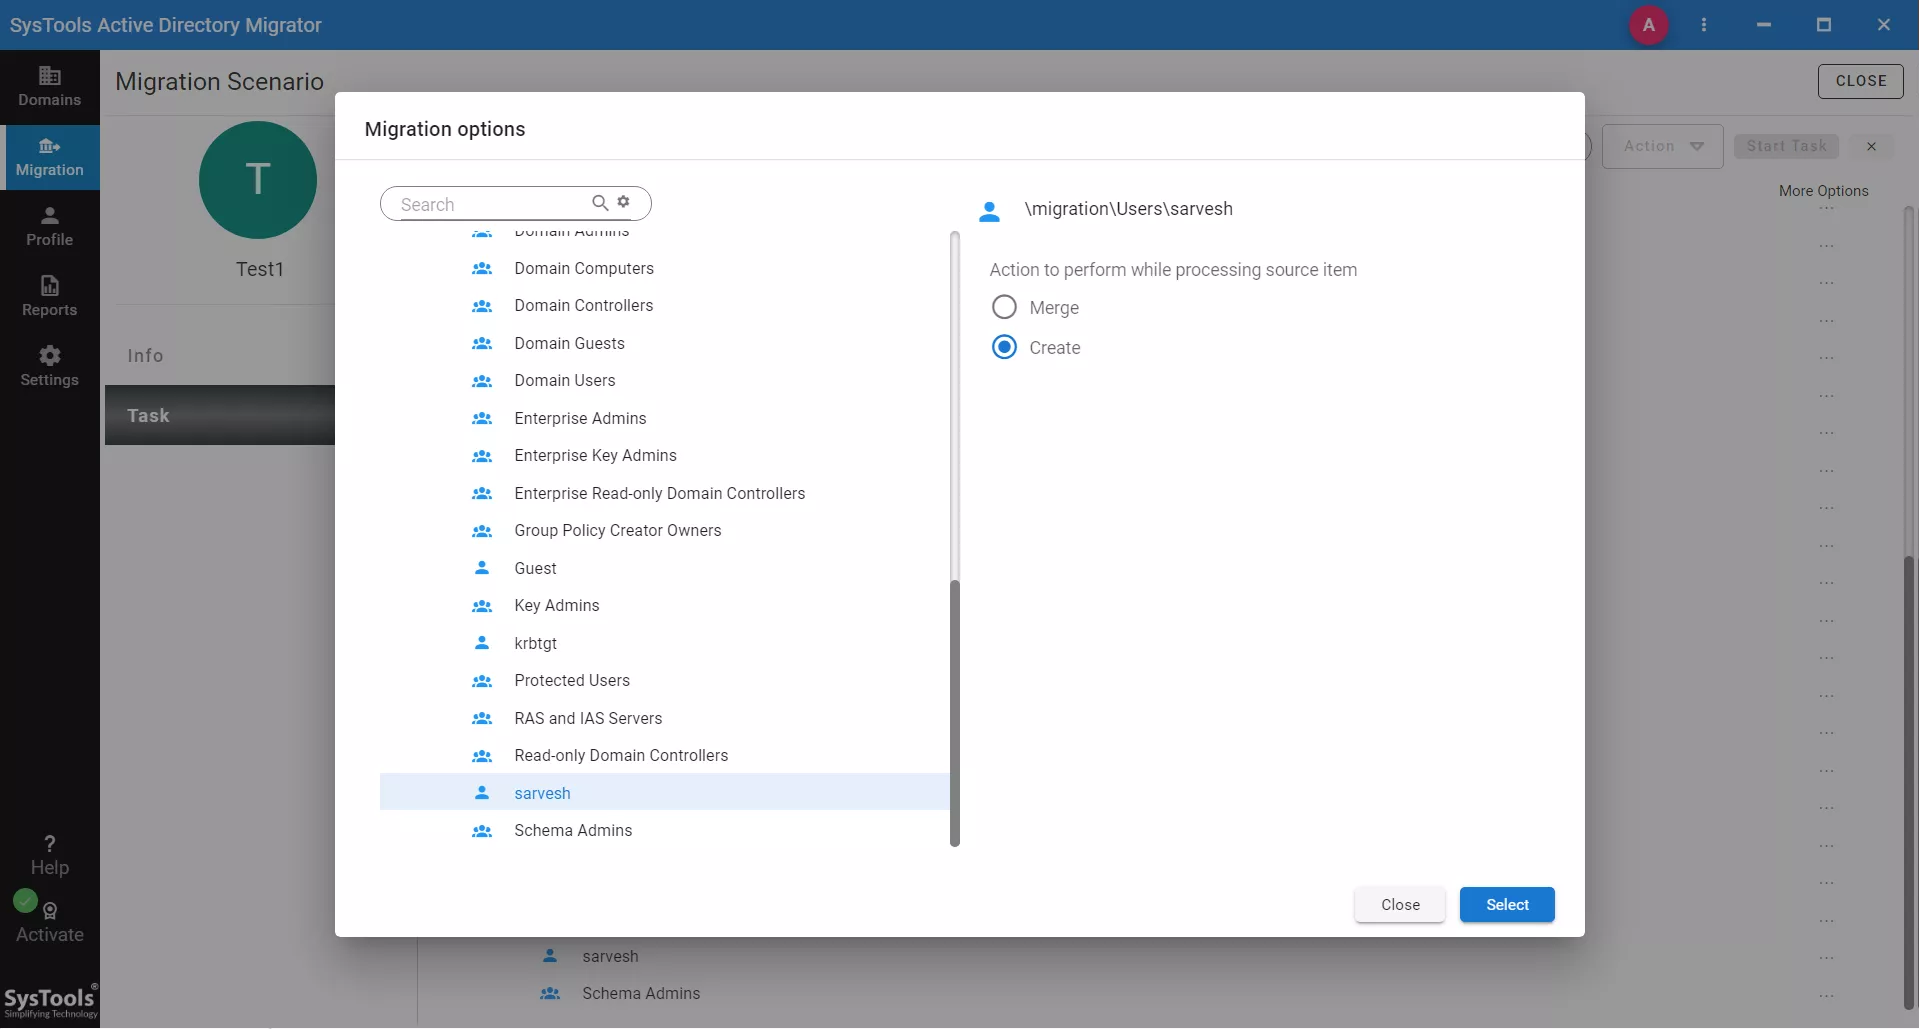
XIII. It is time to map the objects from Source to Destination by clicking on the three dots (…) icons on the right side of the screen.
XIV. In this step, you can choose whether you want to Merge or Create (replicate) the Active Directory data. Then, click on the Select button.
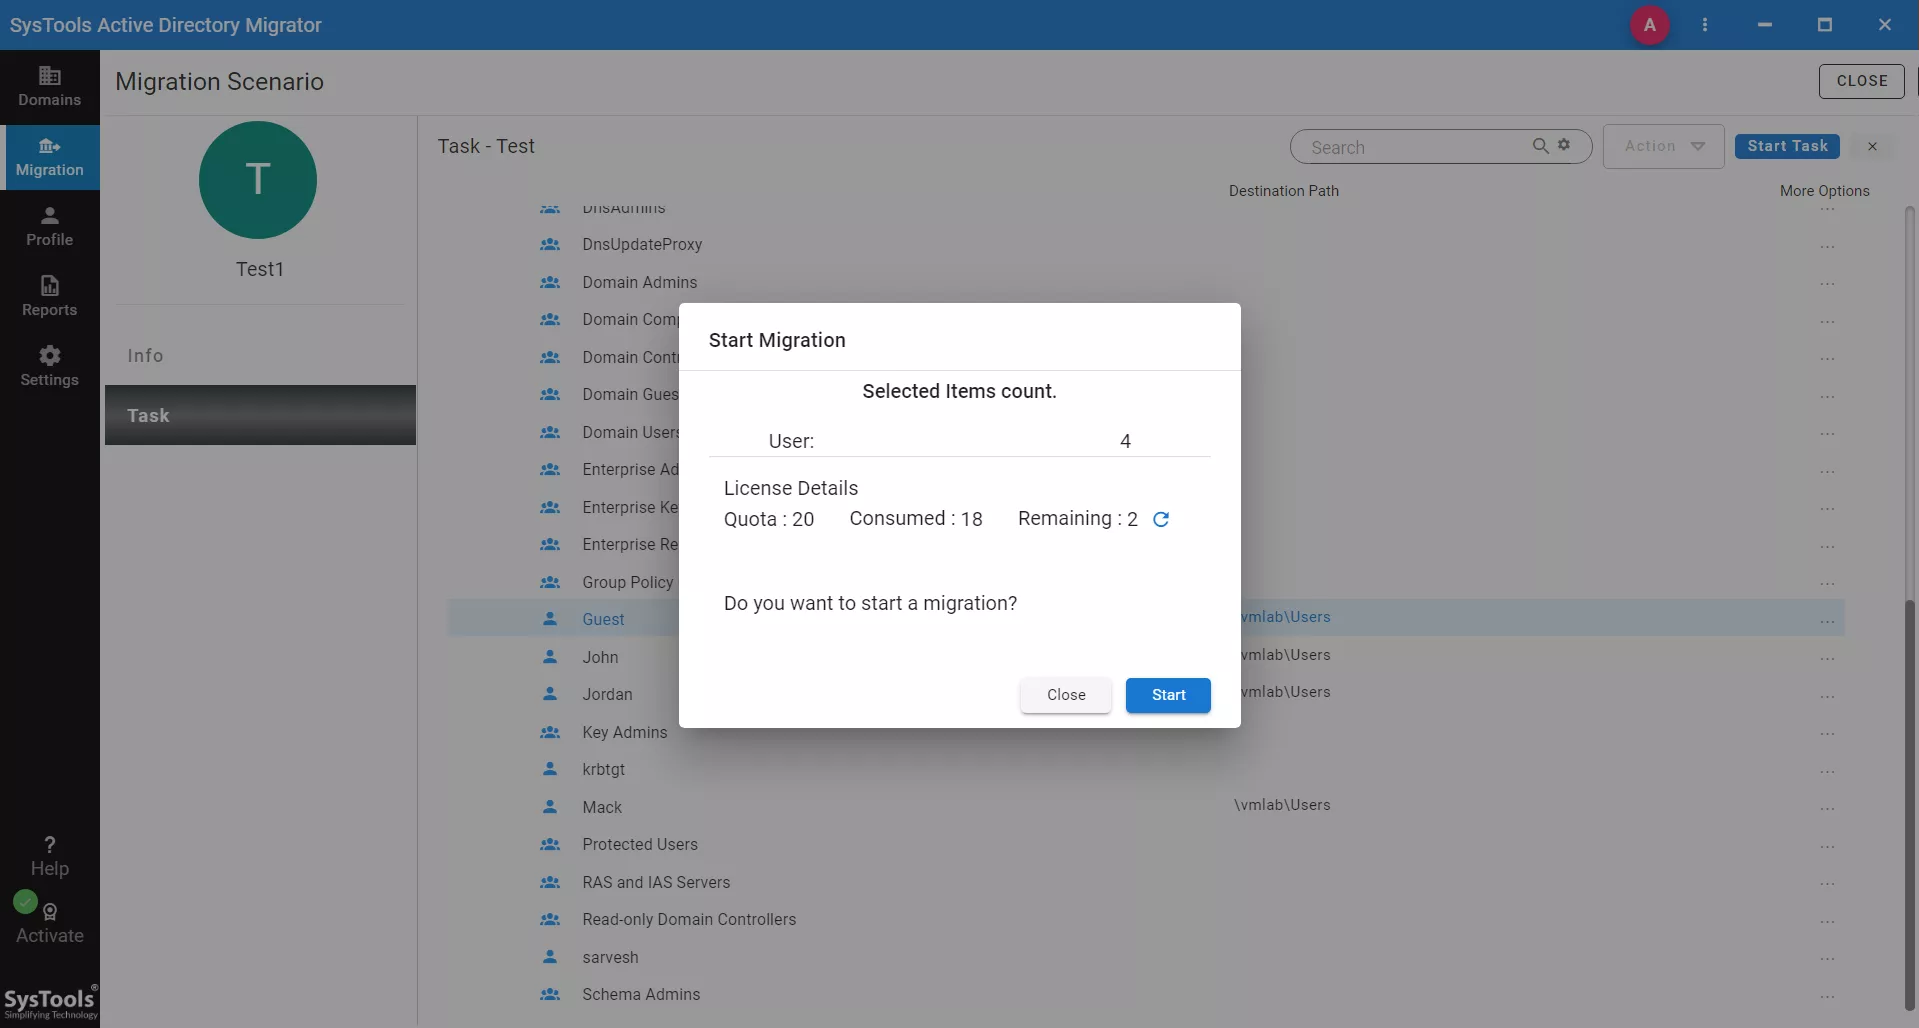
XV. Finally, click Start to transfer Active Directory to another server successfully.
Active Directory & the Need to Migrate it to New Server?
Active Directory (AD) is a network resource management and organization directory service created by Microsoft. It stores information about objects such as users, computers, groups, and network resources. It plays a vital role in ensuring network security, performing access management, and streamlining administrative tasks in a Windows-based environment.
Reasons to Migrate Active Directory to a New Server:
- A growing network often demands a better software infrastructure. After all, you need to handle the growing capacity and performance of the network.
- If the existing server is experiencing performance issues, it is better to move Active Directory to a new server.
- If the existing server is outdated and vulnerable to security issues, then it is best to move it to a new server with up-to-date security features.
- When an organization expands from the early stages, more users, resources, and locations need to be accommodated.
- Other reasons include a disaster recovery plan, restructuring network architecture, and upgrading to a new version of the Windows server.
Conclusion
To transfer Active Directory to another server, you not only need careful planning but also require meticulous execution. This is especially the case if you are using Powershell or other manual techniques. By following the step-by-step guide outlined above, you can ensure a smooth migration with minimal downtime. You can either use Powershell commands to migrate Active Directory or use a professional tool to move the AD objects. The choice is yours.
