Migrate Exchange 2010 to 2016 Seamlessly Using Step-by-Step Guide


Overview: In this article, I am going to cover a detailed explanation of how you can migrate Exchange 2010 to 2016 in a step-by-step process. Not just the migration process, I will also explain the pre-migration steps that you need to complete before the migration to ensure the process is effortless.
As Exchange Server 2010 support ended on October 13, 2020, many organizations have upgraded their Exchange Server to the latest version. Now, there is an option to either migrate to Exchange 2016 or Exchange 2019 as these are the most preferred Exchange Servers by administrators.
There are two ways in which a user can migrate Exchange Server 2010 to 2016 i.e. a manual solution and an automated way. If you haven’t upgraded to the updated Exchange Server and are looking for a straightforward way to migrate Exchange 2010 to 2016, then check out the below steps to same.
5 Easy Steps to Migrate Exchange 2010 to 2016
Follow the below 5 steps to perform the same:
- Step 1. Download Install & Run Software.
- Step 2. Opt Exchange as Source & Destination.
- Step 3. Choose Mailbox Items & Apply Filter.
- Step 4. Enter Exchange Details & Validate.
- Step 5. Finally, Start the Migration Process.
First, let’s discuss the manual way in a step-by-step manner. But before getting into it, there are some of the important steps that you should be aware of.
Pre-requisite & Setup Before Migrating from Exchange 2010 to 2016
You might find these steps a bit lengthy and technical but if you follow the below steps carefully, then you can easily perform this task safely.
- Step 1. Exchange Server Sizing
- Step 2. Fulfill Exchange Server Requirements
- Step 3. Exchange Server Installation
- Step 4. Exchange Server Configuration
- Step 5. Creating Co-existence of Exchange Servers
- Step 6. Exchange 2010 to 2016 Mailbox Migration
Step 1. Exchange Server Sizing
As you are already running Exchange Server 2010, you might have an idea of the performance of the existing server. So, you can consider increasing the RAM, Disk Space, and Processor to ensure smooth working on the new Exchange 2016 Server.
You can also consider reducing or increasing mailbox quotas and ensuring you have enough storage space for mailbox and backup storage.
Furthermore, you can also give thought to separating Exchange logs, Exchange database, and Windows volume.
Step 2. Comply with Exchange Server Requirements
It is necessary to have the right set of resources to set up a new Exchange Server and migrate Exchange 2010 to Exchange 2016.
- Windows Server 2012 onwards
- No less than .Net 4.5.2 (The latest version is recommended)
- Exchange 2010 Server must be updated to SP3 – Update Rollup 11
- Outlook 2010 SP2 with KB2965295 and KB2956191
- Functional AD 2008 or above
Once you fulfill all these requirements, you can now proceed with the Exchange 2016 installation.
Step 3. Exchange Server 2016 Installation
Now download the latest Exchange 2016 version and implement the following steps:
1. First change the directory to the Exchange’s download location.
2. Prepare AD Schema
setup.exe /PrepareSchema /IAcceptExchangeServerLicenseTerms
3. Now update Active Directory with new Exchange objects
setup.exe /PrepareAD /IAcceptExchangeServerLicenseTerms
4. The next step involves domain preparation (You must perform this for all your domains)
setup.exe /PrepareDomain /IAcceptExchangeServerLicenseTerms
Network and directory server requirements for Exchange 2016:
| Component | Requirement |
| Domain Controllers | All forest domain controllers should operate on any one of these Windows Server versions:
|
| Active Directory Forest | The forest’s Active Directory functional level must be Windows Server 2008 R2 or higher |
| Active Directory Site | An Exchange Server installation requires at least one writable domain controller acting as a global catalog server in the Active Directory site. The absence of this will lead to installation failure. Additionally, installing Exchange and subsequently removing the domain controller from the site is not permissible. |
| DNS Namespace Support | Exchange 2016 supports the following domain name system (DNS) namespaces:
For more details on supported DNS namespaces, refer to Microsoft Knowledge Base article 2269838, titled “Microsoft Exchange compatibility with Single Label Domains, Disjoined Namespaces, and Discontiguous Namespaces. |
| IPv6 Support | Pv6 is supported in Exchange 2016 only when IPv4 is installed and enabled. In scenarios where both IPv4 and IPv6 are supported by the network, Exchange servers can communicate with devices, servers, and clients using IPv6 addresses alongside IPv4. For additional information, refer to the article on IPv6 Support in Exchange 2013. |
Once, you fulfill all the above prerequisites, then you can move to the next step.
5. Install Exchange 2016 on this Server
setup.exe /Mode:Install /Roles:Mailbox /IAcceptExchangeServerLicenseTerms
6. Finally, reboot the server.
Another step for Exchange 2010 to 2016 migration is completed here. Now, go through the next section to proceed further.
Step 4. Exchange Server Configuration
1. Now log in to ECP to test that everything is running fine. For this, open a browser and type
https://servername/ECP.
2. Update the Service Connection Point in the Active Directory. Also, ensure that the Server Connection points to your existing autodiscover URL.
Eg. – autodiscover.domain.com/autodiscover/autodiscover.xml
Afterward, we will point this name to the New Exchange 2016 Server.
3. Export your public SSL from the old Exchange Server and Import it into the new Exchange Server.
4. Now restart IIS to apply the new SSL certificate.
iisreset /noforce
5. Open EMS on your machine and run the following script to update all virtual directory URLs. Once all these steps are performed, you can proceed for Exchange 2010 to Exchange 2016 migration.
$Server = “ServerName”
$HTTPS_FQDN = “mail.domain.com”
Get-OWAVirtualDirectory - Server $Server | Set-OWAVirtualDirectory -
InternalURL “https:// $( $HTTPS_FQDN ) /owa” -ExternalURL
“https:// $( $HTTPS_FQDN ) /owa”
Get-ECPVirtualDirectory -Server $Server | Set-ECPVirtualDirectory -
InternalURL “https:// $( $HTTPS_FQDN ) /ecp” -ExternalURL
“https:// $( $HTTPS_FQDN ) /ecp”
Get-OABVirtualDirectory -Server $Server | Set-OABVirtualDirectory -
InternalURL “https:// $( $HTTPS_FQDN ) /oab” -ExternalURL
“https:// $( $HTTPS_FQDN ) /oab”
Get-ActiveSyncVirtualDirectory -Server $Server | Set-
ActiveSyncVirtualDirectory -InternalURL
“https:// $( $HTTPS_FQDN ) /Microsoft-Server-ActiveSync” -ExternalURL
“https:// $( $HTTPS_FQDN ) /Microsoft-Server-ActiveSync”
Get-WebServicesVirtualDirectory -Server $Server | Set-
WebServicesVirtualDirectory -InternalURL
“https:// $( $HTTPS_FQDN ) /EWS/Exchange.asmx” -ExternalURL
“https:// $( $HTTPS_FQDN ) /EWS/Exchange.asmx”
Get-MapiVirtualDirectory -Server $Server | Set-MapiVirtualDirectory -
InternalURL “https:// $( $HTTPS_FQDN ) /mapi” -ExternalURL
https:// $( $HTTPS_FQDN ) /mapi
6. Finally, review the Exchange DB settings and ensure that you create DBs according to the disk configuration and requirements.
Read More – You can also read how to export Exchange mailboxes to PST format.
Step 5. Co-Existence Setup
Now it’s time to link the new server to the old one.
- Point all the external DNS records for emails to the new server and update all firewall rules (if any). (The emails will now flow into the new Exchange Server and then to the old one).
- Remove ExternalURL Value from the previous server.
- Point all the Internal Exchange Records related to emails to the new server.
Migrate Exchange Server 2010 to 2016 Using Exchange Admin Center
Step 1. Launch Exchange Admin Center >> Go to Recipients >> Migration tab.
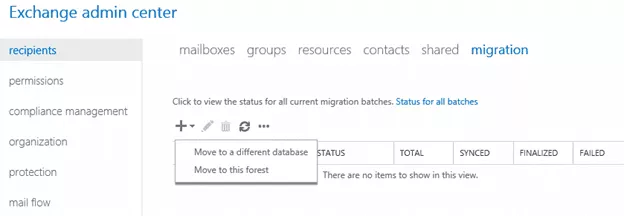
Step 2. Click on the Move to a different database option.
Step 3. Under the New Migration Batch window, choose the “Select the users that you want to move” option or the “Specify the users with a CSV file” option for bulk migration.

Step 4. Click on the Next button after adding all the users.
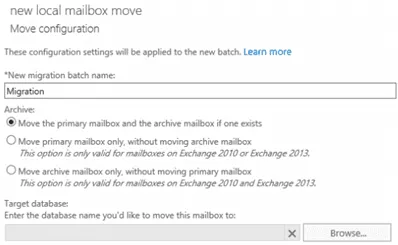
Step 5. Enter a migration batch name.
Step 6. Now, select the “Move the primary mailbox and the archive mailbox if one exists” radio button under the Archive section.
Step 7. Click on the Browse button to select the target database where you want to migrate Exchange 2010 to 2016.
Step 8. Enter the mailbox details to which you want to send the migration details.
Step 9. You can either go with the “Automatically start the batch” option or select the “Automatically complete the migration batch” option to complete the batch.
Step 10. Following that, click on the New button.
Step 11. You can also choose a migration batch manually by selecting the “Manually select the batch later” option.
Step 12. For this, go to the Recipients tab >> Migration tab and then manually select a batch. Afterward, click on the Complete this migration batch option.
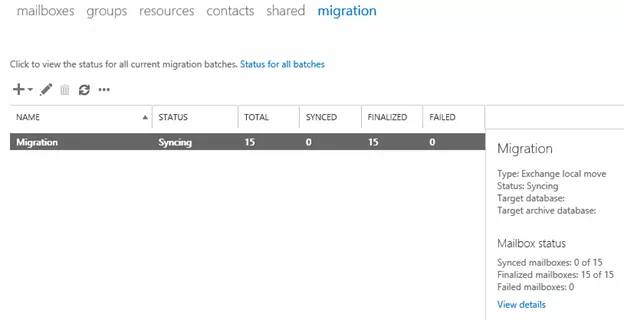
Step 13. You can then open the migration tab to check the migration status by selecting that batch.
After completion of the migration process, it is time to decommission the Exchange 2010 Server. For that, you need to take care of the following points:
- The router is pointing to the new Exchange Server after the Exchange 2010 to Exchange 2016 migration.
- Point the external domain DNS to the new server. (If you have an external IP Address for the server)
- Point scanners and multi-function printers to the new server.
Once you have performed all these actions, you can perform the decommissioning process very smoothly.
Using An Automated Solution to Migrate Exchange Server 2010 to 2016
If you have set up Exchange Server 2016 on your system successfully and need a simple way using which you can perform the migration, then I will suggest you EmailDoctor’s Exchange to Exchange Migration Tool. This advanced solution offers abundant features to make your entire process smooth and error-free.
When I have used this, I just need to log in using the Exchange Server 2010 credentials and choose Exchange Server 2016 as my destination platform. The tool does not require any other details, and also it offers many additional filters and customization options to filter your data before getting into the migration process.
Some of the Note-worthy Features of Software:
- Migrates email, contacts, and calendars to any Exchange version after 2010
- Allows you to migrate between Exchange Servers maintaining data integrity and hierarchy effortlessly.
- Offers bulk migration capabilities for multiple mailboxes to migrate simultaneously.
- Provides a date and category filter for selective data migration for granular control over transferred data.
- Provision to prioritize user accounts to undergo migration first over others.
- Comes with a user-friendly interface suitable for various levels of technical expertise.
- Using this software you can also Migrate Exchange 2016 to 2019 and perform Exchange 2013 to 2019 migration.
- Generates post-migration reports for detailed status and troubleshooting.
Likewise, there are many useful features to make your job effortless. Additionally, the software comes with a demo version that will let you try all the features for free.
Step By Step Software Guide to Migrate Exchange 2010 to 2016 – Best Way
Step 1. Download, install, and launch the software on your computer. On the main software screen, opt for the migration platform. Select Exchange as both the source and destination platforms.

Step 2. Moving on to workload selection, pick the necessary mailbox items and apply filters to facilitate selective data transfer.

Step 3. Progressing to the next phase, choose the appropriate Exchange Server version from the drop-down menu. Fill in all essential details. Click the “validate” button to confirm necessary permissions and then proceed by clicking “Next.”

Step 4. On the destination tab, provide the required details and validate the information by clicking the appropriate button. Proceed by clicking “Next.”

Step 5. Integrate users by creating a mapping between the source Exchange 2010 and Exchange 2016.

Step 6. Finally, select the desired user accounts and initiate the migration process by clicking the “start” button.

Conclusion
Migrating an Exchange Server from 2010 to 2016 can be quite difficult to perform. It becomes more challenging especially if the Exchange database that you are migrating is damaged or has some issues with it. However, with detailed pre-planning and complete execution, you can overcome this with flying colors.
To help you achieve this I have mentioned all the important insights of this migration project in this detailed guide that will help you migrate Exchange 2010 to 2016 in a hassle-free manner. You can follow this step-by-step process and complete the migration process with 100% precision.
Commonly Asked Queries
Q. Is this aforementioned utility free to use or does it need a license to perform migration?
A. The tool to migrate Exchange 2010 to 2016 is not free to use but offers a free trial version. If you want to try the demo version of this utility before purchasing the licensed version, then you can download and try the software for free. This software will help you migrate 2 user accounts for free. Additionally, you can also test all the features offered in this utility.
Q. Are there any chances of data deletion or modification during the migration process?
A. No, the advanced algorithms used in this software ensure that no changes are made to the data. Thus, you can rely on this application if you are planning to migrate from Exchange 2010 to 2016.
