Best Practices to Import MBOX to Office 365


Know how to import MBOX to Office 365 using 2 free manual methods. Follow these manual Guide to know more.
Cloud is the future. It is powerful, cost-effective, and will continue to grow in the future. Whether it’s enterprise or self-employed individuals, everyone is more or less shifting to cloud applications to better manage their work.
The same holds for desktop-based email client users. Many have already shifted their mailboxes to cloud applications like Microsoft 365 and many are on the way. After all, it is centralized, more productive and it allows them to work anytime, anywhere. In this article, we are focusing on specific user groups who wish to import MBOX file to Office 365 accounts.
Process MBOX Files of All Origins
- Associated with email clients like Mozilla Thunderbird, Entourage, etc.
- Downloaded from email apps like Gmail.
- Backup files created through Backupify, MozBackup, etc.
- Old archive mailboxes of different types – .mbox, .mbx, .mbs, MBOX without extension.
Regardless of its origin, as long as you have a healthy MBOX file, you can easily upload it to Microsoft 365 after reading this article. First let us know the need to import MBOX files into Office 365 Migration.
Why to Import MBOX to Office 365?
There would be many reasons why you want to Import MBOX files into Office 365 as this provides a vast range of additional features and services like office 365 Exchange as compared to other email clients applications. It includes enhanced security, prevents Data loss and improved collaboration with other applications.
Secondly, importing MBOX files into Office 365 migration allows you to consolidate all your email accounts in one place. This makes it easier to manage all your emails and ensures that you never miss your important messages or emails related to your work.
Discover Office 365: Features Overview
As I told you before Cloud is the future. It’s features are the reasons that other email services don’t think of. So, to know how to import MBOX to Office 365? You need to know the Listed below cloud (office 365) features:
- Office 365 includes Office Exchange online which provides email hosting features like any customization of domain, shared calendars, and provides support for mobile devices.
- As it is the primary feature of Cloud, Using office 365 users can access their emails from anywhere without having any internet connections.
- There is no Downtime as Being a cloud service, Office 365 remains always up to date. Hence, you don’t have any need to go through the server downtime to update your apps.
- Definitely Microsoft is a leading tech giant across the globe and Microsoft does provide support for Office 365 users in case they face any issues regarding Office 365.
- As said before, it’s a cloud service and always auto-updated, so you’ve no need to spend money on its maintenance and upgrades.
So these are a few features that I think are the primary reasons to import MBOX to Office 365 or any other email client to Office 365 migration. I have given the MBOX file as the example which is supported and used by several email clients applications.
Without further ado, let us start with the manual solution to help you understand with this article:
Free Solution to Upload MBOX to Office 365 – Method 1
The manual solution to import MBOX file to Office 365 is divided into three different segments. At first, we will set up the Office 365 Account in a desktop mail client. After that, we will use the free Add-on to complete the process.
In case, if you don’t want to complete the process manually, then you can directly jump to the automated solution section. It is a more secure & convenient way to import MBOX to Office 365. So, let’s begin the solution with a manual approach.
Step #1. Setup Office 365 in MBOX Compatible Mail Application
- Firstly, download the Thunderbird email client.
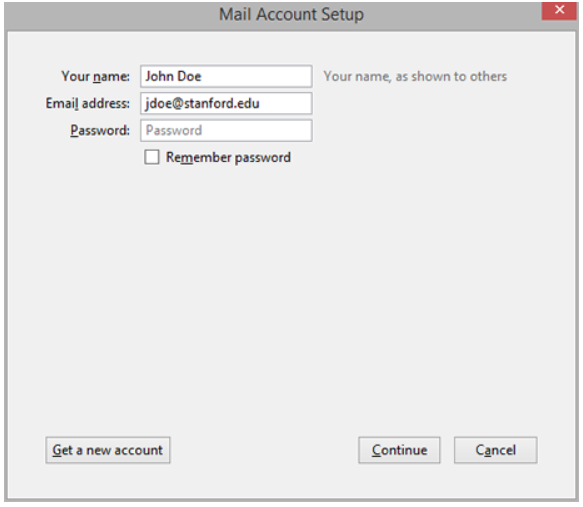
- On setup select the skip option and use the existing email.
- Now, enter the Office 365 account details in the Account Setup Wizard.
- Afterwards, click on Configure Manually and enter details.
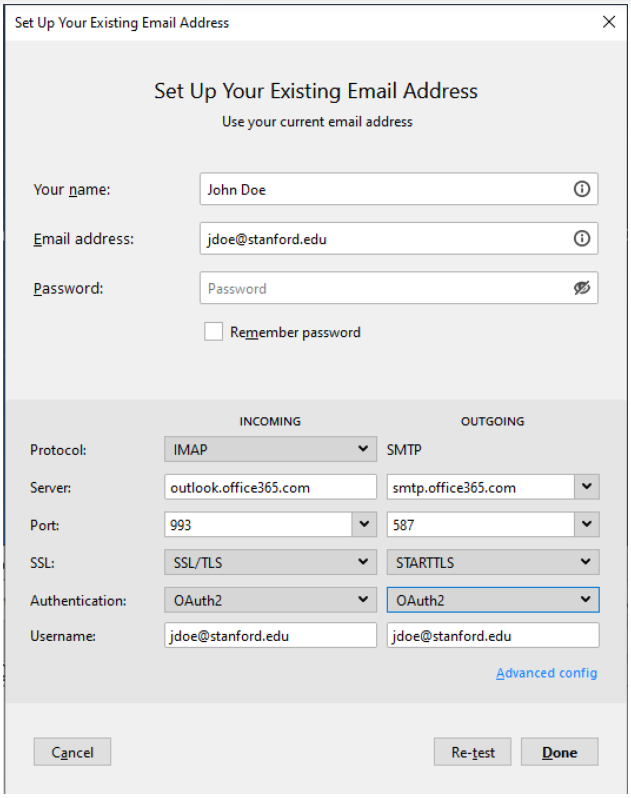
- At last, Click Done and Authenticate your account.
Now, let’s head to the second stage of manual solution to import MBOX to Office 365.
Step #2. Import MBOX File to Mail Client
- Run Thunderbird, and tap the Alt key.
- After that, go to the Tools menu and select Add-ons
- Search for ImportExportTools in the search bar.
- Click on the +Add button >> Add the ImportExportTools NG.

- Then, restart the email client.
- Right-click on Local Folders >> ImportExportTools NG >> Import MBOX File.
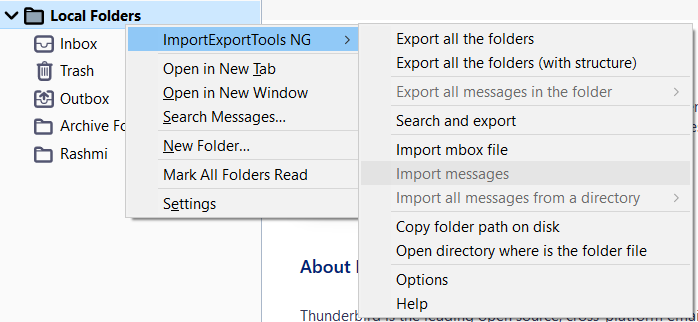
- After that, click OK and select the MBOX file you want to import in Microsoft 365, then click Open.
- At last, the file is added and emails are available in the email client.
Step #3. Copy & Import MBOX File to Office 365
- Select all the MBOX emails (Ctrl+A) and right-click.
- Choose Copy to >> Office 365 account.
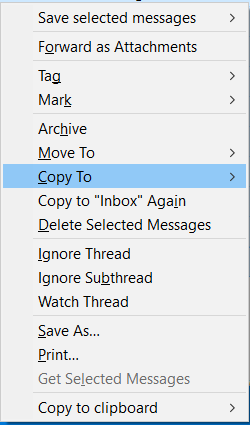
- This will copy all the emails from MBOX to the Office 365 mailbox.
- Now, Check the Microsoft 365 account on a browser to confirm that all the files are there.
Open Solutions to Import MBOX to Office 365 – Method 2
- Export MBOX to EML Files
Connect your MBOX-based email client to Outlook and export the mailbox contents as EML files.
- Connect MBOX client to Outlook: Establish a connection between your MBOX client and Outlook. This may go to the configuring process to connect MBOX server to outlook or by using any import tool.
- Export mailbox contents as EML files: Using the export feature in your MBOX email client, export the entire mailbox contents or particular folders as individual EML files. These are standard email file formats that can be easily imported into various email clients, including Outlook.
- Import EML Files into Outlook
Open Outlook and drag and drop the individual EML files into your desired location.
- Launch the MS Outlook desktop application into your application.
- Create a new folder in Outlook.
- Select your Exported EML files and drop them in the new folder which you have created.
- Convert EML Files to PST
To convert the EML files into a single PST file you can use the Import/Export Wizard in Outlook
- Upload your PST file to Office 365
Connect your Office 365 account to Outlook and import the PST file into your mailbox.
Manually migrating MBOX files to Office 365 is a multi-step process that involves exporting MBOX files to EML format, importing EML files into Outlook, converting EML files to PST format, and now uploading your converted PST file into your Office 365.
Limitations of using Manual Method
- It required multiple steps for configuration which makes it complex and time-consuming.
- It’s not applicable for large MBOX files due to its limitation for handling large data volumes.
- It may not be scalable for large-scale migration to import MBOX to office 365 containing large amounts of data.
Concluding Thoughts
Microsoft 365 is the new trend. As said Cloud is the future, users will prefer to go to this platform which benefits the users. And if confirmed, the task to import MBOX to Office 365 becomes an important one. We have 2 manual methods here to get you through this process in a seamless manner. If you want any other solution then you can opt for EmailDoctor MBOX to Office 365 Migrator tool which will efficiently import your MBOX file in bulk to office 365 platform.
FAQ ( Frequently Asked Questions)
Q) Can I directly import MBOX files to Office 365?
Unluckily no. Office 365 doesn’t natively support MBOX file import. You’ll need to convert the MBOX files to a compatible format like PST or use a dedicated migration tool.
Q) Which is the best way to migrate MBOX to Office 365?
Both manual methods (EML conversion and PST import) and dedicated tools like SysTools MBOX to Office 365 Migrator have their pros and cons. Manual methods are free but time-consuming and prone to errors, while tools are faster and more user-friendly but sometimes have costs associated.
Q) Can I Import multiple MBOX files at once?
Yes, several tools and also the manual method with EML files allow batch migration process. This saves time and simplifies the process, especially for large mailboxes.
