How to Import Contacts from Outlook into iPhone?


Do you want to import contacts from Outlook into iPhone 15, 14, 13, 11, 10, 8, 7, 6? Here in this blog, we will explain the safe and secure solutions to import Outlook contacts to iPhone without losing any information.
If you use your Outlook Address Book a lot, then the thought of importing contacts into your iPhone might be overwhelming for you. Because that’s not as easy as it seems to be. Moreover, you can’t spend several hours retyping all your contact information into an Outlook contact list.
Therefore, here is an easy solution to fix how to transfer Outlook contact file to iPhone query. The solution given here is completely safe, and it is highly recommended to follow the guidelines carefully to avoid any kind of data loss or contact field mismatching issues.
Why Do Users Want to Import Outlook Contacts to iPhone?
- Moving Outlook file contact to the iPhone creates a unified communication platform.
- The integration allows you to create emails quickly and without errors by transferring contacts directly from Outlook.
- Having Outlook contacts on your iPhone allows you to quickly access important contact information, increasing your productivity.
- Importing file contacts improves security by providing access even if Outlook data is not available.
- Allows consumers to access contact information across multiple devices and platforms.
- Improve your event and contact management by syncing your contacts with your iPhone calendar.
- Enables seamless work communication, especially in professional environments where Outlook is used frequently.
- Ideal for those who change devices frequently, allowing you to access your contacts anywhere, anytime.
Related Blog: Import Outlook Contacts to Salesforce
Import Contacts from Outlook into iPhone — Manual Method
Since there’s no direct option to import / export Outlook contacts to an iPhone, the complete process is categorized into 3 major steps:
Step 1: Export Contacts from Outlook
Exporting your contacts from Outlook saves a copy of your contacts as a CSV file or other file type. You can use this file to transfer your contacts into another email account.
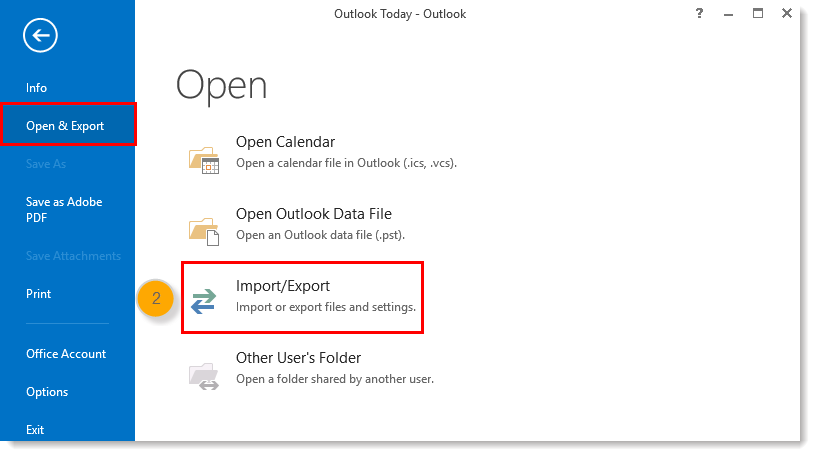
- In Outlook on your PC, choose File Tab.

- Select Open & Export > Import/Export.
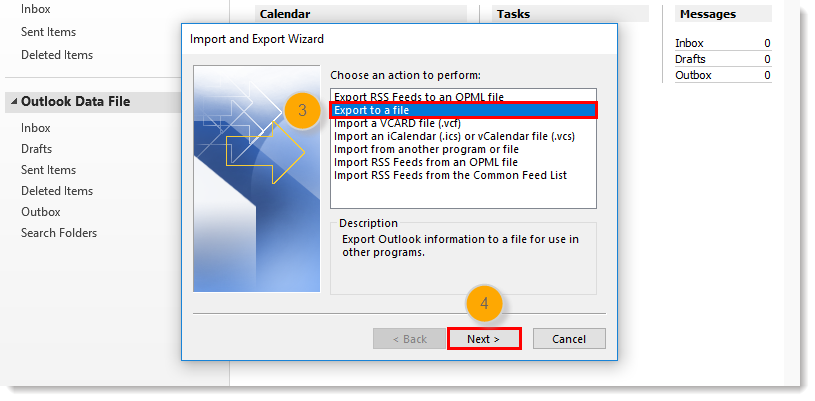
- Choose Export to a File Option.
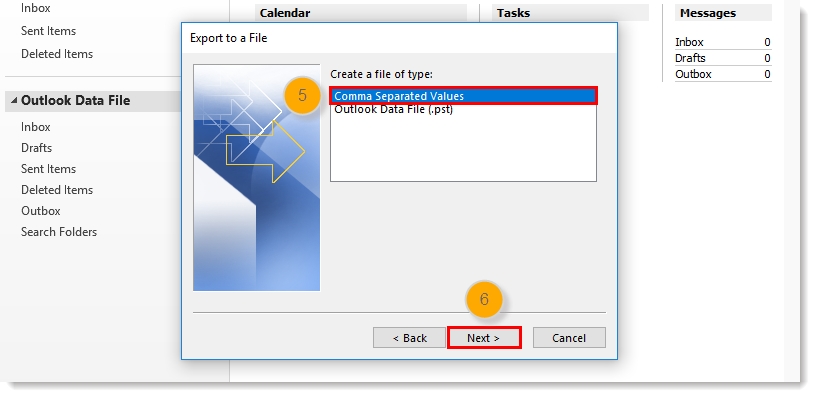
- Pick the comma values separated.
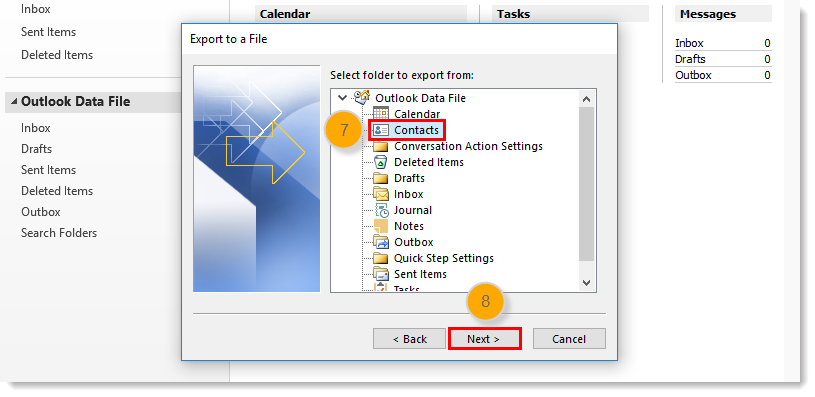
- In the Choose folder to export box, scroll to the top if necessary and click your Contacts folder. Select Next.
- Select Browse, name the file, and click on Next.
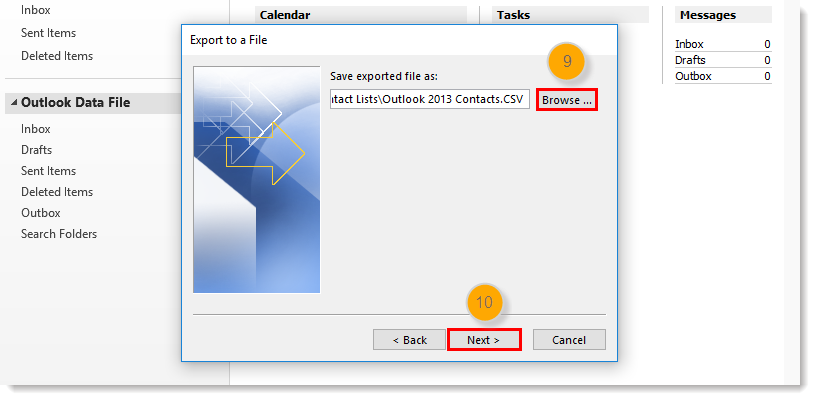
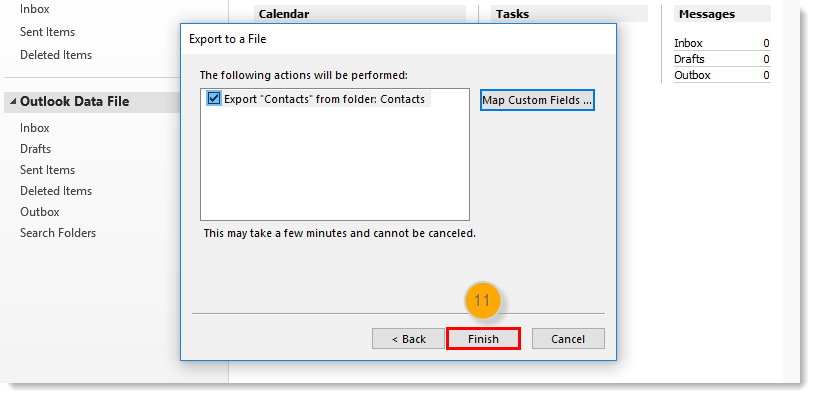
- Select the Finish button to start exporting your contacts immediately.
Now, add a CSV file to Gmail and then move contacts to your iPhone from Gmail. Below is how to transfer CSV contacts to iPhone.
Step 2: Import Output CSV File to iPhone
- Open the browser and sign in to Google.
- Click the https://contacts.google.com/
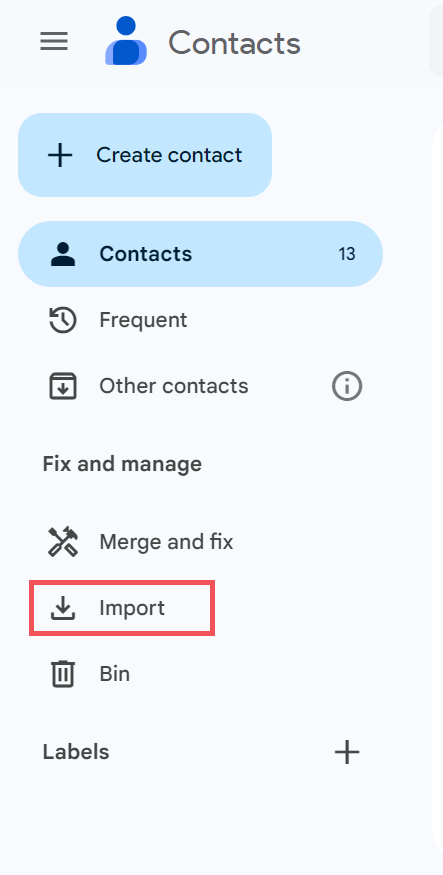
- On the left, click on the Import option.
- Select the File to upload a CSV file containing the contacts that you want to add to your iPhone.
- The move contact file dialog showing the choose file button.
- Now the CSV contacts are transferred, automatically labeled with the import date.
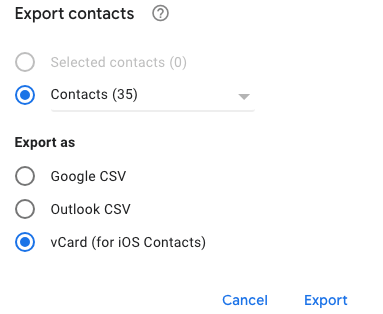
- Press the Export tab in the top right corner. Select the dropdown list and choose the contacts with the right label.
- Under the Export as section, select vCard (for iOS Contacts). Click Export.
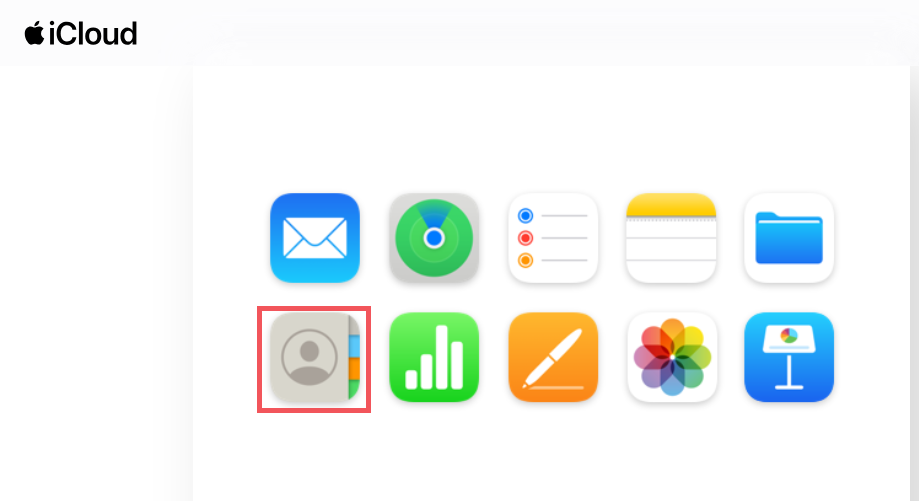
- Go to https://www.icloud.com/. Sign in to it.
- Click Contacts.
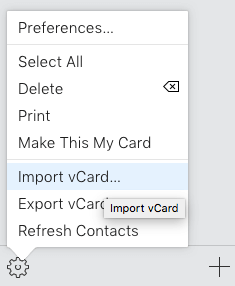
- Click the settings icon in the corner and choose Import vCard file option.
- Sync iCloud file contacts to iPhone.
Method 2: Add Outlook Contacts to iPhone via Exchange
This method is only available if your iPhone is connected to an internal corporate network. Follow these steps to learn how to add Outlook file contact on an iPhone:
- Open the Settings app on your iPhone or iPad.
- Click Contacts and then Accounts.
- Press the Add Account”. Select Outlook.com from there.
- If you have an Outlook account, tap it and turn on Contacts.
- Sign in using your Outlook account name and password.
- Remove content to the Enabled position. Click the Save icon.
- You can also go to Settings app > Accounts & Passwords > Add Account > Outlook.com > Sign In > Enable Contacts > Save.
Manual techniques are best, but many steps make this way lengthy and very time-consuming. Also, users can lose their contacts while moving the expert solution.
Automatic Solution to Import Contacts from Outlook into iPhone
vCard Export Tool software allows you to easily export Outlook contacts to vCard VCF without any technical knowledge. It not only performs the entire task efficiently but also ensures maximum data security throughout the entire export process. The tool is also fully compatible with all versions of the Windows operating system, be it the latest Windows 11 or any other older version.
Now, you have successfully exported the Outlook contacts file to vCard format. As you can see, all the steps are very simple and quick, so even a novice user will be able to perform them. After that, we can easily transfer the exported vCard file to the iPhone. Moreover, with this application, you can easily export contacts from Outlook to Gmail without losing your contact details.
Step-by-step Guide to Exporting Contacts from Outlook to iPhone
To this process, first, you can convert Outlook contacts to iPhone supported format vCard file; after that, move the vCard contacts file to the iPhone.
- Download the Outlook to VCF Import tool.
- Select the Outlook data file.
- Next, preview all contact details.
- Now, choose the vCard Option.
- Start the conversion process from Outlook contact to vCard.
- Finally, move the output vCard file contact into the iPhone and complete this task.
Final Words
The day-by-day increasing craze of iPhone emerging queries like how to import contacts from Outlook into iPhone. Also, today everyone wants their crucial data at their fingertips. Hence, in this tutorial, we have talked about a simple and efficient approach to transferring Outlook contacts to an iPhone. The solution is safe, easy, and non-tech-savvy people can also implement it.
FAQs
Q: Can I transfer Outlook contacts to iPhone 11?
Yes, you can transfer contacts from Outlook to iPhone by following the above solutions.
Q: Does the program support syncing contacts from Outlook to iPhone without restrictions?
Yes, the tool does not impose any restrictions when exporting Outlook contacts to an iPhone.
Q: Where are Outlook sync settings located?
- Open Outlook.
- Select Settings >> View all Outlook settings.
- Select the “Mail” option.
- Click “Sync Email” in the center pane.
- Select Yes for POP and IMAP.
- Click on the “Don’t allow…” option.
- Finally, tap the “Save” icon.
