How to Backup Shared Mailbox in Office 365? [Explained]


This write-up focuses on the queries asked by Office 365 users i.e. “How to backup shared mailbox in Office 365?“
Follow the steps illustrated to execute this complex task without errors or data loss.
Table of Content
“User Query: I need to backup some shared mailboxes in Office 365, I am trying to export Office 365 mailbox to PST using the eDiscovery method. But it’s frustrating as the eDiscovery Export tool is not responding and freezes at the last minute. So, I am in search of the best possible solution as I have multiple shared mailboxes to back up. Please suggest any alternative to this method. Thanks.”
5 Steps to Backup Shared Mailbox in Office 365
- Step 1. Download & Run the Tool on Computer.
- Step 2. Choose Office 365 & Outlook Platforms.
- Step 3. Select Required Mail Items & Apply Date Filter.
- Step 4. Set Destination & Choose User Accounts.
- Step 5. Validate Permissions & Click on Start Button.
Scenario
A shared mailbox in Office 365 is a crucial feature offered by Microsoft, it allows admins to provide multiple user access to a particular mailbox. Furthermore, it helps improve collaboration, productivity, and efficiency for organizations of all sizes. Additionally, it also provides greater flexibility and control over email management and access.
Some of the Benefits of Shared Mailbox
- Collaborative email management
- Centralized mailbox access
- Reduced licensing and overall costs
- Simplified email routing and forwarding
- Enhanced security and compliance
Being a crucial part of the Office 365 suite, it becomes equally important to backup shared mailbox in Office 365 along with the other user mailboxes. Let’s discuss the different ways that can be used to perform this task efficiently.
Approach #1 Using eDiscovery to Backup Shared Mailbox Office 365
eDiscovery or Electronic discovery is the process where you can identify and deliver electronically stored information. Further, it can be used as evidence in legal cases.
Furthermore, it allows users to search mailboxes in the eDiscovery search, and then export the same to their local system. Let’s have a brief discussion regarding the same.
Manual Way on – How to Backup Shared Mailbox in Office 365?
Step 1. Use your Office 365 admin credentials to log in. Navigate to the Microsoft 365 Admin Center portal.
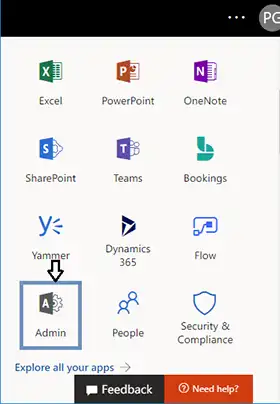
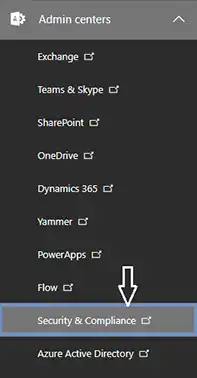
Step 2. Now, from the left pane, navigate to the bottom and click on Admin Centers. Then hit the Security and Compliance option.
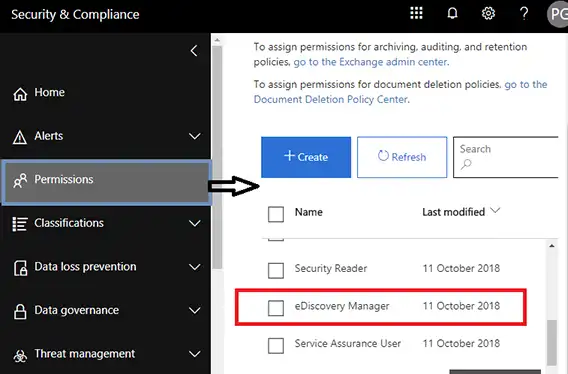
Step 3. From the Security and Compliance drop-down, click on Permissions and navigate to eDiscovery Manager.
Step 4. Click on the checkbox beside eDiscovery Manager, and hit the Edit icon to add the necessary roles that are required for the Discovery Management group.
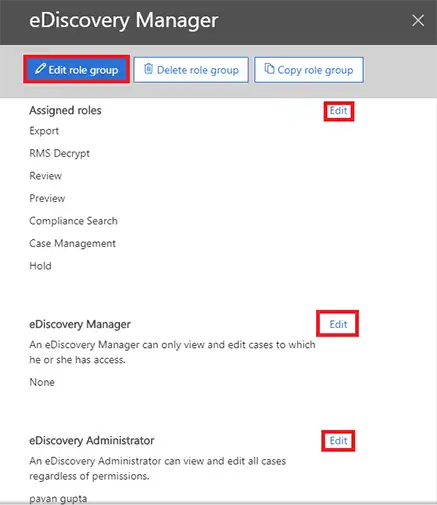
Step 5. By default, the role group is given to the following roles i.e., Case Management, Compliance Search, Export, Hold, Preview, Review, and RMS Decrypt.
Step 6. In case, the Export role is missing, then you can click on the Edit role group and add the same to backup shared mailbox Office 365.
Step 7. Then, again go back to the ‘Security and Compliance’ section. Find the More Resources section. Then, on the Microsoft Purview Compliance Portal click on Content Search >> the New Search option.
Note: If you don’t find the ‘Content Search’ option, then check the eDiscovery permissions. You must have the permissions, so, set the required eDiscovery permissions before the process. Also, be informed that it usually takes up to 24 hours for the changes made to the eDiscovery permissions to reflect.
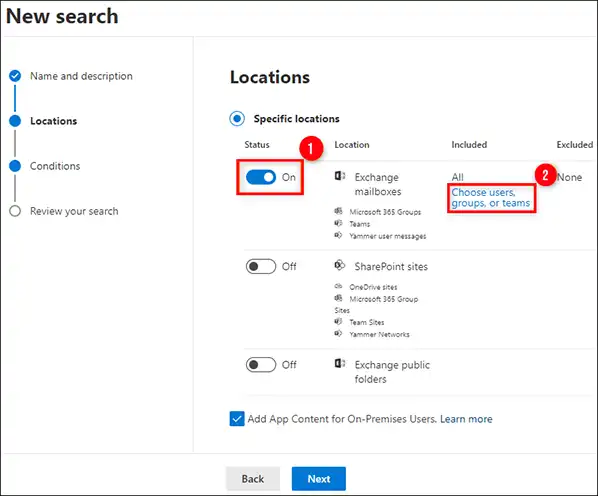
Step 8. The moment you click on New Search, you will see a new window. Here, you can find all the options to customize all elements of content search. For instance, you can specify the Name & description of the search and location of the mailbox that you want to export.
Note: You can enable the SharePoint and Exchange Public options under the Locations section. It’s easy to do so however, the entire search process is going to take a little longer to complete.
Step 9. Next comes the Conditions section. Here, you can apply different filters such as query language/ region, and keywords/phrases. By doing this, you can make the conditions more specific.
Note: Though the Conditions section is optional, in case you don’t want to skip any data from the mailbox then avoid applying any filters.
Step 10. Once you are satisfied & applied all the necessary filters in the settings press the Submit button and then click on Done.
Step 11. After you tap on Done, the search process will start running in the background. And, for checking the status of the search, you can navigate to the Search tab and check the same.
Step 12. After that, check whether the search process is complete or not, and when you see the search result on the Search tab, click ‘Actions’ and then tap on Export Results.
Step 13. You can also export the encrypted files. For that, there are various options available. So, go to the Output Options, click on the radio button according to your need, and then click Export to backup shared mailbox Office 365.
Note: If you want to avoid any confusion while carrying out the process then it’s recommended to don’t change the default settings. Moreover, if you want to export the search results as a single PST file then don’t on the Enable Deduplication option.
Step 14. The export process will start immediately once you click on the Export button. To check the progress of the ongoing process navigate to the Export tab and check from there.
Step 15. Once the Export process finishes, you can save the results by clicking on the Download Results option.
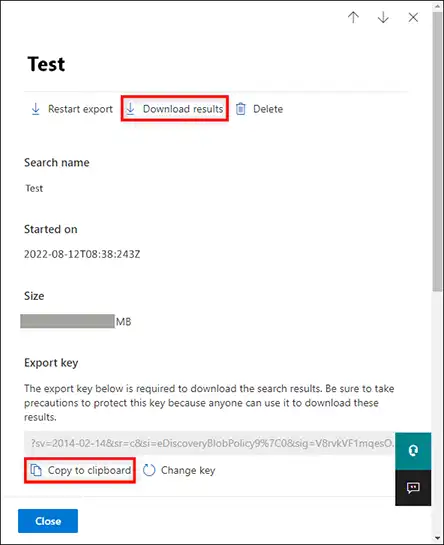
Note: Make sure to click on the Copy to Clipboard button under the Export Key section to save the export key cause you are going to need the same in the next section.
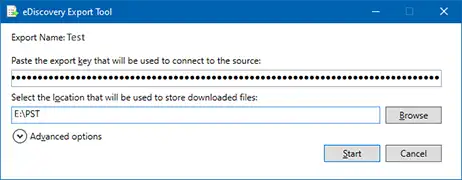
Step 16. After that, once you click on the ‘Download Results’ option, the eDiscovery Export Tool will start automatically. Then, a window will pop up, here, you need to enter the Export key that you copied to the clipboard. After that click on Browse to define the destination path for saving the export result. At last, press the Start button to begin the process of exporting Office 365 mailbox items.
However, many Office 365 users are having a hard time dealing with so many issues in the eDiscovery Export tool. Let’s discuss some of the most common issues in the coming section.
Also Read: Learn how to forward Email to another user in Office 365
Common Errors Faced by Users While Using the Manual Method
Sometimes users get an error saying ‘can not download the application. The application is missing the required files. Try contacting the application vendor for more help.’ Well, it can happen, if you are using Internet Explorer 9.0 or an earlier version.
Plus, when users try to extract data from Office 365 mailboxes on the local system, many times they get error messages. Such as, ‘Office 365 eDiscovery Tool not working’ or ‘Office 365 eDiscovery search failed’.
So, what could be the root cause(s) for the eDiscovery export tool not responding?
eDiscovery Export Tool Issues and How to Fix it?
Various reasons can stop the eDiscovery export tool from responding.
- Cause 1. If you are not using the latest version of Windows.
- Fix – Use Windows 10 or a later version of the Operating System.
- Cause 2. You are using Internet Explorer 9.0 or later and do not have the appropriate .NET version.
- Fix – Install the Microsoft .NET Framework 4.5 or later version.
- Cause 3. Did not set up Local intranet zone settings correctly.
- Fix – Make sure to add ‘https://*.outlook.com’ to the Local intranet zone in Internet Explorer. If it is not added then do the same by following the below steps.
- Open Internet Explorer >> Tool >> Internet Option >> Security >> Local Intranet >> Site >> Advanced >> add ‘https://*.outlook.com’ >> Close.
- Cause-4. You might be using a non-Microsoft(third-party) browser.
- Fix – If using browsers like Google Chrome or Mozilla Firefox, install the ‘ClickOnce’ extension on the add-on web page.
- Cause-5. Connections time out when using a proxy server
- Fix – Try using the ‘netsh’ command-line tool to open port 8080 on the proxy server.
Now, you have the fixes to deal with the issues. However, don’t you think some of these are quite exhausting and very complex to attain?
So, let’s have a look at the below questions. You too must be wondering the same question.
How to Backup Shared Mailbox in Office 365 – A Flexible Solution
Thankfully, yes! There is a quick solution to deal with issues while backing up shared mailbox in Office 365. Using the Office 365 Export Tool eliminates all the errors and complexities. It is the one-stop solution, that ensures maximum data protection and integrity, throughout the entire process. Most importantly, it is recommended by many IT experts and Office 365 admins.
Step By Step Quick Guide on – How to Backup Shared Mailbox in Office 365?
Refer to the below procedure to carry out the process-
Step 1. Download, install, and launch the software on your computer. Choose Office 365 as the source and Outlook as the destination platform.
Step 2. Now, moving to the next step, choose the desired mailbox items that you want to back up from the options such as emails, contacts, and calendars. Apply a date filter, if you want to backup specific data from the shared mailbox.

Step 3. In the source tab, use the Office 365 admin credentials to log into the software. Validate the required permissions by clicking on the validate button.

Step 4. Now browse the destination path and set the destination location. Choose the desired PST file size for the resultant file.

Step 5. Add user accounts to back up their mailboxes. You can use any of these methods for the same –

- Fetch Users: It fetches users from the source Office 365 account.
- Import Users: With this option, you can Import users through a CSV file.
- Download Template: This option gives you a sample CSV template to create your user list.
Step 6. Choose the user accounts to back up their respective data, and click the validate button. Once the account gets validated click on the start button.

Extra Benefits You Can Get by Using the Software
Features that make it a prime choice for users when backing up shared mailboxes in Office 365.
- You can back up a shared mailbox into multiple file formats.
- Not just one, you can export multiple mailboxes at once.
- It preserves all the mail attachments and attributes in their original state.
- You can pause and resume the process at any point in time.
- After validating the Office 365 account, it can automatically fetch all the existing mailboxes.
And, many more!
Bringing It All Together
In this write-up, we have discussed one of the most commonly asked queries – “How to Backup Shared Mailbox in Office 365?” You can choose any of the above approaches to perform this task. However, the manual method can be overwhelming and error-prone. Moreover, it should be implemented under technical supervision, or it could result in crucial data loss scenarios.
Whereas, the automated software discussed above is the best alternative to manual methods and is recommended by various IT experts, throughout the globe.
