Convert OST to PST File Format in Quick Steps
In this blog, we are going to discuss 4 effective methods to convert OST to PST with or without Outlook. Simply read the complete write-up and follow the instructions. You can access the exported PST in any version of Microsoft Outlook.
For a quick and secure export process, users should use a professional utility. Choose your OS and download the utility, and easily export all data from the OST to PST file.
OST file, aka Offline Storage Table, is a file created by IMAP Server (Exchange Server) automatically while configuring IMAP profile (Email ID) into Outlook. The OST file is a replica of the Microsoft Exchange server mailbox and allows users to access it even without an internet connection.
Sometimes, when the user creates an account with IMAP configuration, it also works as a web server-based application and synchronizes data in the (.ost) file.
However, there are various situations when these files become inaccessible. To manage the situation, the user needs to change the OST file into another file format, i.e., a PST file. So that data can easily be accessed in offline mode. In the section below, I am explaining 4 methods that can be followed by users to convert OST to PST file.
A Quick and Secure Way for Converting OST Data
The user can use this utility and easily export the entire data from the OST file to the PST format. The utility ensures that it maintains folder order, data integrity, and email formatting. Download the utility and use it.
Why Convert OST to PST File Format?
Multiple reasons can force users to export data from the OST file to PST. Some of them are listed below. The user can scroll below to know the steps.
- Power Failure, Malicious Software, and Virus Attacks can hamper Exchange server mail flow it resulting in email breakdown.
- Email Migration: Changing the email server or mail client for any reason.
- Free Space from Exchange Database: Exchange admin needs to manage storage space. The simplest way to take a backup of the OST file into PST format and delete data from the server.
- Employee Left the Organization: When an employee leaves the organization, the Exchange Admin must back up their mailbox and delete it from the server.
- Open Orphaned OST File: Microsoft does not provide any way to relink or open an orphaned OST file even with Outlook. In this case, first export the OST in PST format and then access it in Microsoft Outlook.
Methods to Convert OST to PST File Format
Now, let us list the different solutions to export data from the OST file to PST file format. All the mentioned steps are secure and widely used. Use can rely on them; let us list the methods.
- Using the Auto Archive Setting
- PowerShell Script for OST in PST Conversion
- Free Convert OST in PST with Outlook Manually
- Convert Orphaned OST to PST Free
- Expert Suggested Way to Convert OST Files to PST
Both solutions have advantages and disadvantages. In cases of orphaned OST, inaccessible OST, corrupted OST, Exchange Downtime, and so on, I recommend that users use third-party software. But if you can access your IMAP profile through Outlook. Then, using Outlook’s Import/Export feature, follow the steps in method 2.
Method-1: Convert OST to PST using the Auto Archive Option
Auto Archive is one of the features provided in Microsoft Outlook that is used to resolve the problem of occupying much space in one’s Mailbox by automatically archiving old items. This feature can also be used for other activities, such as archiving of the data to convert OST to PST files.
-
Open Outlook on your computer.
-
Go to the File tab → click Options.
-
In the Outlook Options window, select Advanced from the left panel.
-
Under the AutoArchive section, click on AutoArchive Settings.
-
Configure the following settings:
-
Tick Run AutoArchive every [x] days and set how often it should run.
-
Choose whether you want Outlook to prompt before AutoArchive runs.
-
Under Move old items to, click Browse and select a location to save the PST file.
-
-
If you want the same settings for all folders, click Apply these settings to all folders now.
-
You can also set AutoArchive individually for a folder:
-
Right-click on a folder → select Properties → go to the AutoArchive tab.
-
Choose whether to follow the default settings or customize them for that folder.
-
-
To run AutoArchive manually:
-
Go to File → Info → Tools → Clean Up Old Items.
-
Select the folders and date range you want to archive.
-
Click OK.
-
Once AutoArchive runs, Outlook will move the selected mailbox items into the chosen PST file, effectively converting OST data into PST format.
Method-2: Run PowerShell Script to Perform Conversion
If we look at it generally, Microsoft doesn’t provide an option that allows a user to directly convert an OST in PST. This is because the APIs for both Outlook and Exchange Server do not support export operations.
Using the New-MailboxExportRequest command, an Exchange Administrator can export emails from an OST file. To run this command, you need to use the Exchange Management Shell, which is a part of the Exchange Management Tool.
Let’s understand through an example how someone can use PowerShell commands to convert an OST in PST. Before starting, let’s go over the requirements.
Pre-requisites
- Exchange Management Shell: It must be installed and configured on the same system.
- Permissions: The user must have the necessary permissions to perform mailbox export operations.
- Shared Folder: The destination folder where the PST file will be saved must be a shared folder that the Exchange server can access.
Steps to Use the Script for OST in PST Conversion
- Open Exchange Management Shell: This is a specialized version of PowerShell for Exchange.
- Run the Script: Copy and paste the script into the shell, then execute it. Change the $mailbox and $exportPath variables as per your system configuration.
Load Exchange Management Shell if not already loaded. Skip this if already loaded.
if ($null -eq (Get-Command Get-Mailbox -ErrorAction SilentlyContinue)) {
Add-PSSnapin Microsoft.Exchange.Management.PowerShell.E2010
}Specify the mailbox and the destination path for the PST file
$mailbox = “user@domain.com”
$exportPath = “\\\\Server\\Exports\\user.pst”Create the export request
New-MailboxExportRequest -Mailbox $mailbox -FilePath $exportPath
Optionally, monitor the export request
Get-MailboxExportRequest -Mailbox $mailbox | Get-MailboxExportRequestStatistics
Check Status of Export Request
Excecated the following command and check the export request status
# Command to List all export requests
Get-MailboxExportRequest
# Get details of a specific export request
Get-MailboxExportRequest -Mailbox user@domain.com | Get-MailboxExportRequestStatistics
Method-3: Free Convert OST in PST Using Outlook
Microsoft Outlook users can easily export data from an OST file. Follow the listed steps to use Microsoft Outlook’s built-in Import/Export option.
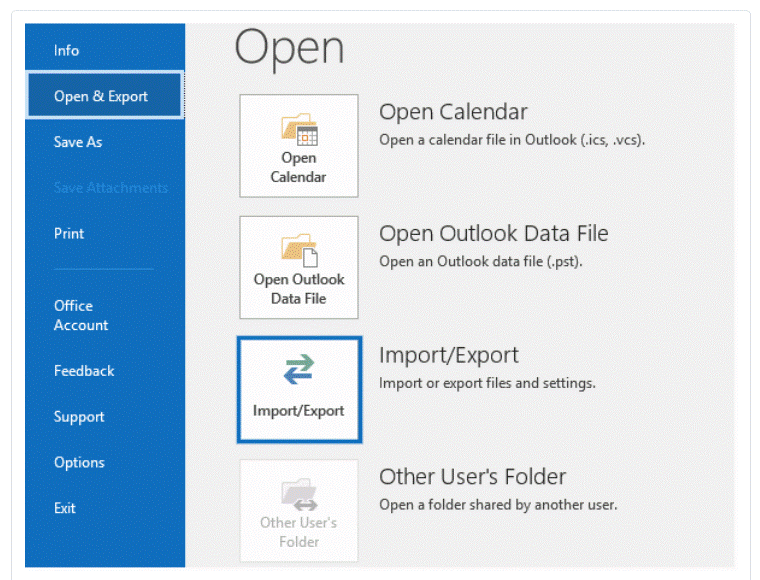
- Step-1: First, you need to open MS Outlook, then click on “File” and select the option “Import/Export”.
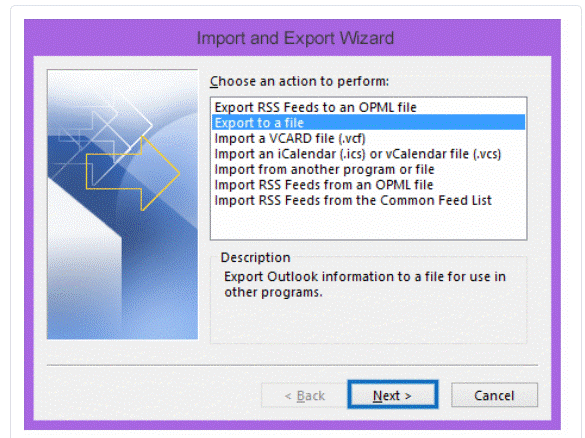
- Step-2: A new dialogue box opens asking to “Choose an action to perform”. Select “Export to a File” and proceed.
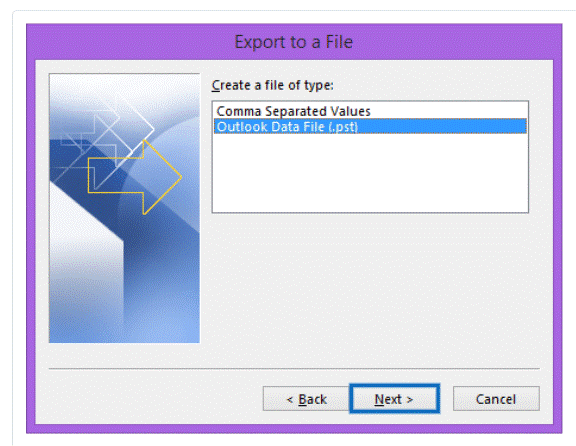
- Step-3: The next screen will ask you to choose the file type to import. Choose “Outlook data file (.pst)” then hit the button to “Next”.
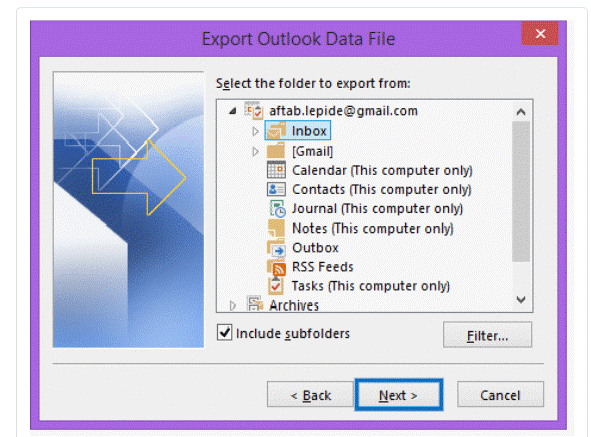
- Step-4: Now, choose the folder to export data from, and click on “Next”.
- Step-5: Choose an option from the list “Allow duplicates to be created” and click “Finish”.
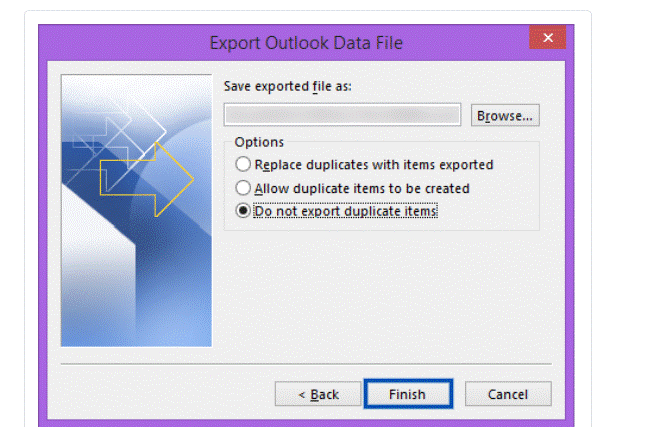
- Step-6: After it, a new pop-up appears to ask for an optional password. You can easily move ahead without entering it.
Now, manually converted the Microsoft Outlook OST into a PST file format. You can check your OST files, which have been saved in PST file format, at the selected location.
Method-4: Convert OST to PST Free Using Outlook IMAP Account
Most of the free solution fails to export orphaned OST files into PST format. But here, in this method, I will explain a severely verified and tested method.
Key Points: This method is a little bit tricky and requires some technical understanding. So, as per my understanding, if you are not a techie and then do not follow this.
- Requirements: Microsoft Outlook with an IMAP-configured profile
- Time Required: 10 to 16 minutes.
Note: If your IMAP profile is configured in Outlook and you can access the same profile. Then follow the steps mentioned in method 1.
Let us start the steps to convert orphaned OST to PST for Free!
- Launch Outlook and locate the storage path using any of the methods listed below.
- Follow the given path (C:\Users\Admin\AppData\Local\Microsoft\Outlook). Remember that the path may be slightly different in different versions of Outlook and Windows OS.
- You can also open the storage path from the Outlook dashboard, simply right-click on your profile and click on open file location.
- Disable the Automatic Send/Receive option of the IMAP profile. This profile we will use further to convert the OST to PST format.
- Close all instances of Outlook
Now return to the Outlook storage location you selected in step 1. Simply copy the connected Outlook profile OST file (support abc.ost) and paste it at the same location (abc-copy.ost). Now you have two OST files of the same profile. Delete your main OST file (abc.ost), and make sure you have a backup copy of the same mailbox.
- Copy the orphaned OST file (suppose xyz.ost) which you want to convert and paste it to the same location where abc.ost file is saved.
- Now, rename your orphaned OST file as your working OST file (For Example: xyz.ost to abc.ost)
- Launch Outlook and select the same profile that we used in the above scenario (abc.ost).
- Use the Import/Export feature built into Outlook and explained in Method 1. It will provide you with a healthy and accessible PST file that is created from an orphaned OST file.
- You can perform the same steps for multiple OST files. After the completion conversion of OST to PST format. Close all instances of Outlook and delete all OST files except abc-copy.ost, and rename it to abc.ost Enable the automatic Send/Receive option, and use your existing profile seamlessly.
That’s all to convert OST to PST for free, even the orphaned OST file.
Limitations of the Manual Method to Export Data from the OST file to the PST File:
We have discussed the above manual method to convert OST to PST without Outlook, having some drawbacks, as mentioned below:
- Need to configure the Outlook Account in the system.
- The system must be connected to the MS Exchange Server.
- The slow process is compared to manual methods.
- Risk of data loss or corruption.
- Need a technical expert to follow the procedure.
Method-4: Convert OST to PST without Outlook
To overcome the limitations, we recommend using an automated tool to convert OST to PST without Outlook.
Offline OST in PST converter is one of the best third-party software which makes this task easy and facilitates a user. It completes the process of conversion in just a few simple steps and is free from risks or errors chances.
This software exports mailboxes from OST in PST file format. It also allows us to recover, backup, and extract all items of offline OST files.
Also helps to convert IMAP .ost to .pst, without any file size limitations. It provides a preview of data like emails, contacts, calendars, or other mailbox items before conversion.
This tool also has the additional ability to save OST files into different file formats like PST, HTML, MSG, EML, MBOX, EMLX, NSF, PDF, vCard, CSV, ICS, TXT, MHT, DOCX, DOC, and RTF. It also provides a demo version for free, with limitations to export only the first 25 items per folder. Then, if the user is satisfied, they can go for a licensed version available at an affordable price.
When to Use Professional Software:
The Outlook Import/Export feature has some limitations. You can use the OST in PST converter software to get around them.
- Want to convert an OST file without Outlook
- Same Profile and IMAP Configuration Not Required
- Convert Large Size OST File without Any Limitation
- Want to Convert an Orphaned OST File to PST Format
- Export Corrupted, Inaccessible, Offline OST in PST file
Steps to Convert OST to PST without Outlook
Follow these simple steps to convert emails from OST to PST file format without Outlook, with the help of this tool:
Note: – The software is capable of exporting orphaned, corrupted, inaccessible OST files to PST format even without an Exchange profile and server connectivity.
- Step-1: Download the OST in PST converter and install the software in your system offline, and start the conversion process.
- Step-2: Simply Add Files and preview OST file items into 8 different view modes. After that, hit the Export button.
- Step-3: To export, click on the radio button to PST and proceed.
- Step-4: Browse the destination location to save the exported PST in your system. After that, hit the Export button to start the conversion of the OST to PST format.
- Step-5: Ensure the accuracy of the exported data by locating the directory where the PST file has been stored after completing the conversion process.
Now, the procedure has been completed, converting the OST to PST in just a few steps. You can check your converted PST data at the destination location. Simply launch Outlook and use the Import/Export option to access this file in Outlook. Get the complete guide for the OST to Outlook import process.
Users’ Reviews After Performing the Above Steps
Many users tried this converter software and shared their thoughts. I’ve included a few reviews on this page.
By Marc Vidal
Hi all, I came across this page while looking for a solution to convert OST to PST format. I purchased this OST in PST converter and installed it on my Windows 11 system. It worked well in my case.
By Ameliya Lanne
I copied the OST file from my old laptop using a pen drive and tried to access the same in my new laptop’s Outlook. But it was not that easy, because later on I found know that Outlook allows importing PST only. So, I searched on Internet for a solution to convert OST to PST format. This post helped me to understand the conversion process. I recommend everyone to buy the full version to convert complete data from the OST file to PST file format.
By Steph Joria
I followed the steps explained in method 1 to convert the OST to PST for free. I successfully exported complete data manually.
By Mattias
This post assisted me in converting OST to PST without Outlook. I had 37 OST files stored on an external hard disc. The OST to PST converter software described above made it very easy for me to complete the task.
FAQs Related to the Conversion Process of Converting OST to PST
Q: Is It Possible to Access an Orphaned OST File?
Answer: Yes, but first you have to convert orphaned OST files to PST format.
Q: How Do I Convert OST Files to PST for Free?
Answer: Microsoft Outlook has an inbuilt utility, i.e., Import/Export, you can try this and export the complete data.
Q: How long does it take to convert an OST file?
Answer: There is no fixed timing for converting OST to PST format. It depends on the size of the OST file and the system configuration.
Q: Is It Safe to Use Third Party Software for Conversion?
Answer: Yes, a third-party tool allows you to export complete data on your own system. But remember to use only trusted tools.
Q: What Should I Do If My Exchange Profile Is Deleted?
Answer: In this case, find the respective OST file and convert it into PST format using method 3, and then access the output file in Outlook.
Q: Which is the Faster and Reliable Way to Change the OST File Extension?
Answer: All the solutions explained above are safe to follow and guarantee users no data loss.
Conclusion
Manual methods are free, but have some limitations. You can freely convert OST to PST format manually if your system has MS Outlook configured with an Exchange Server. Also, these methods usually take a longer time.
Using above above-listed software is more facilitated than the free methods to convert OST files to PST file format. However, you are free to choose the solution that best matches your needs.


