How to Fix “Outlook Send/Receive Error 0x800ccc92”


Being an Outlook user, most of us have received various types of errors now and then. Error code 0x800ccc92 is one such instance that has encountered Outlook error while they are trying to transmit all emails. In simple words, this error occurred while sending or receiving emails through an Outlook application and such error usually showing like this ‘Receiving reported error (0x800ccc92): Your email server rejected your login.’ Well, consider the following scenarios to understand the aim of writing this blog:
Since the past one year, I have been using Outlook application but all of sudden it starts showing an error message which appeared on the screen i.e. “Sending and Receiving reported error 0x800CCC92: Your Email server rejected your login. Verify username and password in account properties”. Please suggest any possible solution to fix Outlook error 0x800ccc92?
Important Note: In case if you are facing a problem in accessing the OST file data items such as your important emails, contacts, calendars. So, in that case, the user can take the help of an automated solution to access OST files and extract all OST file mailbox items.

Possible Reasons for Error 0x800CCC92 in Outlook
Go through the following reasons due to which users have received the above error code:
a. Incorrect entry of username and password details
b. Corrupted or damaged Outlook Data Files(.ost & .pst)
c. Assigned the wrong Outlook configuration settings
d. Due to the Oversized PST as well as OST data file
e. Failure of POP3 & SMTP protocols regularly from the server
f. Synchronization issue between Outlook mail client & server
g. Due to some of virus or malware infection in Outlook emails
h. Improper shutdown of MS Outlook application
Manual Tricks to Fix Outlook Error 0x800ccc92
To resolve the Outlook error 0x800ccc92, users have to follow the below steps as mentioned below:
1. First, Check the User Name and Password
Sometimes many users have entered the incorrect username and password at that duration, also they might face an issue during sending or receiving emails in Microsoft Outlook. Therefore, to overcome this problem make sure that users have filled all the required parameters under Username and Password section in a proper manner.
2. Then, Investigate the Web Server Settings
Keeping in mind that the mail server settings are correct like POP, SMTP, IMAP and so on. After getting it, users can easily re-add their own account. In case, if users cannot be sure about the server settings then, view the below table and correct it accordingly:
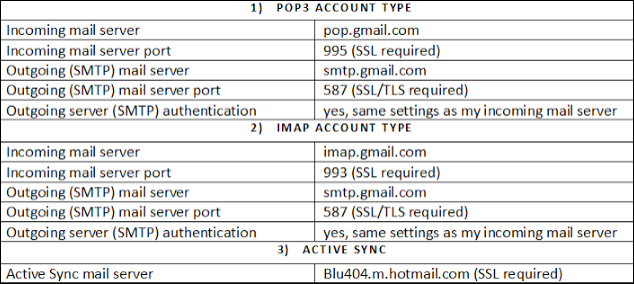
Remember: The above settings only for Gmail and Hotmail account. In case if users have connected their own domain.com profile into Outlook then, for that situation they must have to use their domain.com account settings (To know about the correct settings, users can contact with their domain provider)
3. Reduce Outlook OST/PST File Size Limit
In case, if Outlook data file (OST & PST) exceeds maximum length, then it might result that host a new problem for an individuals. Resultantly, users may receive the error code as 0x800CCC92. When users try to enhance the .pst file, it would not only counter this error still, it is reappearing, but also needs to improve the overall functioning of this application. To optimize the Outlook error, let us do the following:
i) Set Auto-Archive Option in Outlook 2013
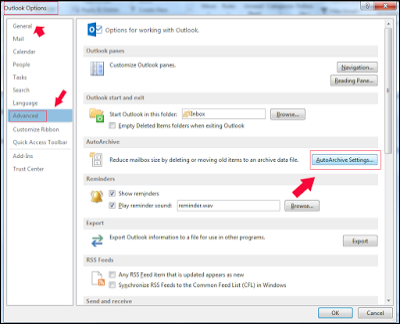
a. First of all, Open Microsoft Outlook, click on the File and choose the Options
b. Now, Click on the Advanced under the Outlook Options box
c. From AutoArchive, select the AutoArchive Settings
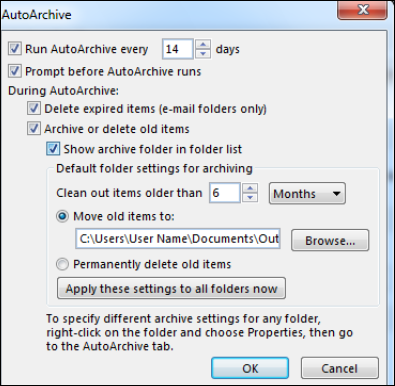
d. Setting up the Run AutoArchive every option equal to 14 days
e. Leave out all the box marked as shown in below screenshot and Press OK button
ii) Executing Auto Archive Manually
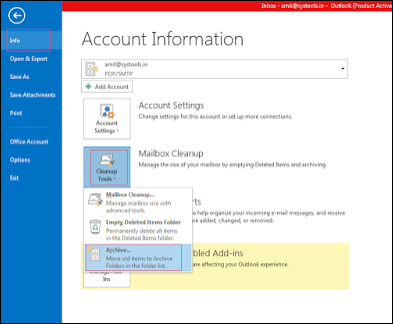
a. Now, Launch the MS Outlook, select the File icon and click on the Cleanup option
b. After this, Click on Archive option, then choose manually what users want to archive
iii) Fetching the Outlook Archived Folder
a. Sometimes, the Archived items folder may not visible until users existing email messages are archived successfully. Follow these below steps to search and view an archived data:
b. Download & Install Outlook program and click on File tab then, choose the Open & Export option
c. Selecting the Open Outlook Data File
d. Under Open Outlook Data File, choose the required file that user want to open and click OK button
Disclaimer: The name of the data file that users have opened will get in the Navigation panel, below an ordinary set of files or folders.
Let us follow such steps to analyze the name of archive data file that users want to open
Choose the File tab, select the Cleanup Tools button and press on Archive button
Take a look at the Archive File and make sure that users cannot modify any of the information; Otherwise, MS Outlook can send their archived items somewhere else.
The data information in Archive File is usually complex or unfamiliar by colons, slashes and other word that some people unable to easily memorize.
Go through the following steps to close the archive data file:
Under the Folder panel, clicking right on the name of Archive data file and choose the Close Archive option.
iv) Clean Up the Deleted Items Folder
Before clearing the Deleted Items folder, if users accidentally deleted the particular message that they do not wish to remove, then, select the Deleted Items folder, and they would find the list of those item(s) in a folder.
To restore the deleted items from Deleted folder, users have to simply dragging those OST/PST data from Deleted Items folder and dropping them to the preferred folder.
To clean up the items from Deleted folder, click-right on the Deleted Items folder and choose the Empty Folder icon.
There are some steps to set up Microsoft Outlook 2013 for removing the Deleted Items folder:
a. Go to the File option, select the Options and then, click on the Advanced tab.
b. From Outlook Start and Exit, check the box to choose the Empty Deleted Items Folder upon Exiting option
c. Click on OK button to remove the Deleted Items folder automatically
Before cleaning the Deleted Items folders automatically first, you need to notify, click on the Advanced Tab and displays the Prompt box for confirmation before permanently deleting items.

Repair Corrupt Outlook Data File
If the above-stated approach fails to fix your errors then there exist corruption issues in your Outlook data file and you need to repair corrupt Outlook data file, then instead of spending too much time, it is better to choose any Outlook data repair tool to repair and extract OST data to PST format. It helps to repair corrupt data without affecting the original data. By using this software the user can easily extract the OST file mailbox items such as emails, contacts, calendar. This application is compatible with Microsoft Outlook 2019, 2016, 2013, 2010 and it’s below versions.
Deleted items can be recovered from PST file, by using EmailDoctor Outlook Email Recovery Tool. The software is easy to use and gives accurate results with no data loss.
Bottom Line
Outlook is widely used mail client among individuals. However, while sending or receiving emails in Outlook, users may face certain issues and creates a big hurdle in the continuity of workflow. We have explained the relevant solution to help users how to fix “Outlook error 0x800ccc92” using manual approach. Moreover, to avoid such annoying situations on regular basis, the users can repair Outlook data file if any error detected in Outlook PST file which helps to fix the different Outlook error code.

